


Contents
The warrior pose is one of the most popular in yoga. It develops inner strength and endurance, accumulates vital energy. At first glance, it may seem quite simple to implement. But it will take effort and even courage from you to achieve ease and comfort in this asana. We understand the intricacies of the correct execution of the pose of a warrior, its benefits and contraindications.
Many of us lack self-confidence, determination to achieve a goal. Everyone who practices yoga knows that the posture of a warrior can endow a person with these qualities. Its name speaks for itself: get together, feel your strength, you have it. Challenge yourself and achieve what you have planned, no matter what!
Want to check how it works? Here’s one test for you. Say something short on the video, like what are your plans for the day. Then put your phone down, spread out your mat, and do Warrior Pose (see below for step-by-step instructions). Made? Good! We take the phone again and record the same text on video. All! And now let’s compare how your voice and feelings have changed, how much calmer and more confident you have become in achieving today’s goals? I think you felt the effect! That’s how it works.
Photo: social networks
The myth of Virabhadra
The Sanskrit name of the asana is Virabhadrasana, which means “the posture of the good warrior.” And his name, according to legend, Virabhadra. This powerful, multi-armed and wielding various weapons master is the image of Shiva himself. In a fit of rage, he pulled out a lock of his hair and threw it on the ground, thus Virabhadra appeared.
What preceded this? There are several versions of this myth, but it all boils down to one. The first wife of Lord Shiva – Sati – came to the feast of sacrifice to her father Daksha. One, he did not invite Shiva. Sati could not endure this humiliation and threw herself into the sacrificial fire. When Shiva found out about the death of his wife, he became furious. From his fallen hair, Virabhadra rose up and marched against Daksha with his army. He punished an irreverent father by beheading him.
Here is a legend. Now, performing the pose of a warrior, we can feel all its power, feel the will to achieve the goal.
The warrior pose consists of three parts:
- Virabhadrasana I
- Virabhadrasana II
- Virabhadrasana III
Each of them can be performed separately from each other. But it will be better if during your practice you connect all three parts of the hero’s pose. But first, let’s look at the benefits and harms of these exercises.
Virabhadrasana I
The benefits of exercise
- strengthens leg muscles, tones knees and ankles
- opens the hip joints and prepares them for more complex asanas, for example, for the Lotus position – Padmasana (see the description in our section)
- works with osteochondrosis and sciatica in the lumbosacral region
- improves the mobility of the joints of the shoulders and back
- opens the chest and deepens breathing, thereby improving blood circulation
- increases concentration and balance
- promotes weight loss in the pelvis and hips
Exercise harm
Attention to those who are concerned about high blood pressure and there are violations of the heart! Before starting this exercise, you should always consult with your doctor.
Virabhadrasana II
The benefits of exercise
- strengthens the muscles of the legs, back, shoulder girdle
- especially beneficial in diseases such as arthritis and osteochondrosis of the spine
- reduces fat deposits in the waist and abdomen, as it tones the abdominal organs
- strengthens the muscular system of the whole body
- relieves cramps in the hips and calves
- increases endurance and coordination
- deep breathing promotes lung expansion, ventilation and elimination of toxins
- helps to feel inner strength
Photo: social networks
Exercise harm
It is contraindicated to perform at the time of exacerbation of arthritis and osteochondrosis.
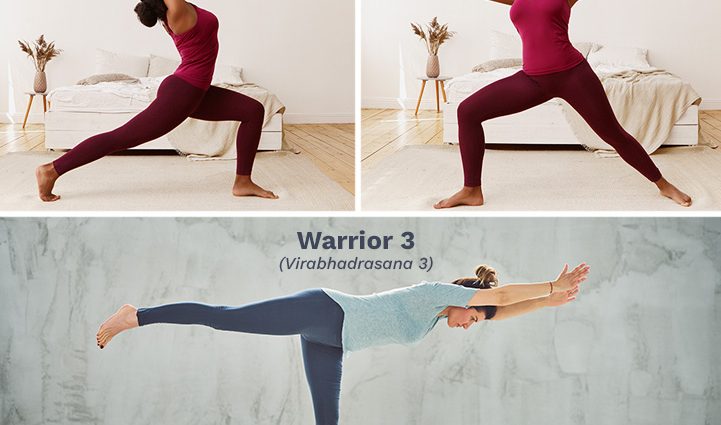
Virabhadrasana III
The benefits of exercise
- strengthens the muscles of the lower back and the entire back, the muscles of the arms
- makes the muscles of the legs strong and gives them a beautiful shape
- tones the abdominal organs
- strengthens the hamstrings, so the pose is recommended for those who have had hamstring injuries and even torn ligaments
- restores mobility of the knees and their ability to bear loads
- teaches you to balance mind and body
Photo: social networks
Exercise harm
During any knee injury, this exercise is contraindicated. You should also not perform this pose for those who have high blood pressure and problems in the work of the heart.
IMPORTANT. If you do the warrior pose (all three parts) constantly, your shoulder girdle and back muscles will relax, tightness will go away, leg muscles will tighten, your posture and gait will improve. You will also appreciate the improvement in digestion.
How to Do the Warrior Pose
ATTENTION! The description of the exercise is given for a healthy person. It is better to start the lesson with an instructor who will help you master the correct and safe performance of these three postures. If you do it yourself, carefully watch our video tutorial! Wrong practice can be useless and even dangerous to the body.
Virabhadrasana I Step by Step Technique
Step 1
We get up in Tadasana – the pose of the mountain: we connect the feet together, pull the kneecaps up, point the coccyx down, take the shoulders back in a circular motion up and down (for a detailed description of the asana and a video lesson, see our section of yoga poses).
Step 2
We spread our legs, leaving a little more than a meter between them.
Step 3
Fully turn the body and right foot to the right. We also turn the left foot to the right, but by about 60 degrees.
ATTENTION! We turn the pelvis forward. Our chest is open and our shoulders are straight.
Step 4
We bend the right leg, push the knee forward, as if pushing the thigh out of the joint. Left leg is straight.
ATTENTION! The thigh should be parallel to the floor, and the lower leg should be perpendicular. The angle in the bent leg is at least 90 degrees.
Watch the position of the feet: we press the one that goes forward to the floor, the second one rests on the toe.
Step 5
Straighten your lower back as much as possible. We stretch the crown of the head up. We squeeze the coccyx.
ATTENTION! Keeping the coccyx in good shape will be very helpful, as you will improve the blood supply to the hip joints and gently prepare them for lotus postures.
Step 6
We push the floor with our feet, stretch our arms up and forward (sometimes it is suggested to join the palms).
ATTENTION! We do not wring the neck, it continues the bend of the spine. We don’t bend our elbows.
Step 7
We stretch upward, lengthening the arms and back. The gaze is directed after the hands – up.
Step 8
Exit the pose: inhale, exhale and lower your hands. We repeat the exercise on the other side.
Execution time: 30-60 seconds. Gradually, it can be increased until you feel comfortable in this position.
Yoga Beginner Tips:
- Your thigh muscles are not that strong yet, so you can lean on your arms in the beginning. Do not lift them up, but leave them on the floor, near the foot.
- And yet it is better to immediately try to perform the asana according to all the rules, so you will quickly achieve the effect.
- You can enhance the benefits of the exercise by increasing the deflection in the lower back and thoracic back. This will open up your chest more.
Virabhadrasana II Step by Step Technique
Step 1
We get up in Tadasana, with an exhalation we spread our legs at a distance of about 120 centimeters. We turn the body and the right foot completely to the right, the left – also to the right, but by 60 degrees.
ATTENTION! The feet are firmly pressed to the floor, the toes are extended.
Step 2
We continue to push the floor with our feet, bend the right knee.
ATTENTION! Track the position of the legs: the right thigh is parallel to the floor, the left leg is straightened and tense.
Step 3
We pull the coccyx down, the pubic bone up.
ATTENTION! This position allows you to straighten the lower back and strengthen the hip joints.
Step 4
We spread our arms to the sides and hold them at shoulder level. Palms pointing down.
ATTENTION! The whole body must be in the same plane! Your arms are tensed as if you are being pulled in different directions.
Step 5
Pull the crown up, then turn the head to the right. The gaze is directed forward.
Step 6
We maintain the pose for 30 seconds. The top of the head is constantly stretching up.
ATTENTION! You are doing everything right if your pelvis is open and your chest is turned to the side.
Step 7
Exit the pose: take a deep breath, exhale completely and lower your hands. Repeat the exercise on the other side and hold the pose for 30 seconds. Over time, we increase the duration of stay in the asana.
Yoga Beginner Tips:
- Do not lower the pelvis too low, this will make the work of the hip easier, and we do not need this.
- We don’t take the pelvis to the side, it looks forward.
- The whole body is in the same plane.
Photo: social networks
Virabhadrasana III Step by Step Technique
Step 1
We perform Virabhadrasana I. Remember that the foot of the supporting leg is directed forward, firmly pressed to the floor, and the fingers are extended.
Step 2
As you exhale, lower your chest to the right thigh, which goes forward, and straighten your arms in front of you. We linger a little in this position.
ATTENTION! We stretch our arms parallel to the floor, palms “look” at each other. The head tends to top forward.
Step 3
Raise and stretch back the left leg, straighten the knee of the supporting right leg. We turn the pelvis to the floor. You should get a straight line from the heel of your left foot to the tips of your fingers.
ATTENTION! Both legs are extended. The front surface of the elongated right is parallel to the floor. The toe of the left foot is pointing down, the heel is pointing up.
Step 4
We hold the pose for as long as possible, trying to calm down internally. The gaze is directed to the floor. Check: the arms are straightened at the elbows.
Step 5
Carefully exit the asana and perform the exercise on the other side.
Run time: according to my own feelings. As long as you can hold out in this position and you will be comfortable.
Yoga Beginner Tips:
- It will be easier to maintain balance in the pose if you focus on the three reference points of the foot: two in the front, the third in the heel. Press them into the floor.
- Imagination will also help to hold the pose: imagine that you are being pulled by your arms forward and by your leg back.
- But if the pose doesn’t work out, don’t do it anyhow.
- Then master the asana in parts, but be sure to keep your arms and legs straight and stretched.
- Pay special attention to the neck, do not wring it.
- If you feel a quick pain in your lower back, it means that it is not yet ready for such loads. To begin with, master the pose, resting your hands on the floor or on your knee. As soon as you realize that you are ready to go further, try to stretch your arms forward, while leaving the supporting leg slightly bent at the knee.
- And yet our advice to you: do not get carried away with simplifications. As practice shows, then it is more difficult and lazier to perform the pose as it should. Try to immediately do the right thing, even a little bit – rest and get back to work. And soon master it and get the maximum effect.
Have a great practice!