


Contents
The task of transferring data from a spreadsheet in a PDF file to a Microsoft Excel sheet is always “fun”. Especially if you don’t have expensive recognition software like FineReader or something like that. Direct copying usually does not lead to anything good, because. after pasting the copied data onto the sheet, they will most likely “stick together” into one column. So they will then have to be painstakingly separated using a tool Text by columns from the tab Data (Data — Text to Columns).
And of course, copying is possible only for those PDF files where there is a text layer, i.e. with a document that has just been scanned from paper to PDF, this will not work in principle.
But it’s not so sad, really 🙂
If you have Office 2013 or 2016, then in a couple of minutes, without additional programs, it is quite possible to transfer data from PDF to Microsoft Excel. And Word and Power Query will help us in this.
For example, let’s take this PDF report with a bunch of text, formulas and tables from the website of the Economic Commission for Europe:

… and try to pull out of it in Excel, say the first table:

Let’s go!
Step 1. Open PDF in Word
For some reason, few people know, but since 2013 Microsoft Word has learned to open and recognize PDF files (even scanned ones, that is, without a text layer!). This is done in a completely standard way: open Word, click File – Open (File — Open) and specify the PDF format in the drop-down list in the lower right corner of the window.
Then select the PDF file we need and click Open (Open). Word tells us that it is going to run OCR on this document to text:

We agree and in a few seconds we will see our PDF open for editing already in Word:

Of course, the design, styles, fonts, headers and footers, etc. will partially fly off the document, but this is not important for us – we only need data from tables. In principle, at this stage, it is already tempting to simply copy the table from the recognized document into Word and simply paste it into Excel. Sometimes it works, but more often it leads to all sorts of data distortions – for example, numbers can turn into dates or remain text, as in our case, because. PDF uses non- separators:

So let’s not cut corners, but make everything a little more complicated, but right.
Step 2: Save the Document as a Web Page
To then load the received data into Excel (via Power Query), our document in Word needs to be saved in the web page format – this format is, in this case, a kind of common denominator between Word and Excel.
To do this, go to the menu File – Save As (File — Save As) or press the key F12 on the keyboard and in the window that opens, select the file type Web page in one file (Webpage — Single file):

After saving, you should get a file with the mhtml extension (if you see file extensions in Explorer).
Stage 3. Uploading the file to Excel via Power Query
You can open the created MHTML file in Excel directly, but then we will get, firstly, all the contents of the PDF at once, together with text and a bunch of unnecessary tables, and, secondly, we will again lose data due to incorrect separators. Therefore, we will do the import into Excel through the Power Query add-in. This is a completely free add-on with which you can upload data to Excel from almost any source (files, folders, databases, ERP systems) and then transform the received data in every possible way, giving it the desired shape.
If you have Excel 2010-2013, then you can download Power Query from the official Microsoft website – after installation you will see a tab Power Query. If you have Excel 2016 or newer, then you do not need to download anything – all the functionality is already built into Excel by default and is located on the tab Data (Date) in group Download and Convert (Get & Transform).
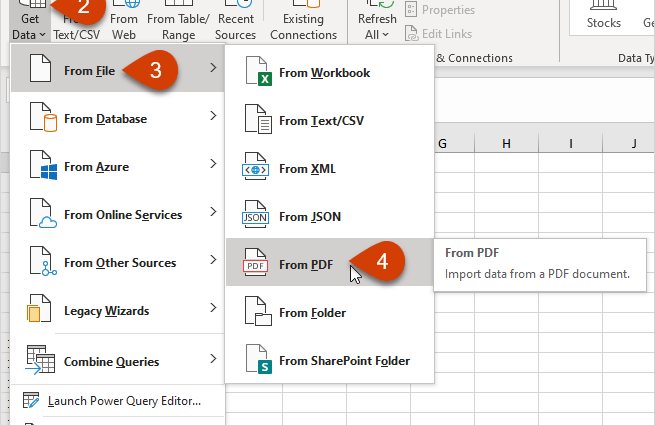
So we go either to the tab Data, or on the tab Power Query and choose a team To get data or Create Query – From File – From XML. To make visible not only XML files, change the filters in the drop-down list in the lower right corner of the window to All files (All files) and specify our MHTML file:

Please note that the import will not complete successfully, because. Power Query expects XML from us, but we actually have an HTML format. Therefore, in the next window that appears, you will need to right-click on the file incomprehensible to Power Query and specify its format:

After that, the file will be correctly recognized and we will see a list of all the tables that it contains:

You can view the contents of the tables by clicking the left mouse button in the white background (not in the word Table!) of the cells in the Data column.
When the desired table is defined, click on the green word Table – and you “fall through” into its contents:

It remains to do a few simple steps to “comb” its contents, namely:
- delete unnecessary columns (right-click on the column header – Remove)
- replace dots with commas (select columns, right-click – Replacing values)
- remove equal signs in the header (select columns, right-click – Replacing values)
- remove the top line (Home – Delete lines – Delete top lines)
- remove blank lines (Home – Delete lines – Delete empty lines)
- raise the first row to the table header (Home – Use first line as headings)
- filter out unnecessary data using a filter
When the table is brought to its normal form, it can be unloaded onto the sheet with the command close and download (Close & Load) on The main tab. And we will get such beauty with which we can already work:

- Transforming a Column to a Table with Power Query
- Splitting sticky text into columns