


It is best to dry the shirt on a hanger and iron it while damp. If the fabric is dry, use a spray bottle to wet it. And to make the moisturizing evenly, place the shirt for a while in a plastic bag.
To avoid burning or ruining your shirt, select a suitable ironing setting for your fabric.
Cotton shirt with polyester blend ironed at a temperature of 110 degrees. Use of a small amount of steam is acceptable.
Compressed-effect fabric shirt should be ironed without steam, keeping to a temperature of 110 degrees.
Viscose shirt easily smoothed at a temperature of 120 degrees. It is not recommended to wet it, water stains may remain, but the use of steam is permissible.
Pure cotton shirt already requires a stronger iron pressure, a temperature of 150 degrees and wet steam.
Cotton fabric with linen – temperature 180-200 degrees, a lot of steam, strong pressure.
Linen fabric – 210-230 degrees, a lot of steam, strong pressure.
On dark fabrics, when ironing on the front side, lacquers (shiny stripes) may remain, therefore it is better to iron from the wrong side, if ironing is necessary on the front side, use steam, lightly touching the product with the iron. Ironing procedure:
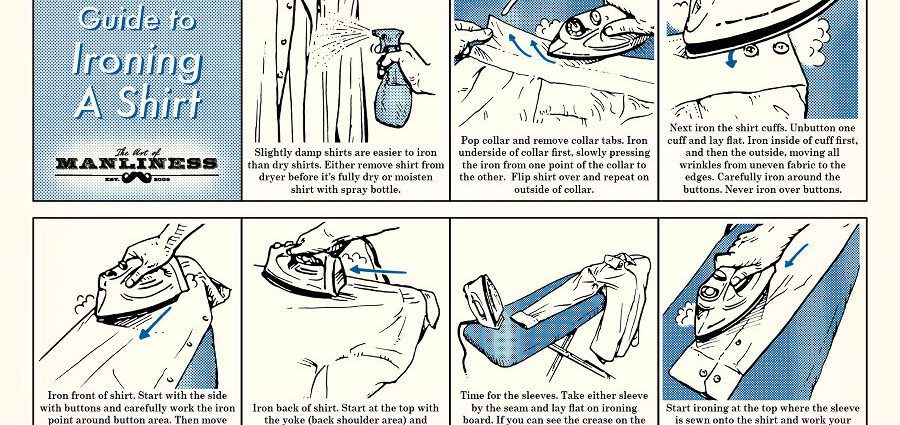
1. Collar
Iron the seamy side, starting from the corners to the middle. Turn it over to the front side and iron it by analogy. Do not bend the collar upright or iron the fold – the result will be terrible, and it will not be corrected by a single tie.
2. Sleeves
Start ironing the long sleeve from the cuff. Like the collar, we first iron it from the inside out, then from the front side. The double cuffs are ironed differently. We unfold the cuffs and iron them without folds on both sides. Then we fold, giving the desired width, and smooth along the fold, the button loops should lie flat one on top of the other.
Fold the sleeve in half, so that the seam is in the middle, smooth the seam, turn it over and iron it on the other side. Then we fold the sleeve along the seam and iron it from seam to edge, making sure that no folds are imprinted on the material. If you are using a sleeve ironing board, pull the sleeve over it and iron in a circle. Repeat with the second sleeve.
3. The main part of the shirt
Start at the right front (the one with the buttons). We lay out the shirt with the upper part on the narrow part of the board – with an angle, iron the part of the yoke and the top. Move and iron the rest of the shelf, not forgetting about the buttons. The left shelf is ironed by analogy. Iron the back from the right side seam to the left, gradually turning the shirt. Order: side seam, up along the seam of the sleeve, unfolded – yoke, moved – middle, unrolled – left side of the yoke, to the seam of the left sleeve, down to the side seam.