


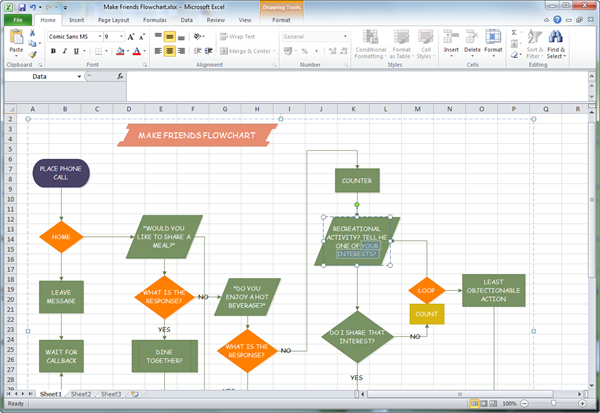
Have you ever created a flowchart for a document or business process? Some companies buy expensive specialized software that can create flowcharts with a few mouse clicks. Other companies choose a different path: they use a tool that they already have and in which their employees know how to work. I think you guessed that we are talking about Microsoft Excel.
Make a plan
The purpose of a flowchart is to show the logical structure of the events that must happen, the decisions that must be made, and the consequences of those decisions. Therefore, it will undoubtedly be easier to build a flowchart if you first take a few minutes to put your thoughts in order. A flowchart made up of messy, poorly thought out steps will be of little use.
So take a few minutes to take notes. It doesn’t matter in what format, the main thing is to write down each step of the process and fix each decision with possible consequences.
Customize items
For each outline step, add flowchart elements to Excel.
- On the Advanced tab Insert (Insert) click Figures (Shapes).
- The opened list of figures is divided into main groups. Scroll down to the group Block diagram (Flowchart).
- Select an element.
- To add text to an element, right-click on it and select Change text (Edit text).
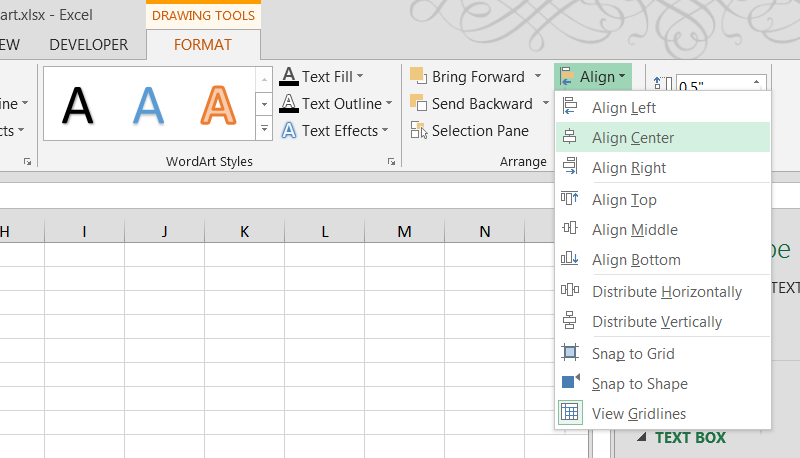
- On the Advanced tab Framework (Format) Menu Ribbon Select the style and color scheme for the item.
When finished with one element, add the next element for the next item of the intended structure, then the next, and so on until the entire structure appears on the screen.
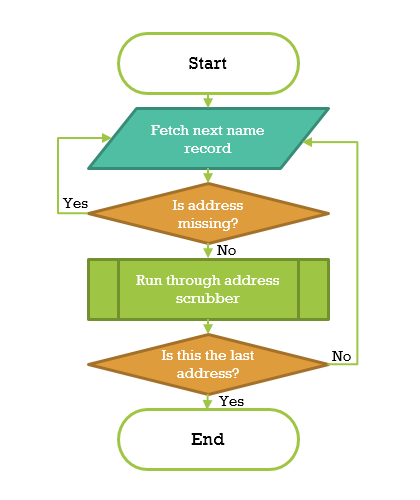
Pay attention to the shape of each flowchart element. The form tells the reader which function is executed at each step of the structure. It is recommended that all forms be used in accordance with their generally accepted purpose, since non-standard use of forms can confuse readers.
Here are some of the most common items:
- Start or end of the flowchart:

- Workflow, procedure to be followed:
- A predefined process, such as a reusable subroutine:
- Database table or other data source:
- Making a decision, such as evaluating whether the preceding process was performed correctly. The connection lines emanating from each corner of the rhombus correspond to different possible solutions:


Organize the elements
After all elements are inserted on the sheet:
- To arrange elements in an even column, select several elements by clicking on them with the mouse key pressed Shift, then on the tab Framework (Format) click Align Center (Align Center).
- To fine-tune the spacing between multiple elements, select them and on the tab Framework (Format) click Distribute vertically (Distribute Vertically).
- Make sure the element sizes are the same. Make all elements the same height and width to make your flowchart look nice and professional. The width and height of the element can be set by entering the desired values in the appropriate fields on the tab Framework (Format) Menu ribbons.

Set up link lines
On the Advanced tab Insert (Insert) click Figures (Shapes) and select a straight arrow or ledge with an arrow.
- Use a straight arrow to connect two elements that are in direct sequence.
- Use an arrow ledge when the connector needs to be curved, for example, if you want to return to the previous step after a decision element.
Further actions
Excel offers many additional elements for creating flowcharts and an endless variety of customizable formatting options. Feel free to experiment and try all available options!