


Contents
Working with time and date is an important aspect of using Microsoft Excel. Today you will learn how you can enter a date in different ways, how to determine today’s date using a timestamp, or use dynamically changing values. You will also understand what actions you can use to fill a column or row with the days of the week.
There are several options to add dates to Excel. Depending on what goals you are pursuing, the actions are different. And the tasks can be anything: specify today’s date or add a date to the sheet, which will be automatically updated and always show what is currently on the clock and calendar. Or you want to have the spreadsheet automatically populated with business days, or you want to enter a random date. No matter what goals you are pursuing, today you will learn how to achieve them.
How to enter a date in Excel
The user can enter the date into the spreadsheet using a variety of methods and formats. For example, you can write it as January 1, 2020, or you can write it as January 1.01.2020, XNUMX. Regardless of the format in which to specify the date, the program will automatically determine that the user wants to record it. Very often, the program itself formats the value based on the format set in Windows, but in some cases formatting is possible in the form specified by the user.
In any case, if the user’s date format does not satisfy, he can change it in the cell settings. How to understand that the value that the user specified, Excel defined as a date? This is indicated by the alignment of the value to the right, and not to the left.
If Excel was unable to determine the entered data and assign the correct format, and you see that they are not located on the right edge of the cell, then you can try to enter the date in any other format that is close to the standard one. To see which ones are currently available, you can go to the “Cell Format” menu, which can be found in the “Number” section, which is located on the “Home” tab.
If there is a need for this, the user can easily change the view of the representation of the cell that is recorded as the one that contains the date. To do this, you can use the same Format Cells window that was described above.
It can also be called using the key combination Ctrl + 1.
Sometimes the user is faced with a situation where a cell is displayed in the form of a large number of grids that are contained in it. As a rule, this indicates that the program asks the user to increase the cell sizes. Fixing this problem is very simple. It is enough to double-click on the right border of the column in which this error is displayed. After that, the width of the cells in this column will be determined automatically, based on the largest length of the text string contained in it.
Alternatively, you can set the correct width by dragging the right border until the cell’s width is correct.
Inserting the current date and time
There are two options for inserting the current time and date in Excel: static and dynamic. The first serves as a timestamp. The second option allows you to always keep the current date and time in the cell.
What can be done to ensure that the timestamp is always up-to-date? To do this, use the same formulas as below. They will always show the current date and time.
If you need to set a static time, then you can use special Excel tools that are called using hot keys:
- Ctrl + ; or Ctrl + Shift + 4 – these hot keys automatically insert into the cell the date that is relevant at the moment when the person clicks on these buttons.
- Ctrl + Shift + ; or Ctrl+Shift+6 – with their help you can record the current time.
- If you need to insert both the time and date that are relevant at the moment, you must first press the first key combination, then press the space bar and call the second combination.
What specific keys to use? It all depends on the layout that is currently activated. If the English layout is now on, then the first combination is used, but if the layout is the second one (that is, the one that follows immediately after the word “or”).
It should be noted that the use of these hotkeys is not always ideal. In some cases, only one of the combinations described above works, regardless of which language is selected. Therefore, the best way to understand which one to use is to test.
As a rule, the pattern is as follows: it all depends on which language was installed at the time the file was opened. If English, then even if you change the layout to , the situation will not change at all. If the language was installed, then even if you change it to English, then you need to use the formula that is suitable for the language.
How to set a permanent timestamp automatically (with formulas)
In order for the cell to always display the time, there are special formulas. But the specific formula depends on what tasks the user is pursuing. So, if the usual display of time in the table is enough, then you need to use the function TDATA(), which does not contain any arguments. After we insert it into the cell, we change its format to “Time” in the manner described above.
If later, based on this data, you are going to do something else and use the resulting result in formulas, then it is better to use two functions at once: =DATE()-TODAY()
As a result, the number of days will be zero. Therefore, only time will remain as the result returned by this formula. But here you also need to use a time format so that everything works like a clock. When using formulas, you need to pay attention to the following nuances:
- The data is not updated all the time. In order for the date and time to change to the current one, you must close the window, having previously saved it, and then open it again. Also, the update occurs if you enable a macro that is configured for this function.
- This function uses the system clock as its data source. Therefore, if they are configured incorrectly, the formula will also not work well. Therefore, it is recommended to set the automatic detection of the date and time from the Internet.
Now let’s imagine such a situation. We have a table with a list of goods located in column A. Immediately after they are sent, the customer must enter the value “Yes” in a special cell. Task: automatically fix the time when a person wrote the word “Yes” and at the same time protect it from being changed.
What actions can be taken to achieve this goal? For example, you can try using the function IF, which will also contain the same function, but with data depending on the value of another cell. It is much easier to demonstrate this with an example. The formula will look like this: =IF(B2=”Yes”, IF(C2=””;DATE(); C2); “”)
Let’s decipher this formula.
- B is the column in which we need to record the delivery confirmation.
- C2 is the cell where the time stamp will be displayed after we write the word “Yes” in cell B2.
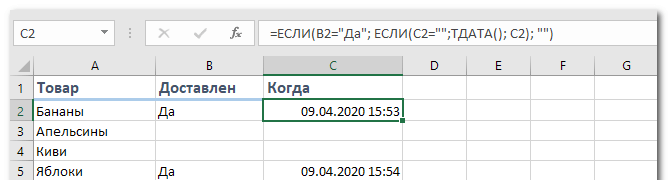
The above formula works as follows. It checks to see if the word “Yes” is in cell B2. If so, then a second check is performed that checks if cell C2 is empty. If so, then the current date and time is returned. If none of the above functions IF contain other parameters, then nothing changes.
If you want the criterion to be “if at least some value is contained”, then you need to use the “not equal” <> operator in the condition. In this case, the formula will look like this: =IF(B2<>“”; IF(C2=””;DATE(); C2); “”)
This formula works like this: first, it checks if there is at least some content in the cell. If yes, then the second check is started. Further, the sequence of actions remains the same.
For the full performance of this formula, you must enable interactive calculations in the “File” tab and in the “Options – Formulas” section. In this case, it is undesirable to make sure that the cell is referenced to it. The performance will be worse from this, but the functionality will not improve.
How to automatically fill in dates in Excel
If you need to fill most of the table with dates, then you can use a special feature called autocomplete. Let’s look at some special cases of its use.
Suppose we need to fill in a list of dates, each of which is one day older than the previous one. In this case, you must use autocomplete as you would with any other value. First you need to specify the initial date in the cell, and then use the autocomplete marker to move the formula either down or to the right, depending on the sequence in which the information in the table is located specifically in your case. The autofill marker is a small square that is located in the lower right corner of the cell, by dragging it, you can automatically fill in a huge amount of information. The program automatically determines how to fill in correctly, and in most cases it turns out to be right. In this screenshot, we have filled in the days in a column. We got the following result. 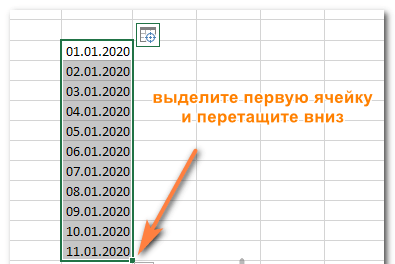
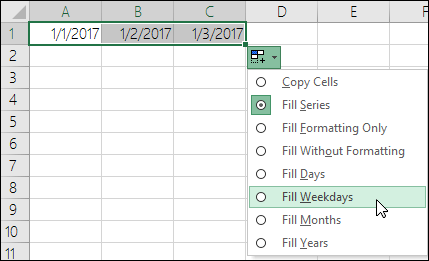
But the possibilities of autocomplete do not end there. You can perform it even in relation to weekdays, months or years. There are two whole ways how to do it.
- Use the standard autocomplete token as described above. After the program automatically finishes everything, you need to click on the icon with autocomplete options and select the appropriate method.
- Drag the autofill marker with the right mouse button, and when you release it, a menu with settings will automatically appear. Choose the way you want and enjoy.
It is also possible to perform automatic insertion every N days. To do this, you need to add a value to the cell, right-click on the autocomplete handle, hold it down and drag it to the place where you want the number sequence to end. After that, select the “Progression” fill option and select the step value.
The footer is an area of the document, which is, as it were, universal for the entire book. Various data can be entered there: the name of the person who compiled the document, the day it was done. Including put the current date. Follow the instructions below:
- Open the “Insert” menu, from which you call the header and footer settings menu.
- Add the header elements you need. It can be either plain text or date, time.
Important note: the date will be static. That is, there is no automated way to constantly update the information in the headers and footers. You just need to write from the keyboard the data that is relevant at that moment.
Since headers and footers are intended to display service information that is not directly related to the content of the document, it makes no sense to insert formulas and so on there. If you need to use formulas, you can always write the desired values in the first line (and add an empty line in this place if some data is already stored there) and fix it through the “View” or “Window” tab, depending on the version of the office suite you are using (the first option is for those editions that were released after 2007, and the second one is for those that were before that time).
Thus, we figured out different ways to automatically insert the date and time in Excel. We see that there is nothing complicated in this, and even a child can figure it out.