


The popper is a surface bait and is included in the arsenal of many recreational and sport anglers. During posting, such lures make characteristic sounds that actively attract perch, pike, and sometimes catfish.
Fishing stores have many models from different manufacturers with very interesting coloring. Of course, it is very difficult to find an alternative to branded models, but still, you can make catchy poppers on your own. Considering how many varieties of lures there really are, and that it is not cheaper, then fishing turns into an expensive pleasure, because you want to have a complete set of existing lures for all fishing occasions.
Based on this, in the arsenal of many anglers, along with branded items, you can see a lot of homemade products. Well, now it’s time to share our experience in making such a bait as a popper.
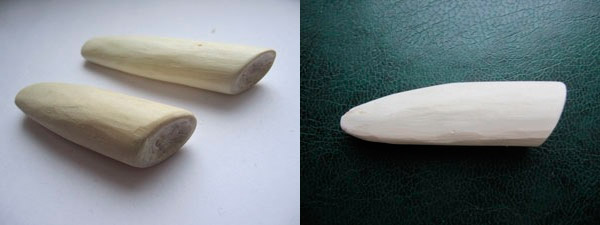
The basis of the bait is a dried willow stick of a suitable size. To bring the stick to the desired shape, you can use an ordinary, but rather complex knife. With the help of a knife, the sides are somewhat narrowed so that they become flatter. The tail section is formed in the same way. The front part of the workpiece is sawn off at an angle, using a conventional hacksaw. Then you can begin to form a recess in the front of the workpiece. To do this, you can use a well-honed round chisel. In conclusion, from the bottom of the workpiece, along the body of the future popper, a cut is made for loading. The blank for the bait is ready, as you can see by looking at the corresponding photo.
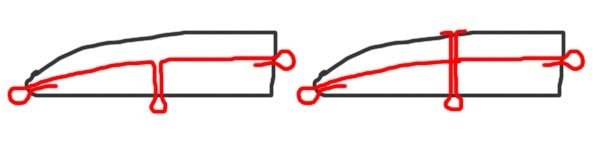
After that, you can proceed to the preparation of the frame, which is made of steel wire, with a diameter of 0,5-0,8 mm. Depending on the size of the popper, a frame is made with either two or three rings. This frame is inserted into the cut, along with the lead load, and fixed in it with glue. After installing the frame, voids may remain in the cut. They can be repaired with matches mounted on glue or filled with epoxy, and then gently sanded. In order for the workpiece not to be afraid of water, it is well impregnated with drying oil, after which it must be allowed to dry completely. And in conclusion, it is desirable to paint the popper with nitro varnish or other paints, preferably with the addition of varnish. For greater reliability, the top of the popper is covered with two more layers of colorless varnish.
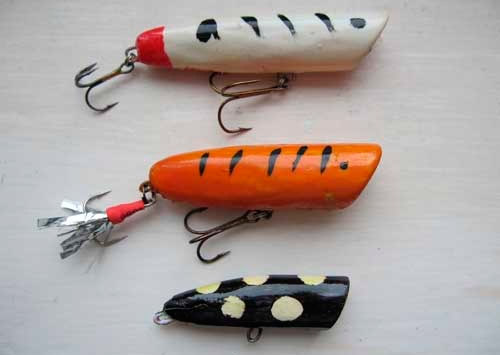
As for the coloring of the bait, it is more necessary for the angler than for the fish. Since the popper moves on the surface of the water, the fish only sees its silhouette and how it moves and makes sounds at the same time. As for the fisherman, he needs to control the operation of the bait, and from a great distance. Therefore, it is better to paint the popper in bright colors so that it can be seen far away.
After the popper is painted, you can start installing the tees. To the rear tee, for greater attractiveness, you can tie a small fly or a bunch of rain. The size of the tees is determined experimentally. It is possible that the middle tee will be larger than the rear. It all depends on the game of the bait: this way it “squishes” better and attracts the predator more.
It is possible to look at the diagram of the wire frame and how it is located in the cut.
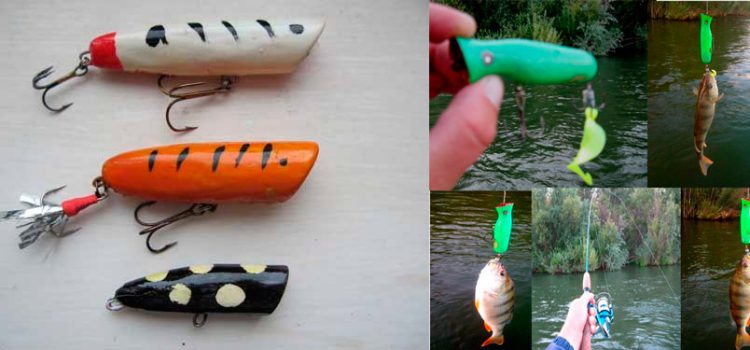
Such poppers successfully catch good perch and pike. Despite this, the design does not allow you to place a rattle inside. As a rule, branded models have such an addition in their design, which makes them out of competition.
In conclusion, we can say that there is room for imagination. And if you are smart, it is quite possible that in the near future, a similar home-made popper with a rattle inside will appear on the Internet.
Homemade popper How to make a DIY popper Part 1