


Hairstyle tutorial: Elsa’s braid from Frozen
The animated film Frozen is a global hit. All little girls (and little boys too) have eyes only for beautiful Princess Elsa. And many of them dream of having the same hairstyle: that sublime voluminous braid. Notice to mothers, we will explain how to achieve this famous hairstyle, which is none other than an African braid on the side, thanks to the advice of blogger Alicia (). This young mother made the braid on her little girl and the result is stunning. We let you discover the tutorial.
In video: Frozen: how to make Elsa’s braid?
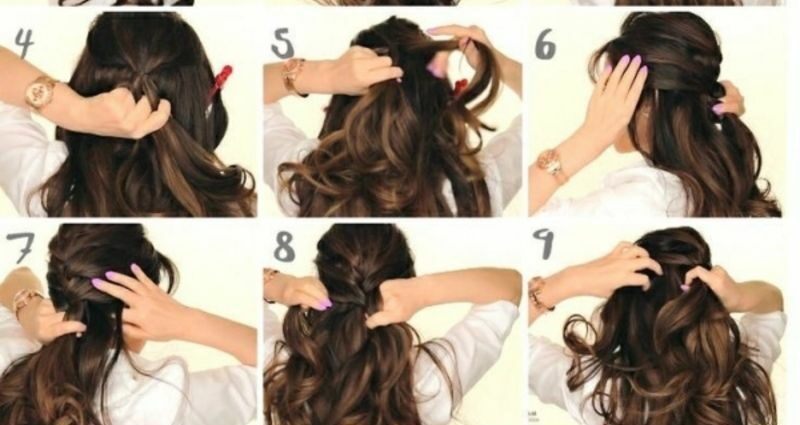
Step 1 : Detangle the hair and make a parting on the side. Put all the hair on one side. Take a small wick on the top of the head. Divide it into three equal parts and start the braid.
Step 2 : Start by doing a classic braid. To do this, all you have to do is pass the right wick over the middle one, then the left wick above the middle one. As you braid, add strands of hair to incorporate them into the braid so that it sticks to the skull and follows the path of the hair. Tighten the braid more or less as you wish.
Step 3 : Pass the last strands of the braid under the left ear. Finish by making a classic braid that you will drop over the shoulder. Here it is finished. You can do this same braid in a more classic way in the back. In this case, take a section of hair from the top of the head where you want the braid to begin.
Little tip : to give more relief to the braid, you can perform it upside down. In this case, take the three strands, except that instead of passing the right and left strands above the middle one, you pass them below. Last point, this hairstyle can be done on all types of hair, including the finest, but it is best if it is long (at least at the shoulder).