


Contents
All yogis do Surya Namaskar. This set of exercises only at first may seem difficult, incomprehensible … But it is worth doing it several times, and you will understand everything, remember the sequence of asanas and appreciate them. We tell you why asana is so useful for beginners.
What does Sun salutation mean in Surya Namaskar
The explanation is very simple: the word “Surya” is translated as “sun”, and “Namaskar” – “greeting, bow.” With this set of exercises, you meet a new day, greet the sun and recharge with its strength (energy), heat (health) and light (happiness).
As you already understood, Surya Namaskar is best done at dawn or a little earlier in order to see the sunrise. And be sure to face the East, from where the sun rises. But, alas, our pace of life is such that it is not always possible to practice in the morning, so there is nothing to worry about if you do the asana in the evening. Remember that all yoga practices can be done at any time of the day. In the morning they will work more on the health of your body, and in the evening on its relaxation and calm.
Surya Namaskar in yoga for beginners
When I started doing yoga and tried to do Surya Namaskar for the first time, I felt like a real Tin Woodman. My back didn’t bend (what a cobra!), my legs didn’t straighten out, and something crunched in my knees … And the reason was not that I was doing something wrong. The body, which was not accustomed to physical exercise, immediately made itself felt. The next morning, it hurt so much that it seemed that everything: I would not bend over anymore. But it only seemed. I continued the asana and did it for 40 consecutive days.
After a week, I did not feel any physical pain – on the contrary, every day the body became more flexible and more resilient. And by the end of the practice, I easily managed to do several circles in a row. And she brought me so much strength and vigor!
Indeed, thanks to this set of exercises, many muscle groups begin to work. And the ones you never even noticed before. The main condition: all asanas in Surya Namaskar should be done very slowly and smoothly, especially at first. And do not allow any sudden movements! When you become more skilled, you can perform this complex at a fast pace, but that’s another story.
Features
So, Surya Namaskar is a set of exercises that you will repeat over and over again. It consists of 12 asanas. It will be good if you first master each of them, and only then collect them into a single practice. It’s perfect!
12 asanas is half a circle. The cycle will be completed when you make a semicircle on both sides: first with the right foot, then with the left. As a result, 24 asanas are obtained, and they form a full circle. It is believed that it is enough for beginners to do three circles, gradually bringing up to six. More advanced ones can already perform up to 12-24 circles at a time. Experienced yogis are able to do 108 rounds of Surya Namaskar. But this is a special practice.
If you are a beginner, don’t aim for quantity! The body must be prepared. And everything you need in the first stage, you will get from three circles.
All movements in Sun Salutation are built around tilting the spine back and forth. These variable bends stretch and remove the spinal column as much as possible, bring great and multifaceted benefits to the entire body.
The benefits of exercise
Surya Namaskar is rightly called a precious practice. It not only works with the muscles and flexibility of the spine. Sun Salutation has been proven to revitalize all internal organs, joints and tendons. It also works on a “spiritual level”: it relieves stress and anxiety.
So, why is Surya Namaskar good for beginners and not only:
- It improves heart function
- Activates blood circulation
- Stretches the spine
- Promotes flexibility
- Massages internal organs
- Helps digestion
- Trains the lungs and fills the blood with oxygen
- Restores immunity
- Regulates the menstrual cycle in women
- Relieves headaches and muscle tension
- Helps in the treatment of depression and neurosis
- Increases our well-being
Exercise harm
If you master this complex with the help of a good instructor, you will not get any harm. He will help you rebuild all the asanas in this complex, teach you how to breathe correctly. And only then can you calmly practice Surya Namaskar on your own.
But if you have any diseases, surgeries, then, of course, you should first consult your doctor. Can you do yoga? If possible, what positions should be avoided? All this information you should definitely voice to your yoga teacher.
Yes, Surya Namaskar works great with the spine, restores its flexibility, etc., but there are a number of diseases that are not compatible with part of this complex. For example, disc prolapse, disc wear, sciatica: Surya Namaskr postures will only exacerbate these problems. In these cases, all forward bending should be excluded. But bending forward will be just healing. And there are many such examples. I hope we have convinced you to seek advice from a doctor and study with a good instructor at first. The practice should be reasonable, chosen for you, only in this case it will improve the condition of the spine and back as a whole.
Photo: social networks
When is the best time to do Surya Namaskar?
As you already understood, in the morning after waking up. For someone, only Surya Namaskar will be enough as a practice, someone will choose this set of exercises for warming up. But in both cases Surya is very good!
In a short time it creates a large amount of heat in the body. This is how many yogis warm up before performing the main complexes.
A set of exercises Surya Namaskar
Sun Salutation has several options. We present two main ones.
And we will analyze each step, for beginners it will be clear and useful. Do not confuse the number of steps with asanas.
And one more thing: we connect every movement with breathing. Follow the instructions carefully.
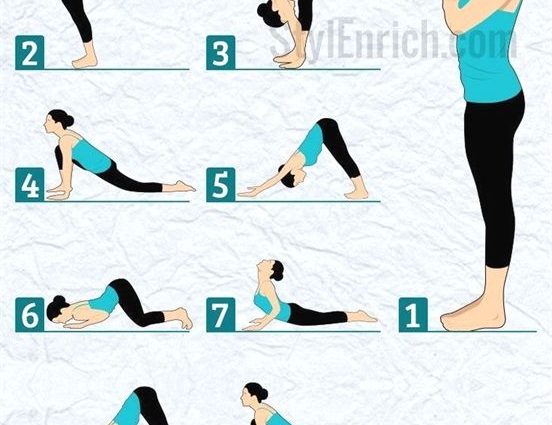
Detailed technique for performing Surya Namaskar
Step 1
We stand on the front edge of the mat, collect the feet together. We remove the natural deflection from the lower back, the stomach tends inward. The bottom ribs remain in place. And we direct the chest forward and up. We take our shoulders back and down, for the fingers we reach for the floor, and for the top of the head up. We connect the palms in front of the chest so that the thumbs touch the center of the chest.
Step 2
With an inhalation, we stretch upwards behind the palms, we remove the shoulders down from the ears, while maintaining extension in the spine.
Step 3
With an exhalation, we bend down.
IMPORTANT! If the slope is not deep, then we bend our knees. We press the stomach and chest to the ribs. Fingers and toes are on the same line. We stretch our palms to the floor. We check that the neck hangs freely down.
Step 4
Inhale as we step back with the right foot. The pelvis goes down, the chest goes up.
Step 5
With an exhalation, lower the right knee and foot to the floor.
Step 6
With an inhalation, we stretch our palms up. We direct the pelvis down so that it is felt how the front surface of the right thigh is stretched.
Step 7
As you exhale, lower your palms to the floor.
Step 8
Inhale – step back.
Step 9
With an exhalation, we lower ourselves to the bar: “Chaturanga”.
IMPORTANT! If there is not enough strength, we put our knees on the floor in this position. Check the position of the elbows, in “Chaturanga” you should keep the forearms vertical, giving the body a little forward and hugging the ribs with the elbows. Try not to pinch your neck – take your shoulders back.
Step 10
With a breath, we take the pose “Dog face up.” Weight is supported on the insteps of the feet, knees and hips are above the floor. We take the shoulders back and down, with the muscles of the back, as if hugging the spine. With palms we pull the mat towards ourselves, we push the chest forward.
Step 11
With an exhalation, we roll over the toes – the pose: “Dog with the muzzle down.” The palms are firmly pressed to the floor, we turn our shoulders from the inside out, open the space between the shoulder blades, point the tailbone up, stretch our back. The feet are hip-width apart. The outer edge of the feet is parallel to each other. And we press our heels into the floor.
Step 12
Inhale as we step forward with the right foot. The pelvis tends down, the chest up, the hind leg is straight, the heel stretches back.
Step 13
With an exhalation, lower the left knee and foot to the floor.
Step 14
With an inhalation, we pull our hands up. In this position, the front surface of the left thigh is extended.
Step 15
With an exhalation, lower the palms down, put the straight leg on the toe. With an inhalation, we step with the left foot to the right. We connect the feet together.
Step 16
And while inhaling, we stretch our back, our gaze is directed in front of us, we try to bring the shoulder blades together.
IMPORTANT! If it is impossible to do this in this way, try a lightweight version: we rest our hands on our hips and pushing them off our legs, we stretch our back.
Step 17
With an exhalation, we bend down to the legs.
Step 18
With an inhalation we rise behind the palms up. Stretch Pose.
Step 19
And with an exhalation we connect the palms in front of the chest.
Step 20
We lower our hands, relax.
Variant of “Surya Namaskar”
TECHNIQUE OF PERFORMANCE
Position 1
Standing pose. Stand straight with feet together, toes and heels touching, weight evenly distributed on both feet. We find a balance. Hands lie on the sides of the body, fingers together.
Attention! You can join your palms at the center of the chest and from this position move on to the next.
Position 2
Stretching up
With an inhale, raise your arms above your head, palms touching. We stretch the spine, raising the chest and relaxing the shoulders. We make sure that there is no excessive tension in the cervical and lumbar spine. Look up at the thumbs.
Position 3
Lean forward
With an exhalation, we lean forward with the whole body. When tilting, we keep the spine straight, stretching it, as if stretching forward with the crown of the head. Having reached a position in which it will be impossible to maintain a straight back, we relax our head and lower it as close to our knees as possible. Ideally, the chin touches the knees. The legs are straight at the knees, the palms lie on the floor on both sides of the feet, the tips of the fingers and toes are on the same line. Look at the tip of the nose.
Position 4
With an inhalation, we raise our head, straighten the spine, keeping our palms and fingertips on the floor. The gaze is directed to the point between the eyebrows (third eye).
Position 5
push up
With an exhalation, we bend our knees and step back or jump back, taking the “lying emphasis” position – the legs are straight, we balance on the balls of our toes. The elbows are bent, pressed to the ribs, the palms are on the floor under the shoulders, the fingers are wide apart. The body forms a straight line from the forehead to the ankles. We maintain balance by balancing ourselves on the palms and feet. Don’t push your body forward with your toes.
Position 6
Cobra Pose
In the “lying emphasis” position, with an inhalation, we straighten our elbows and bend our back. We bend in the upper back so that the lower part of the spine does not experience pressure. The forehead stretches upward, the gaze is directed to the tip of the nose. The fingers are wide apart.
Position 7
Triangle Pose
With an exhalation, raise the pelvis so that the legs and torso form an inverted V. Establish balance. We press the feet and palms to the floor, straighten the elbows and knees. The fingers are wide apart. Look at the navel and hold this position for five breaths.
Position 8
On exhalation, jump or step back to position 4.
Position 9
Lean forward
With an exhalation, we lean forward with the whole body. We accept position 3.
Position 10
Stretch up
We inhale and rise, taking position 2.
Position 11
Standing pose
With an exhalation, we return to the starting position, hands on the sides of the body.Let’s recap the important points:
1. Synchronize breathing with movements to create a continuous rhythm during the entire Surya Namaskar complex.
2. When this sequence is done correctly, the navel and legs (not the arms and back) do a lot of work.
3. It doesn’t really matter if your legs are straight or your knees are bent, it’s different! You want your spine to move from your navel, not your head or back.
4. If you are in class, try not to watch other people do it on mats. We are not in competition.
5. And remember, we do everything smoothly. Do not overstretch your spine or neck. The process will be much more efficient if you move slowly and consistently.
IMPORTANT! After completing the complex, you must definitely do Shavasana. This is the “corpse” or “dead” pose (we have already talked about it in detail – see the “Asanas” section), it will allow you to relax as much as possible and consolidate the result from “Surya Namaskar”.