


Contents
The feeder today is the bottom tackle (donka), which has been redesigned in a modern manner. Their main difference lies in the rod. It has a sensitive top, which signals that there is a bite. Also, special feeders are used for the feeder. They attract fish. Translation from English “feed” – to feed.
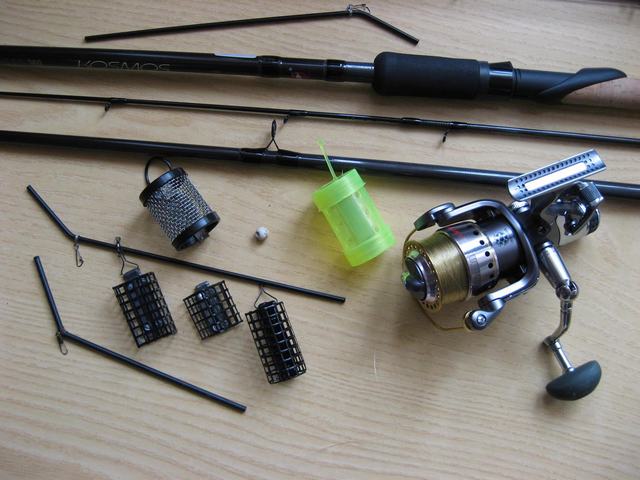
Feeder and rods for him
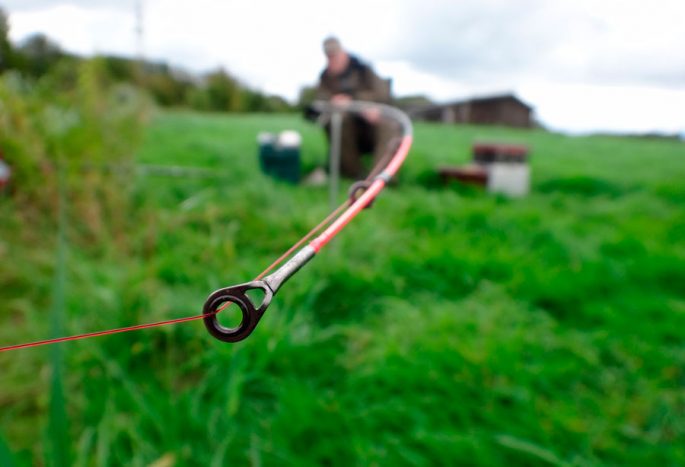
What is the main difference between a feeder rod and a spinning rod? The answer lies in the presence of small o-rings on low holders in large numbers. There are also several thin tips that are interchangeable. Their purpose is to catch on feeders that have different weights. Their second function is to signal a bite. In order to optimize the balance between the bite signal and the weight of the feeder, the tips are equipped with different rigidity.
The main difference from the donkey, which is made of spinning rod, is the feeder rod.
How feeder rods are divided into classes.
There are three classes in total:
- Light (eng. light);
- Medium (eng. medium);
- Heavy (eng. heavy).
You can also select separate classes:
- The feeder is ultralight, which the people are used to calling a picker.
- Super heavy. Its main function is fishing with heavy equipment. Used for long distances and strong currents. (This will be discussed in another article).
Most fishermen give their preference to medium or medium class. This is due to the fact that it is a universal option. This rod can be adapted to different conditions. Fishing can be carried out almost everywhere and always. This option is an excellent school for beginners in fishing who are taking their first steps in feeder fishing.
Test
The test is directly proportional to the class. Simply put, these values indicate the power of the blank and the weight of the equipment, which is the maximum allowable. The medium class (medium) has a weight range within 40-80 grams. The light class (light), respectively, makes it possible to use equipment, the weight of which is 40 grams. Heavy (heavy) – more than 80 grams.
Advice! You should not exceed the upper limit of the test, despite the fact that many manufacturers specifically overestimate the maximum allowable weight as insurance. It is better to ship 10 grams less.
Length
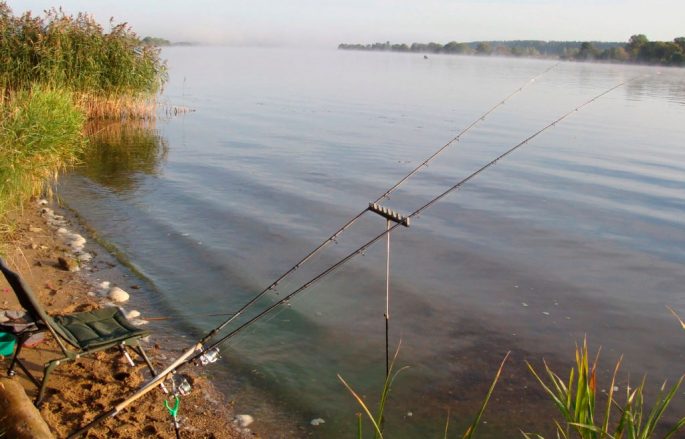
As a rule, a feeder rod has three or four parts. The length, in turn, is based on 2 to 4.5 meters. The top is made of bright color so that it is as noticeable as possible when biting.
You need to choose a rod depending on the distance at which you are going to fish. For reservoirs and large bays, casts over a long distance of 100 meters are used. If there are none in your area, then there is no need to purchase rods with a large length of 4.5 meters. As a rule, feeder rods 3-3.5 meters long are used for our rivers.
Story
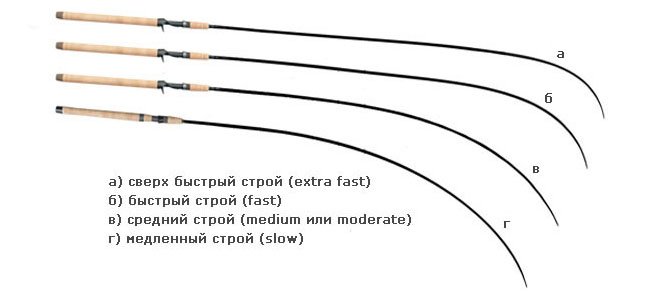
Its structure also depends on the length and class of the feeder rod. Those rods that have a large mass and length also have an ultra-fast action. In turn, small and light ones have a medium action, or a soft parabolic one.
If we take a spinning rod and a feeder rod for comparison, then the differences in the system will be significant, due to the fact that a good hooking of a fish requires a hard blank, the rest of which starts working only when fishing or casting occurs.
It is very difficult to make sure that these characteristics are located in one form. Therefore, almost all feeder rods have a fast action. The exception is the middle class. And very rarely have I seen a blank with a slow action.
My preferred rod is the 3.2-3.6m rod with a fast action because it hits the fish effectively. At this time, I trust the friction clutch and the tip to dampen jerks.
How to fish on a FEEDER for a beginner. Feeder fishing for beginners
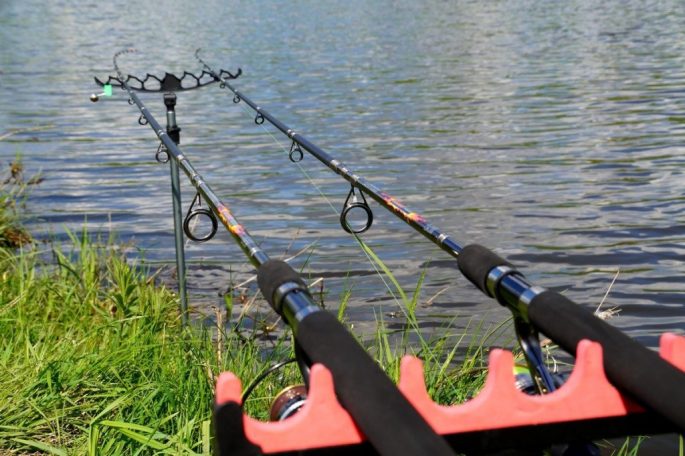
Feeder coils
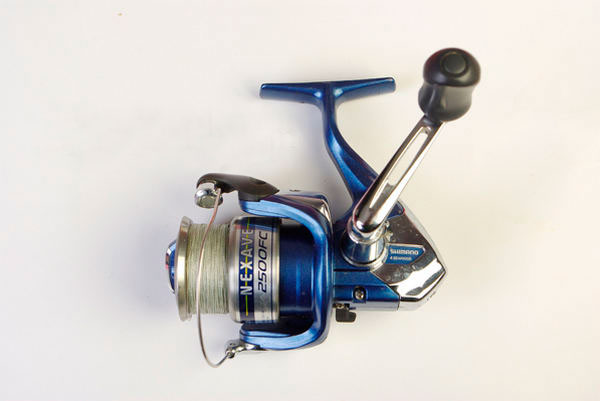
Reels used for feeder gear are called inertialess. Ordinary spinning reels may be suitable. But it is best to use the option that is designed for match fishing. They differ in the presence of spare spools, which are shallow, as well as the difference in the increased gear ratio.
This is due to the fact that a thin fishing line is used for feeder gear. It will fall on the spool under load between the wound turns. Fishing with feeder gear is very fast, which requires high quality and reliability from the reel.
It is also preferable to have a baitrunner system on the reel, due to the fact that big fish will come for small fish. For example, when roach and silver bream come up on the river, then bream can also come after them. If you catch crucian carp on the pond, then carp may come up behind it. So what is the baitrunner system for?
Baytranner performs the function of an instant transition from the operating mode to the minimum friction brake. This allows you to do free bleed fishing line. This feature helps to avoid negative situations during the bite of a large fish. For example, a rod may fall off the stand, after which the fish will pull it into the water.
Hooks, leashes and fishing line for him
Main line
For feeder fishing, both regular mono and braided line can be used. For fishing at short distances, it is preferable to use a monofilament. It has a special stretch that allows you to smooth out the jerks of the fish. At short distances, the stretch of this line has a minimal effect on hooking. It also practically does not affect the visibility of bites.
The diameter I recommend is 0.16-0.2mm for small fish and 0.2-0.25mm for fish weighing over a kilogram. To catch a trophy fish, you do not need to use feeder tackle. My opinion is that a simple donk using spinning is better for this. I formed such an opinion after the bite of bream and carp during fishing, bent the spinning, which stood upright. It folded almost like a donut.
If you decide to fish at long distances, then the monofilament will be too small for you. Here it is better to use braid. And, to be more precise, the following quality of this fishing line is important here – zero extensibility. Required in order to transmit momentum to the tip when biting. Only here you need to be careful when the fish is near the shore, i.e. in the last phase of fishing, due to the fact that breaks in the leash most often occur in this place. I recommend a braided line diameter of 0.1-0.16mm for feeder fishing.
To avoid breaking the leash, you can use this method: install an insert made from the feeder gum in front of it. It will perfectly perform the function of shock absorption of fish jerks, which, in turn, will provide the possibility of using thinner leashes for catching.
I’ll tell you more about a couple of facts about the use of thin fishing line as a “basis”. If the fishing line is thick, then the casting of the equipment will be worse – this is the first. Second: the resistance to the flow of water in the current is lower, which means that the arc of the fishing line will also be less. Which, in turn, will have a positive effect on the transmission of the bite, and will also carry the equipment less with the flow. Well, and, of course, the aesthetic pleasure of catching tackle, which is sensitive and subtle.
Leashes and fishing line for them
We are not talking about savings here. You need to take only the highest quality fishing line so that it is also not visible in the water. If you decide to give preference to mono, then its color should be comparable to the color of the bottom. It is best to take the material for the leash fluorocarbon. It, of course, is more expensive, but you can buy unwinding smaller than 20-50 meters. Fluorocarbon line has the best characteristics for us – this is the high strength and invisibility we need.
Feeder and hooks for it
Well, nevertheless, this is a sports tackle, therefore, in 90% of the options, small hooks are used for it. An exception here may be carp fishing, here hooks are needed a little more.
Feeder and equipment for it
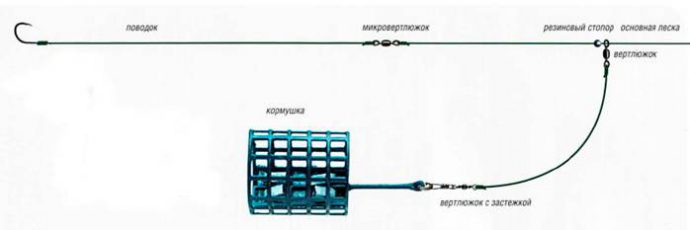
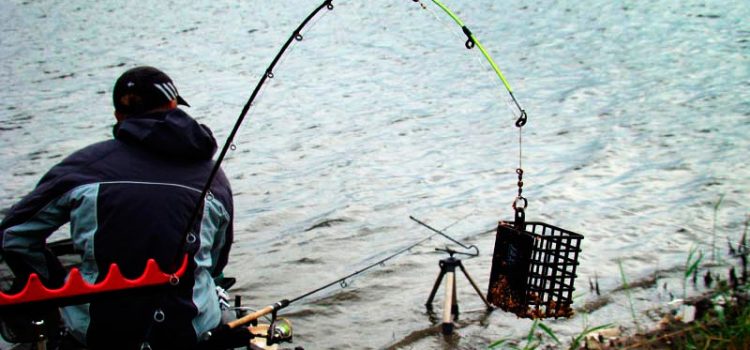
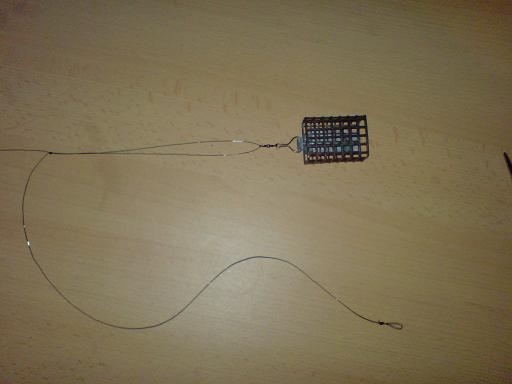
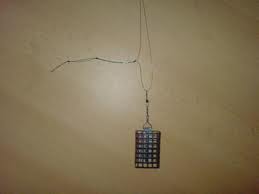
All equipment for the feeder is a hook on a leash and feeders. The main task of the equipment is to position the leash in such a way that even the slightest bite is transmitted to the rod.
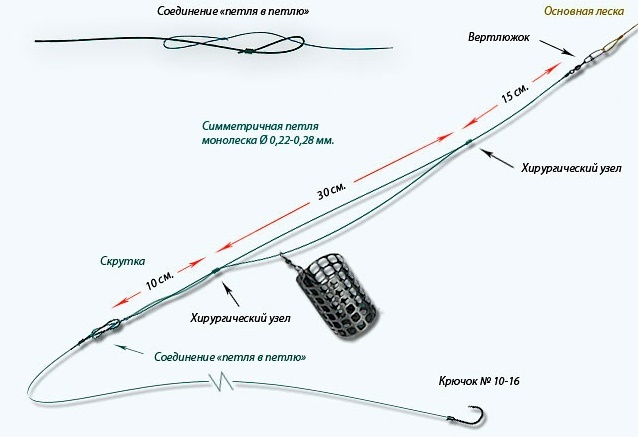
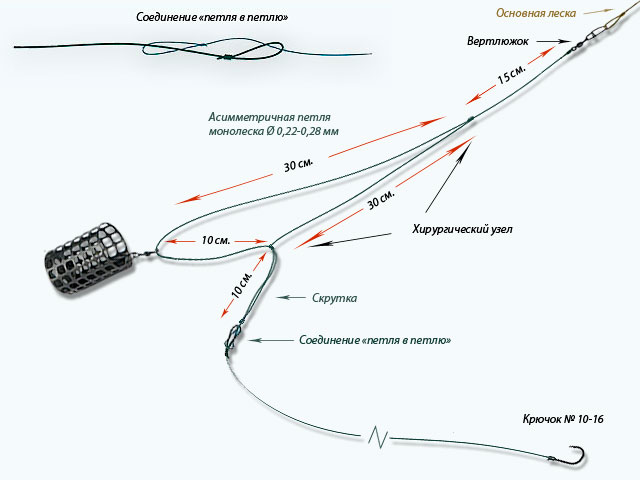
Paternoster, symmetrical and asymmetrical loop are considered the most convenient and effective.
Feeder equipment. Best feeder montages
The lightest feeder rig
It is done in the following way. The “base” line must be threaded through the swivel of the feeder. Next, you need to put on a silicone or rubber bead for cushioning. Simple stoppers or pellets made of soft lead are also suitable, all of which are commercially available. After that, you need to tie the swivel, and we already fasten the leash and hook to it.
Tool with anti-twist
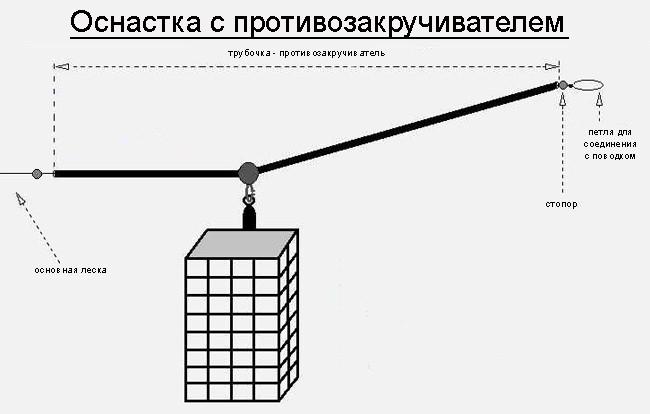
This type of equipment is used, as a rule, by beginners. Fishermen with experience will not catch them, and will try to dissuade them from this method. Although there is no great reason for this. There is an opinion that the fish is frightened. But I did not notice this, how many times I caught it. If only, when does it splash on the water?
The negative points for me consist of two things: the anti-twist tube itself is not very reliable (in my case, it often breaks at the bend), and the leash from the feeder is located remotely. But, in principle, it is quite suitable for fishing.
It is very easy to make it. A piece of fishing line half a meter long is taken, a swivel is knitted and then a bead is put on (it is necessary so that the tube does not leave). Next, we put our piece into the anti-twist, after which we tie the swivel and carabiner at the other end. We put the leash on the swivel.
Paternoster
It is also one of the simplest rigs that will not require much time for you to make. It can be used on all types of water bodies. But it gives the best results on fish that behave aggressively, and are also very careless. When you fish with this rig, the main characteristic of the paternoster, self-setting, becomes well expressed.
In the original, it does not require the use of swivels. The tying of all equipment is carried out directly on the main fishing line. On the one hand, this is correct, but the mobility of the replacement can be challenged. As for me, all options have the right to life. We will look at some of these working options.
Option One
We tie a small loop, the length of which is 2-3 cm, at the end of the main fishing line. After a little higher (10-20 cm) we tie another loop in a larger size.
The size of the second loop should be such that the coil fits into it. As a rule, a loop diameter of ten centimeters is suitable.
After that, we put the main fishing line through the rings on the rod. On a small loop we attach a leash and a hook. You need to do a loop in a loop. Next, we fix the cormak on a larger loop. That’s all. It’s time to fish.
Option two
We knit a loop of 15-20 cm at the end of the fishing line. Next, mode our loop into two uneven parts. Here the best proportions are 7-8 cm by 15-20 cm, i.e. one third to two thirds. A swivel is tied on these two pieces. On the short part we fix the feeder with a carabiner. On the long part we fix the leash and the hook.
Asymmetrical loop
As a rule, this type of loop is used on feeder fishing for fish that have a cautious behavior. Even during the “shooting” to the bait of the fish, a bite is visible at the tip of the rod.
It ties like this. You need to take the end of the fishing line. Next, a swivel is put on it. After that, a long loop is knitted (about half a meter). A feeder is fastened to the swivel, then rises.
As a result, we have a loop, the length of which is 50 cm, on which the cormak is located. It slides and dangles. Next, we make another loop on this loop. But it will be less. About 15-20 cm from the feeder. It is tied with a figure eight, i.e. double knot. Here we fix the leash and the hook, knit to the end, which is free to pair the swivel-carbine for fastening with fishing line.
There is one negative point here: bites are not transmitted to the rod if the leash overlaps. Tackle needs to be thrown again. Everyone has a different way of dealing with this. The most commonly used rigid fishing line for equipment.
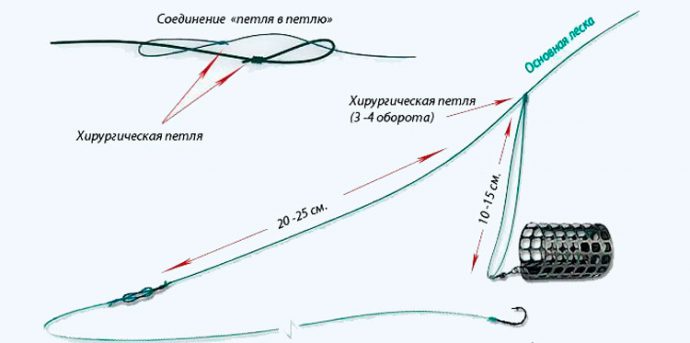
Symmetrical loop
This loop, like the paternoster, belongs to simple options. It is used by many experienced fishermen. The symmetrical buttonhole is also a sensitive tool. You also need to knit it on the main fishing line, without using any other connector elements. It is applied almost everywhere on different reservoirs.
First you need to measure 50 centimeters of fishing line. Then fold it in half. On this folded version of the fishing line, a small loop (figure eight) is tied at the end. It is 2-3 cm long for a leash.
At the free end we thread a swivel and a carabiner. After that, a feeder will be fastened to it. If heavy feeders are used, then a rubber bead should be installed under the swivel for cushioning.
Next, you need to fold the end with a swivel with the main fishing line, we knit a “figure eight” knot. In the future, we will need to fasten the cormac on the carabiner. After that, loop into the loop, tie the leash to the small loop.
The diameter of the large loop in this case will be approximately twenty centimeters. As a rule, this is enough. But it also happens that it needs to be tied a little more. This rig, just like the asymmetric loop, can twist when casting. To prevent this from happening, many do it separately from the main fishing line. At the same time, choosing a more rigid fishing line.
This topic is very broad and there is a lot to be said about it. In this regard, on the pages of our site about fishing, we plan to publish special articles using information from experienced anglers.
You are interested? Subscribe to news. Then you won’t miss anything.
Feeder fishing: preparation for fishing, step by step [salapinru]
Feeder and bait for him

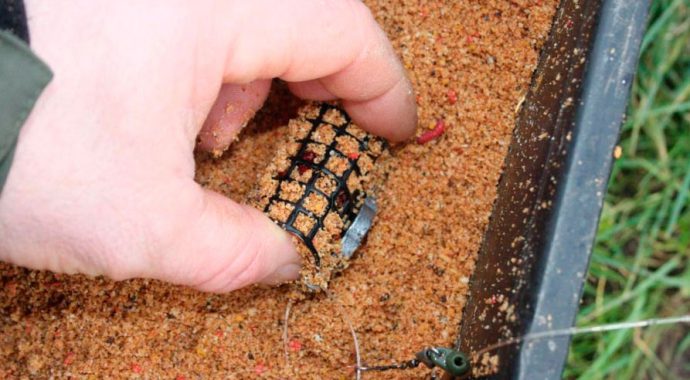
Groundbait is one of the main factors for a good result in feeder fishing. To do this, it is important not only to choose a good reservoir and place for fishing, but also to interest the fish so that it lingers at the point where we need it.
As a basis for feeder bait, you can use cake, various cereals, mixtures that are sold ready-made and are very affordable for sale, and steamed feed can also be suitable. A good addition would be the addition of bloodworms, chopped worms, as well as maggots or any other components of animal origin.
Fish cuisine is a science. Every experienced angler has in his arsenal of secret recipes that have been proven over the years. Well, if you are a beginner and you do not yet have your own serious composition of the ideal bait for fish, then you can use generally accepted recipes for cooking. They are versatile and suitable for any location. You must adhere to them when fishing in an unfamiliar place.
What affects the composition of bait for feeder fishing:
- Current and its strength;
- Bottom and shade of the reservoir;
- The location of the fish;
- The fish to be caught.
How bait depends on the current
The flow and its strength affect the mass of the bait and its viscosity. On rivers in which there is a current, the feed is used with binding and additionally weighting components. This is necessary so that it is washed out more slowly. To increase the viscosity, you need to add a little more water. In this case, the bait will be easily formed into balls, and it will take more time for it to disintegrate.
If this option does not suit you, then in addition it will be possible to take soil on the shore, clean it from litter, and then add it to the feed. This will be the right decision, which will help to further weight the bait. If you are fishing in a pond without current, you can use a simple bait that immediately crumbles and attracts fish.
The dependence of bait on the bottom of the reservoir
When catching fish, the unnatural bright color of the mixture can make them wary or even scare them away. Therefore, I always try to achieve similarity with the bottom. On sand – yellow, on muddy – dark. Not necessarily a perfect match, just a rough match of the background.
Roughly speaking, I divide them into three categories – light composition, dark and medium, dirty gray. The reason for my choice in favor of natural colors is the pressed reservoirs. In such places, the fish is cautious and everything unnatural only repels it.
To change the color, you can take the same primer or use powder purchased additives. If you use purchased mixtures, then knowing the place of fishing, pick up the dry mass immediately in the store, to match the bottom.
Feeding and location of fish
The function of bait is not always calculated so that the fish are attracted on a horizontal layer, at the bottom. It also happens that the fish is located a little higher. Perhaps it can stand in the middle layers of the reservoir. Then you will need a groundbait that will create a plume of feed particles vertically.
For this effect, you need to add food additives to the mixture, which will easily float. There is another good way – this is to saturate the mass with oxygen. For this, a sieve is used through which the mixture is passed. The composition is formed quite loose. A ball of such a mass will disintegrate in water into air bubbles along with food particles.
The dependence of the bait on the fish that is supposed to be caught.
This factor affects the amount of food that will be used to catch a particular fish. Simply put, if you want to catch carp, add corn or peas to your feed. Big fish will not linger on small bait. We conclude that the larger the fish, the more it needs a particle of feed.
The use of flavorings
For us, the saying “you can’t spoil porridge with butter” will not be relevant at all. If you overdo it with flavorings, then you risk not only not attracting fish, but also scaring it away. This is especially important to remember when using ready-made mixtures for fishing, which contain all the necessary components. Therefore, be especially careful in this case.
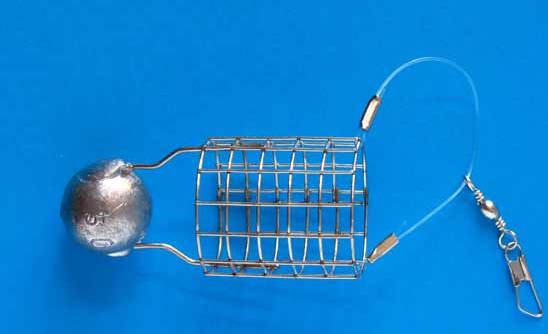
Feeder fishing and feeders for her
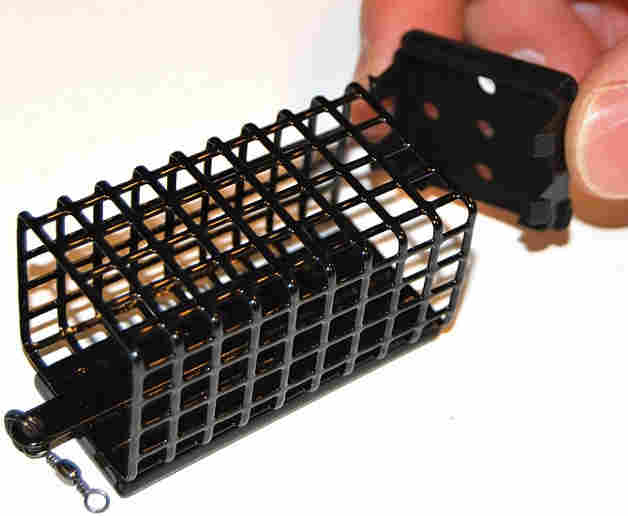
The main function of feeders for feeder fishing is the delivery of ready-made bait to the place where fishing will be carried out, and also to make sure that the bait “opens up” there in full force.
If you make the wrong selection for certain conditions, then the desired result cannot be achieved. Simply put, the fish will not stand in one place, and we will not be able to attract them.
The following types of feeders are distinguished according to the method of their use:
- For feeding the starter;
- For casting far;
- Feeding troughs for stagnant waters;
- Feeders dokormovochny for reservoirs with a current.
Feeders for feeding starter
This model differs in its size and cell size. These cormacs have large cells. The food is washed out of them quickly. They are used in cases where it is impossible to throw a sticky ball of bait far by hand.
Before you start fishing, you need to cast the starter feeder for feeder fishing about ten times. At the time when the feeder falls to the bottom, you need to make a sharp cut to ensure it is cleaned. This is done several times.
Feeding troughs for stagnant waters
This is the same version as described above, only in a smaller form. What form it will be also does not really matter. The main thing here is that the cells have a size that will allow the bait to work without obstacles. It should be gradually washed out of the cell.
Supplementary feeders serve as a deterrent for fish. During fishing, such a system causes appetite in nearby fish, by washing out the food in small portions.
Pre-feeding feeders for ponds with flow
Here the shape of the feeder plays an important role. For current conditions, kormaks are used, the bottom of which is weighted, and the cells are small. This is necessary so that the snap is held in one place. In places where the current is strong, closed-type feeders are used.
For long distance casting
Most often, feeders resemble a badminton shuttlecock. The cell may close completely or partially. When casting, their behavior is also similar to the behavior of a shuttlecock. The feeders have a load on the front, which stabilizes its flight.
If we compare the flight range of conventional kormaks and kormaks for the current, then the latter fly 25-30% further.
How to fish on a feeder
Such fishing is very exciting, it is also distinguished by dynamism. The first thing to do is to find a good place. It should not be obstructed by snags or other objects. Look at the color of the bottom, also determine the current. Then start kneading your bait.
If you bought a ready-made mixture, then it will take about twenty minutes for it to gain condition. While thoroughly mixing the mixture, pour in water in small portions. If you have your own bait, then start mixing it. It is not recommended to mix the ingredients in advance, and definitely do not mix everything in one container. This is due to the fact that all the smells will mix, and the forces will be wasted.
After the ingredients are mixed, leave them for a while to absorb the water and swell. Next, you must take the feeder and fix the sinker on it. It’s time for the next action.
First, try to make the first cast with a lead on the end. By the time of the fall, as well as by the fishing line, you can determine the depth. By broach, one can draw a conclusion about the bottom topography, whether there are algae and various obstacles that will interfere with the fight.
For fishing, you need to look for a local place where there is a small hole or hillock at the bottom. By these signs, one can judge whether there is fish in this place. Also, the place where the fish is found is the edge. This is a territory where there is a sharp transition to the depth from the shoal. Here the fish can be both at the top and at the bottom of the edge.
Before you fish, be sure to make bait in this place. You need to cast to one point. Use a marker to make a mark on the line. For casting, you need to use a clip on the spool of the reel. Experienced professionals in fishing for fishing make several places that they prepare on different parts of the coast to play it safe.
Advice! When catching fish, constantly make adjustments to the equipment: adjusting the leash (length and thickness), as well as the weight of the feeder and hooks.
For beginners in fishing, feeder fishing can be daunting. So for it you need to choose a special equipment, a place for fishing, you need to be able to understand bait. Moreover, you can use only one hook for fishing, which has a small size. But such outdoor recreation is sporty, dynamic, and full of surprises. I think you definitely will not regret all the money and effort spent.
Feeder fishing: preparation for fishing, step by step [salapinru]
Fishing on a feeder catching fish on a feeder tackle (Fishing video) / Feeder bream– MF No. 62
We will be glad if the article is useful for you. Write to us in the comments about your experience, ask questions.