


Contents
Downward Facing Dog Pose is one of the basic asanas. Experienced yogis find it very effective and fairly easy to learn. But for beginners, at first it will be oh, how not easy. But we have no intention of scaring you. On the contrary, it is better to immediately analyze typical mistakes and understand how to perform the asana correctly.
What does the asana “Dog face down” mean in yoga
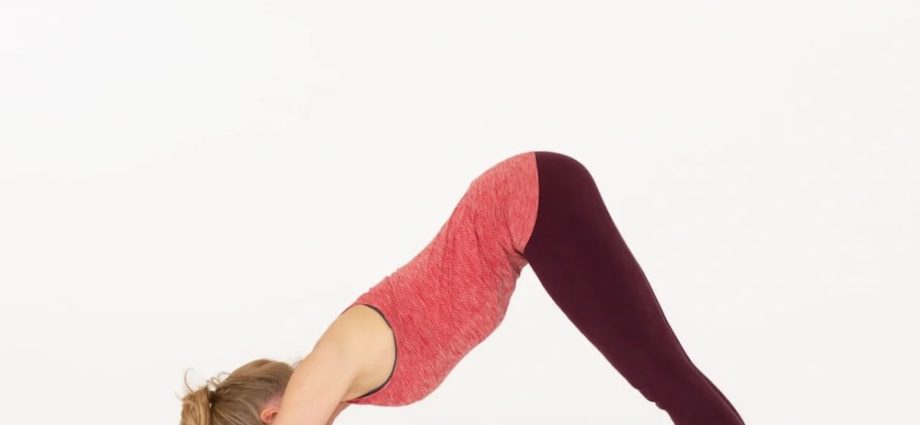
The Sanskrit name for Downward Facing Dog is Adho Mukha Svanasana. Adho mukha translates as “face down” and shvana means “dog”. Hence the name. The pose, indeed, resembles a dog, which is relaxed and happy to stretch. This asana also looks like a triangle. You will need to imagine that you have formed a mountain with two even slopes and a top at the coccyx. This comparison will help you!
As we have already said, Adho Mukha Svanasana is one of the most relevant postures. It is repeated several times in each class and is part of the popular Surya Namaskar exercises. Beginners will need time and patience to master Downward Facing Dog. But advanced yogis do it automatically, moreover, they are able to relax in this position. Hard to believe? But it really is. And over time, you will also be able to relax in it, the main thing is to master the correct execution technique.
The benefits of exercise
- It, like any inverted asana (where the pelvis is higher than the head), gives an influx of fresh blood to the head. This is very important and useful: brain cells are updated, complexion improves. In ordinary life, we do not accept such a position (washing floors, if only), so try to include this asana in your classes.
- One of the few asanas that stretches the back of the legs well (which we also do not do in everyday life). It does this gently and painlessly, the main thing is not to pull anything with great effort. Be patient with your body. Do this exercise smoothly, increasing the stretch over and over again.
- Lengthens the spine. Have you heard the expression “Children grow up, old people grow down”? And this is true: over the years, the human spine settles, becomes less flexible, clamps appear, and vital energy can no longer flow freely along the spinal column. And the Downward Facing Dog pose stretches the spine very well, restoring its youth and strength.
- Opens the chest, which is very important for “office people”. Notice how you sit? Are you slouching? Is your chest tight? And this should not be. The constant performance of this asana removes these tensions, straightens the back and the space between the shoulder blades!
- Removes clamps in the cervical region, which is also very important. If the pose is performed incorrectly, on the contrary, these clamps will only intensify. Pay special attention to this!
Why else is the “Down-Facing Dog” pose so good:
- Reduces pain in the lower back, neck (why this happens, you have already understood)
- Stretches muscles, legs, arms and back
- Makes hands strong
- Improves lung function, relevant for asthma – Massages internal organs
- Improves digestion
- Normalizes sleep and mild depression
Exercise harm
Who is contraindicated in the pose “Downward Dog”? Anyone who has had a traumatic brain injury, people with high blood pressure and impaired
joints in the wrists (arthritis, arthrosis). It is also not recommended to perform the asana for headaches, in late pregnancy and on the days of the menstrual cycle.
How to do the downward facing dog pose
Now we will analyze with you how to perform this asana correctly, as well as the most common mistakes that beginners can make.
So, the execution technique:
ATTENTION! The description of the exercises are given for a healthy person. It is better to start classes with an instructor. If you do it yourself, carefully watch our video tutorial! Wrong practice can be useless and even dangerous to the body.
Detailed technique for performing “Dog facing down”
Step 1
First, let’s see what distance should be between your feet and palms. To do this, we lower our knees to the floor, buttocks – on the heels and reach forward with our hands. We direct our gaze between the palms.
Step 2
The palms are shoulder-width apart with fingers forward, knees and feet are also shoulder-width apart, hips and arms are perpendicular to the floor.
ATTENTION! Immediately press your palms to the floor! We feel that the whole palm is pressed, especially the pads under the index fingers.
Step 3
We rise and transfer the weight of the body forward, we substitute the toes. We take a breath and as we exhale we push off with our hands, stretching behind the pelvis back.
Step 4
We begin to tear off our knees from the floor and lift the pelvis up until you feel that your back has become straight and long.
Step 5
If you feel like you can lift your heels even higher, do so and straighten your knees even more. Try to push off with your hands stronger from the floor and stretch behind the pelvis back and up.
Step 6
Lock in this position. And when you feel ready, lower your heels to the floor.
ATTENTION! If your heels don’t drop, it’s okay. So you leave them slightly raised. We assure you that at some point your practice will deepen – and your heels will calmly drop.
Step 7
Lock in for a few breaths! The chest stretches to the hips, the lower back bends down, the tailbone stretches to the sky. The abdomen is extended, free.
ATTENTION! The gaze is directed downward. Do not raise your head – otherwise the neck tenses up and blood flow to the head is disturbed.
ATTENTION! Make sure you don’t pinch your neck with your shoulders! To do this, you can roll forward slightly, take your shoulders back, direct your armpits to your ears, and once again push yourself back with your hands.
Step 8
And when you finish this asana, shift your body weight forward, kneel down on the floor, buttocks lie on your heels. In this position (child’s pose) we rest for a few seconds.
Asana time: start with 1 minute, bringing the exercise to 2-3 minutes.
Most Popular Mistakes
We should also warn you about them, since you have already understood that the entire positive effect of the asana can only be obtained if it is performed correctly. There are two main mistakes:
1. Round back
Most often, beginners round their backs. Of course, they don’t do it on purpose. This happens when they try to reach the mat with their heels. But forget that the back should be straight. And this is the most important thing in asana!
How to fix: You need to lift your heels up, stretch your buttocks as much as possible, bend your knees and stretch yourself back. When the back is level, you can again lower your heels to the floor.
2. Concave back
The second common mistake is when the back, on the contrary, turns out to be concave. This happens when they are strongly pulled back and, as a result, fail in the back.
How to fix: you need to roll forward on your hands, turn your shoulders, direct your armpits to your ears and stretch out behind your pelvis.
We thank for the help in organizing the filming the yoga and qigong studio “BREATHE”: dishistudio.com