


Contents
When building a house and landscaping, it is often necessary to make round holes in the ground. They are needed when constructing a fence – for installing pillars, when building gazebos, installing arches and other light utility structures. The same pits, but of a larger diameter and depth, are required when constructing a pile foundation. Make these holes with a motorized or manual drill. They are available in stores in sufficient quantities, but many prefer homemade products: they are often more productive and reliable than factory products. In addition, you can make a drill with your own hands of any design, and there are a lot of them.
Designs and application
There are three main designs of earth drills:
- Garden. Usually these are two semicircular blades welded at an angle to one another. A hand drill of this design is used to organize holes for planting, from which it is called “garden”. But pits are made with the same tool when installing poles for fences, arbors and other light buildings.

An example of a homemade earthen garden drill - Auger drill. It differs in that it has a longer cutting part. It is used for the same purposes – to make holes for poles. Due to its longer blade design, it needs to be taken out less often, so it usually drills faster.
The auger drill is characterized by spirally wound several turns of the helix - Drill for piles TISE. This design is similar to a garden auger, but has an additional retractable vane to form an expansion at the bottom of the pile, which is typical of this type of foundation.
Reclining blade – features of the drill for TISE piles


Easier-to-make garden earth drills. Depending on the type of soil on which drilling is carried out, their design is slightly modified. This is the beauty of homemade drills – they can be “sharpened” for specific conditions and it’s not just about size – the blades can be made removable, bolted, but also in design features. Yes, ordinary drills in the store are inexpensive, but they are “universal”. Works well on “light” soils. On loams, clays, marl, etc. they are ineffective.
Making a garden drill
A garden drill is the simplest but most effective design. It consists of:
- cutting part. It usually consists of two steel semicircles with sharpened edges. The diameter of the blades is selected depending on the diameter of the holes to be drilled. For convenience, the blades can be made removable – bolted.
The drill for poles can be with a combined rod - Kernel. It is a round or profiled tube (square). A crowbar can also be used, but it is very heavy and difficult to work with. The length of the rod is the required pit depth plus 50-60 cm. If it is made shorter, then the last centimeters will have to be drilled in a deep slope, which is not at all easy. If, with this calculation, the total height is higher than 1,5 meters, it makes sense to make a collapsible bar. Then the rod is built up with pipe sections of the same diameter, having come up with a joint system.
- Pen. Most often, a crossbar in the form of a T is welded to the rod. The length of the handle is minimal – 40 cm, the optimal one is about 50-60 cm.
- Drill bit. This is the part under the blades. She is the first to loosen the ground, and at the initial stage is responsible for centering the drill – it is easier to hold it vertically.

This is a basic design, and there are many improvements to it. But first, let’s talk about what a ground drill can be made of.
Materials
As already mentioned, the rod is most often made from a round or square pipe. Diameter – from 3/4 ‘to 1,5’, profiled pipe can be taken from 20 * 20 mm to 35 * 35 mm.
Blade knives can be made from:
- sheet steel with a thickness of 4 mm;
- saw blade for a grinder of suitable diameter.
Earth drill with blades from a saw blade for a grinder

It is easier to make blades from a saw blade. In this case, the cutting edges are already prepared. It will be possible to additionally sharpen the side edges so that the soil is cut easier.
Pico drill is made of different materials – there are a lot of its designs. They just make a sharpened rod. Then you need a piece of a large diameter bar. The second option is to make something like a drill from a strip of steel. And yet – a combination of the two.
And finally, about the pen. It is more convenient if it is made of a round pipe. Its diameter can be selected according to the girth of the palms. The main requirement is that you should be comfortable.
Knives and method of fastening
First of all, you need to decide whether you are making a drill with your own hands with removable or stationary blades. If the blades are removable, weld thick steel shelves at one end of the rod. The shelves are made at an angle – so that the planes of the knives are divorced at an angle of 25-30 °.
After the shelves have been welded, two or three holes are made in them – for fasteners. Then the same holes will have to be made in the blades, and they will be installed on bolts of solid diameter.

In the discs themselves, holes will have to be cut in the center – so that they fit more tightly to the rod, but this operation is also required in the monolithic version – with welded blades.
Sheet steel
If you are going to make the blades from sheet steel, cut out a template from paper, along it – a circle of steel. Drill a hole in the center – a rod will need to be inserted and welded into it. Circle or square – depending on the selected bar. The dimensions of the hole are slightly larger than the dimensions of the rod.
Next, you need to decide what you will make the blades – from two halves of a circle (as in the photo above) or in the form of an open circle with offset edges – one turn of the spiral (in the photo below).

It is also necessary to part the edges by 25-30 ° degrees. In this case, the drilling efficiency will be maximized. If you work on dense soils (clay, loam with a predominance of clay), the blades can be brought together under load. To avoid this, stops are added from a corner or a thick strip of steel.

The blades are bent due to the fact that the steel is used unhardened, but it is almost impossible to find it in the sheet, and if it is possible, it will hardly be possible to bend it.
From the saw blade
If you have an old saw blade of a suitable diameter, you have found an almost perfect option. They use hardened steel, and it is elastic and strong. But such a disc cannot be bent, therefore it is cut in half and these halves are bred at the required angle.

Such a homemade drill for earthworks shows a fairly high productivity. Even used discs have a well-sharpened edge. And to make drilling even easier, the drill is also sharpened on the sides with their own hands.
Modifications
In dense soils, it can be difficult to cut the soil with large blades. In this case, several blades of different sizes are welded onto the rod. Below, near the peak, the smallest are welded, higher, retreating a few centimeters – the large ones. There can be three such tiers, maximum four. The entire cutting part should not be more than 50 cm, otherwise it is physically very difficult to work.

If a drill is needed for shallow pits – for installing poles, etc., then such a design is optimal – it has a relatively low weight, it is easy to work with it. The process of work is as follows – they lowered it into the hole, turned it several times – pulled out, poured out the soil stuck between the blades. But if you need to drill deep pits, you will be tortured to drag a small amount of soil from the depth. For such cases, a box for collecting soil is welded over the blades.

And all these are handmade boers. All of them are highly efficient – it is much easier to work than purchased ones.
Auger drill
The auger drill, due to the large number of turns, creates significant resistance, that is, it is much more difficult to work with it than a garden drill. But augers are used mainly in the presence of a mechanized drive – when they make a drill for wells of great depth – for water, devices of underground probes for a heat pump, etc.

To make a homemade auger drill, you will need several metal discs. The number of disks is equal to the number of turns. The discs are cut out the same, in them, in the center, a hole for the rod is cut out, as well as the same sector – so that they can be welded.

The disks are welded on one side, then, slightly stretching the resulting accordion, the seam is welded on the other side. Rings are welded on the outer discs. The welded discs are put on the rod, the lower edge is welded.

Next, you need a winch. The workpiece for the auger is fixed, the winch hook clings to the ring and stretches to the desired length, after which the auger is boiled.

Drill for piles TISE
In the author’s version, the TISE drill is a blade with a soil receiver and a wider folding knife, which forms an extension in the lower part of the pile. But working with such a projectile is inconvenient – a folding knife interferes with it. Therefore, in some structures it is made removable, but in general, it is recommended to drill the pits themselves with an ordinary garden drill, and to expand it, make a separate folding knife with a land receiver. This makes the work easier and faster.

A cut-off shovel acts as a knife here, and a land receiver is made from a herring can. The knife is fixed movably, when lowered into the pit, it is pulled up by a nylon cable tied to the end. Having reached the bottom, the cable is weakened, the blade begins to cut the sides of the pit, forming the necessary expansion.
The photo below shows the second version of a homemade drill for TISE piles. The design is more complex, but also more efficient. The plow-blade is made from a piece of spring, sharpened and welded to the folding structure on bolted connections.

Dredger – from an old propane tank. The collection of earth takes place from the bottom, because the receiver is made with a rounded bottom. It has two holes, their edges are sharpened.

This shell works well even on dense clay. True, to reduce friction, the well must be constantly wetted with water.
Blueprints
A self-made drill is good because its design is “sharpened” for the owner. In the manufacturing process, everyone makes their own changes, then many more modify the product. But it can be difficult to do without basic drawings. This grave contains several drawings with the dimensions of various drills. As you can imagine, the dimensions are relative, they can and should be changed, adjusting to the dimensions of the required wells.
Shovel drill
For planting plants, it makes no sense to make a serious structure. In this case, you can make a garden drill from a shovel. They choose a high-quality shovel made of good steel, apply the markings, as shown in the drawing. According to the markings, you will need to cut out two small fragments, cut the lower part in the middle to a depth of 30 cm (pictured).

Further, the edges are bent one forward, the other back, the petals formed in the lower part are bent to them. The resulting seams are welded from the outside and from the inside.
Drill for soft soils
If the ground is soft, conventional construction does not work very well. For such cases, there is a special drill with an extended cutting part. It is a kind of glass with slots on the sides. The cuts are provided with cutting edges. It is better to make them from well-hardened steel.

This drawing shows an interesting design of the handle – it can be rearranged as the length of the rod increases.
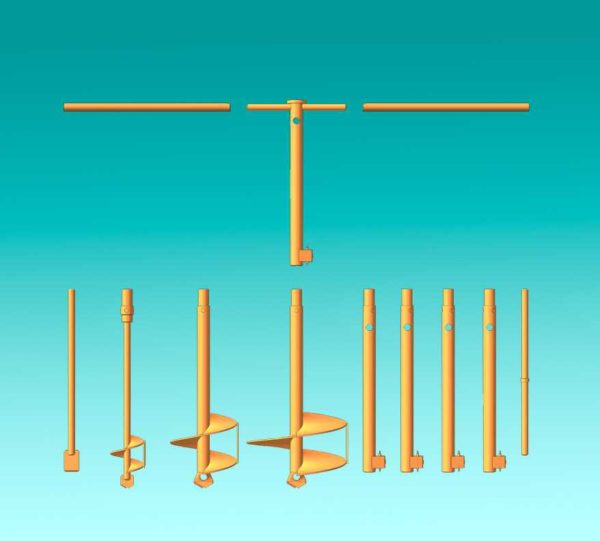
Basic drawings of auger and garden auger
Both of these units work well, but the garden unit has to be removed often, and the auger is harder to rotate. Choose according to your own preferences.


