


Contents
Microsoft Excel provides the user with several, conditionally speaking, levels of protection – from simple protection of individual cells to encryption of the entire file with ciphers of crypto-algorithms of the RC4 family. Let’s go through them one by one…
Level 0. Protection against entering incorrect data into a cell
The easiest way. Allows you to check what exactly the user enters in certain cells and does not allow you to enter invalid data (for example, a negative price or a fractional number of people or the date of the October Revolution instead of the date of the conclusion of the contract, etc.) To set such an input check, you need to select the cells and select tab Data (Date) button Data validation (Data Validation). In Excel 2003 and older, this could be done using the menu Data – Validation (Data — Validation)… In the tab Parameters from the drop-down list, you can select the type of data allowed for input:

The adjacent tabs of this window allow (if desired) to set messages that will appear before entering – tab Input message (Input Message), and in case of entering incorrect information – tab Error message (Error Alert):

Level 1: Protecting Sheet Cells from Changes
We can completely or selectively prevent the user from changing the contents of the cells of any given sheet. To install such protection, follow a simple algorithm:
- Select the cells that no need to defend (if any), right-click on them and select the command from the context menu Cell format (Format Cells)… In the tab Protection (Protection) uncheck the box Protected cell (Locked). All cells for which this check box remains selected will be protected when sheet protection is enabled. All cells where you uncheck this flag will be editable despite protection. To visually see which cells will be protected and which will not, you can use this macro.
- To enable protection of the current sheet in Excel 2003 and older – select from the menu Service – Protection – Protect Sheet (Tools — Protection — Protect worksheet), or in Excel 2007 and later, click Protect Sheet (Protect Sheet) tab Reviewing (Review). In the dialog box that opens, you can set a password (it will be needed so that no one can remove protection) and, using the list of checkboxes, configure, if desired, exceptions:

That is, if we want to leave the user the ability, for example, to format protected and unprotected cells, the first three checkboxes must be checked. You can also allow users to use sorting, autofilter, and other convenient table tools.
Level 2. Selective protection of ranges for different users
If it is assumed that several users will work with the file, and each of them must have access to their own sheet area, then you can set sheet protection with different passwords for different ranges of cells.
To do this, select on the tab Reviewing (review) button Allow changing ranges (Allow users edit ranges). In Excel 2003 and later, there is a menu command for this Service – Protection – Allow changing ranges (Tools — Protection — Allow users to change ranges):

In the window that appears, click the button Create (new) and enter the name of the range, the addresses of the cells included in this range and the password to access this range:

Repeat these steps for each of the different user ranges until they are all listed. Now you can press the button Protect Sheet (see previous paragraph) and enable protection of the entire sheet.
Now, when you try to access any of the protected ranges from the list, Excel will require a password for this particular range, i.e. each user will work “in his garden”.
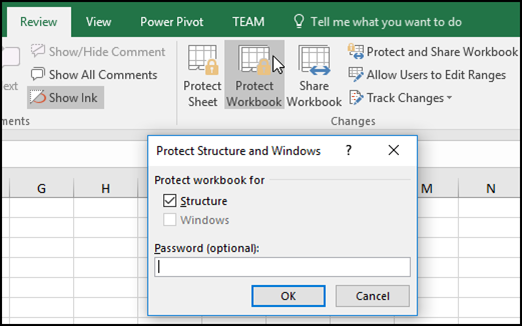
Level 3. Protecting the sheets of the book
If you need to protect yourself from:
- deleting, renaming, moving sheets in a workbook
- changes to pinned areas (“headers”, etc.)
- unwanted structure changes (collapsing rows/columns using the plus/minus grouping buttons)
- the ability to minimize/move/resize the workbook window inside the Excel window
then you need to protect all sheets of the book, using the button Protect book (Protect Workbook) tab Reviewing (Review) or – in older versions of Excel – through the menu Service – Protection – Protect book (Tools — Protection — Protect workbook):

Level 4. File encryption
If necessary, Excel provides the ability to encrypt the entire workbook file using several different RC4 family encryption algorithms. This protection is easiest to set when saving a workbook, i.e. select teams File – Save As (File — Save As), and then in the save window, find and expand the drop-down list Service – General Options (Tools — General Options). In the window that appears, we can enter two different passwords – to open the file (read only) and to change:

- How to set/unprotect all sheets of a book at once (PLEX add-on)
- Highlight unprotected cells with color
- Proper protection of sheets by macro