


Contents
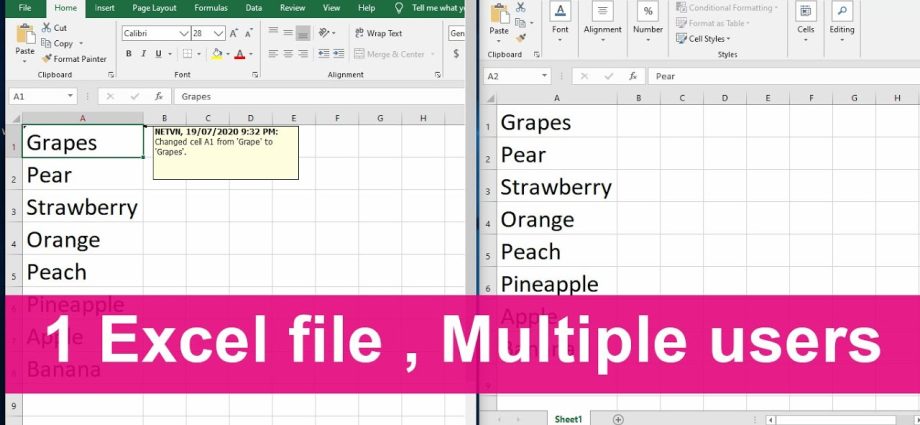
In the process of working on an Excel document, it often becomes necessary for several people to connect to it at once. And very often their number can be calculated in several dozens. Therefore, the issue of collaboration is not limited to just connecting people, since they can often make conflicting changes that need to learn how to quickly and effectively edit.
Who can do it? A person who has the status of a master user. In a word, what needs to be done to make joint work with a document not only possible, but also effective?
Working with a shared file in Excel has its own characteristics. So, some actions are not available to users:
- Creating tables.
- Scenario management, including viewing them.
- Removing sheets.
- Users do not have the ability to merge several cells or, conversely, split previously merged ones.
- Any operations with XML data.
How can these restrictions be bypassed? You just need to remove the general access, and then return it when the need arises.
Here’s another spreadsheet with some tasks that may or may not be possible if you’re working with multiple people on the same spreadsheet.
First you need to understand which file needs to be made available for editing by several people at once. It can be either a new file or an existing one.
Settings
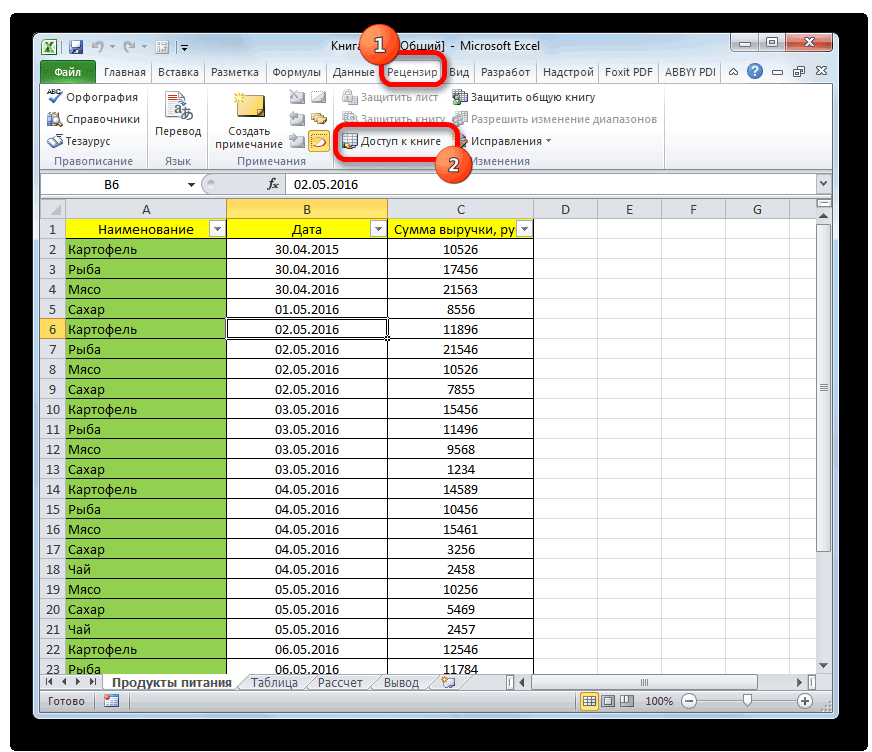
Everything you need to do to share a file in Excel is in the Book Sharing section, which can be found by going to the Review tab.

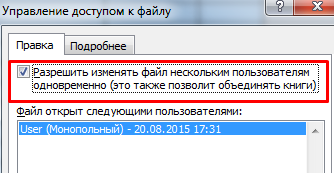
A window will pop up with two tabs. We are interested in the first one, which opens automatically. We need to check the box next to the item marked in the screenshot with a red rectangle. With it, we enable multiple users to manage a document.
After we have opened access for editing, we need to configure it. To do this, open the second tab.
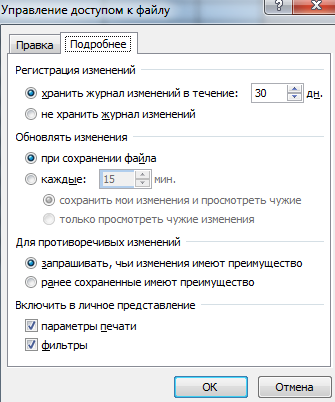
After entering the parameters, we confirm our actions. To do this, left click on the “OK” button. Sharing can be open to any book, both new and existing. In the first case, you will need to come up with a name for her.
After that, you need to save the file on your computer.
Important! The format should be such that the file can be opened by each user with their version of spreadsheets.
You must save the file to a network share or folder that has access to the participants who want to use the file. After the directory is selected, we just have to click the “Save” button.
However, it is not allowed to use a web server to save the shared file.
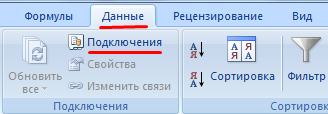
After performing all the operations described above, you need to check whether it is possible to connect other people. To do this, open the “Data” tab and find the “Connections” item directly below it. If you click on it, you will be able to change links or links. If there is no corresponding button, then there are no associated files.
Next, the “Status” tab opens, with the help of which it is possible to check the connections. The fact that everything is fine can be recognized by the presence of the “OK” button.
Excel also allows you to open a shared workbook. To do this, you need to click on the Office button. When the pop-up panel appears, we need to select the “Open” item and select the book that will be used for sharing. After that, again click on the Office button, and open the “Excel Options” window, which can be found at the bottom.
On the left side of the window that appears, you will be able to select a category of settings, but we are interested in the very first one, which contains the most general parameters.
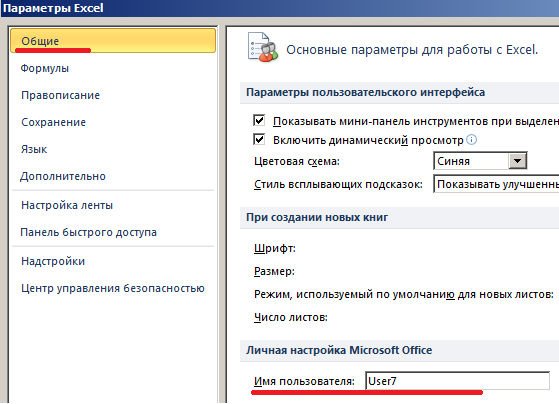
Next, go to the “Personal setting” item, where you need to specify data that allows you to filter users – username, nickname.
After performing these operations, it becomes possible to edit the information in the document or add some data. Don’t forget to save your changes after making them.
This can sometimes cause problems when saving. For example, sharing is only available for the first opening, and when you try to open the document a second time, the program throws an error. This may happen for the following reasons:
- If several participants enter data at once in the same cell. Or any other part.
- Generating a changelog that causes the workbook to grow in size. This leads to problems.
- The user has been removed from sharing. In this case, saving the changes will not work only on his computer.
- The network resource is overloaded.
To fix the problem, you need to take the following steps:
- Delete the changelog or erase redundant information from it.
- Remove redundant information within the document itself.
- Restart sharing.
- Open an Excel document in another office editor, and then save it again in xls format.
True, in recent versions this error does not happen as often as in older ones.
How to view member activity
In the course of joint work, you need to constantly monitor so that one of the participants does not spoil something. Therefore, you need to learn to understand what actions were committed by one of them. To do this, you must perform the following steps.
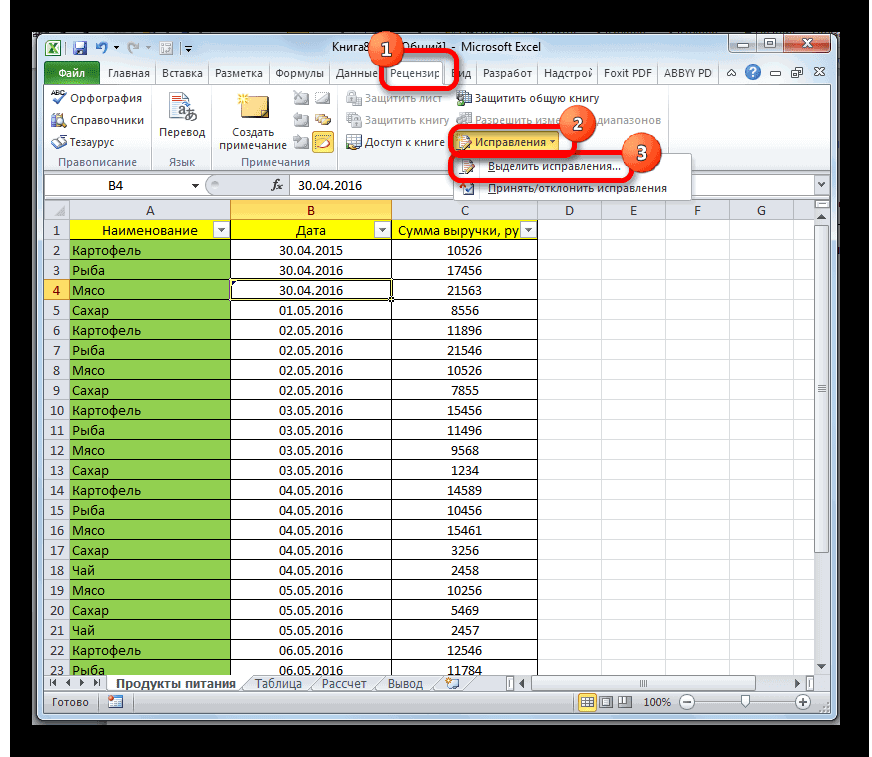
- Go to the “Review” tab, and there find the item “Corrections”. In the menu, select the item “Select corrections”.

6 - Next, a window will appear in which you can find out what changes were made by users. This list is generated automatically. You can verify that this is indeed the case by looking at the checkbox next to the corresponding item in this dialog box.
7 In this case, only those changes that have been made since the last save will be displayed in the list in the upper left corner. This is done for convenience, you can always see earlier edits in the journal.
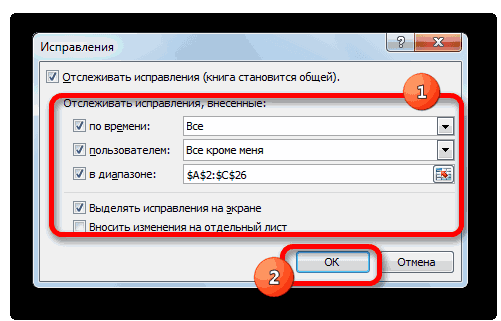
- Each participant is assigned a specific color, by which you can understand who made the changes. The labels are in the upper left corner. You can also set up tracking changes by time, a specific user or in a specific range, as well as disable their display.
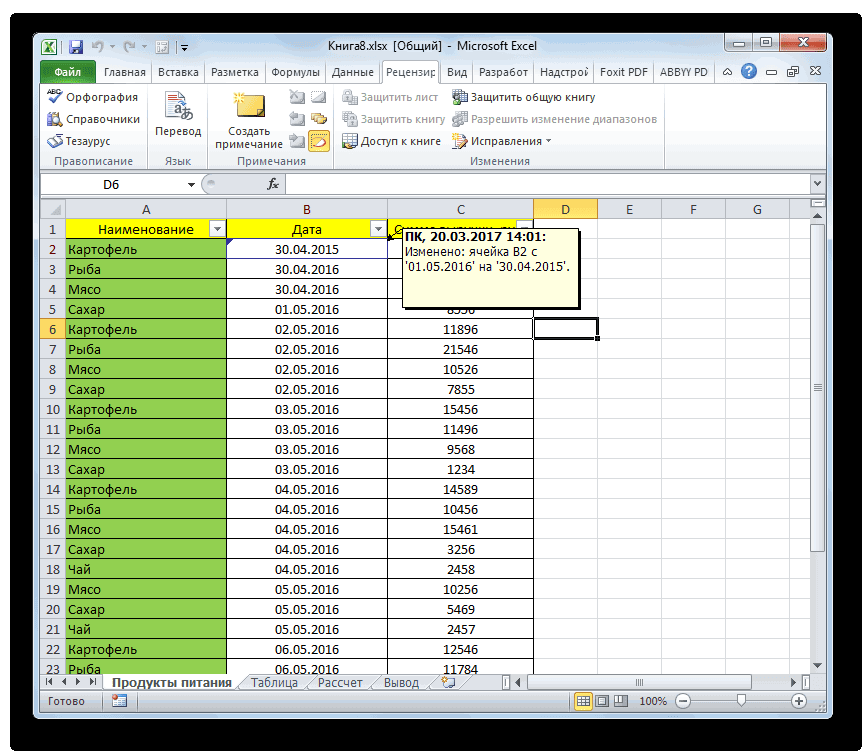
8 - When you hover over a cell that has such a mark, a small block appears from which you can understand who made the changes.
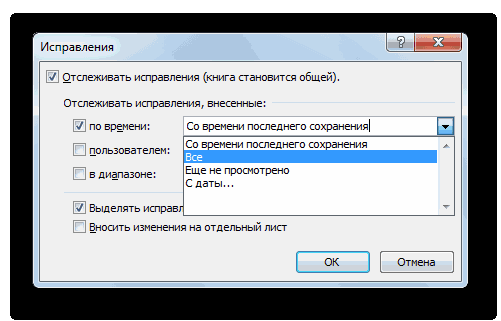
9 - To make adjustments to the rules for displaying corrections, you need to return to the settings window, and then find the “By time” field, where you can set a starting point for viewing changes. That is, the time from which corrections will be displayed. You can set the period since the last save, set to display all changes for all time, exclusively not viewed, or specify the date from which they will be displayed.
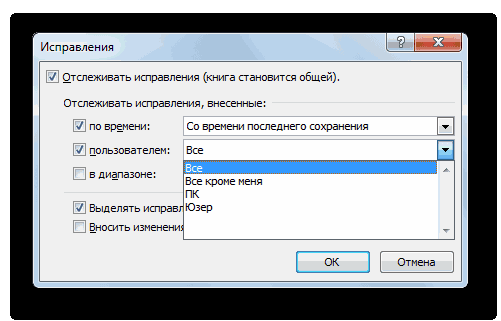
10 - You can also control the display of corrections made only by a specific member.
11 - Using the corresponding field, you can set the range of the sheet in which the command’s actions will be logged.

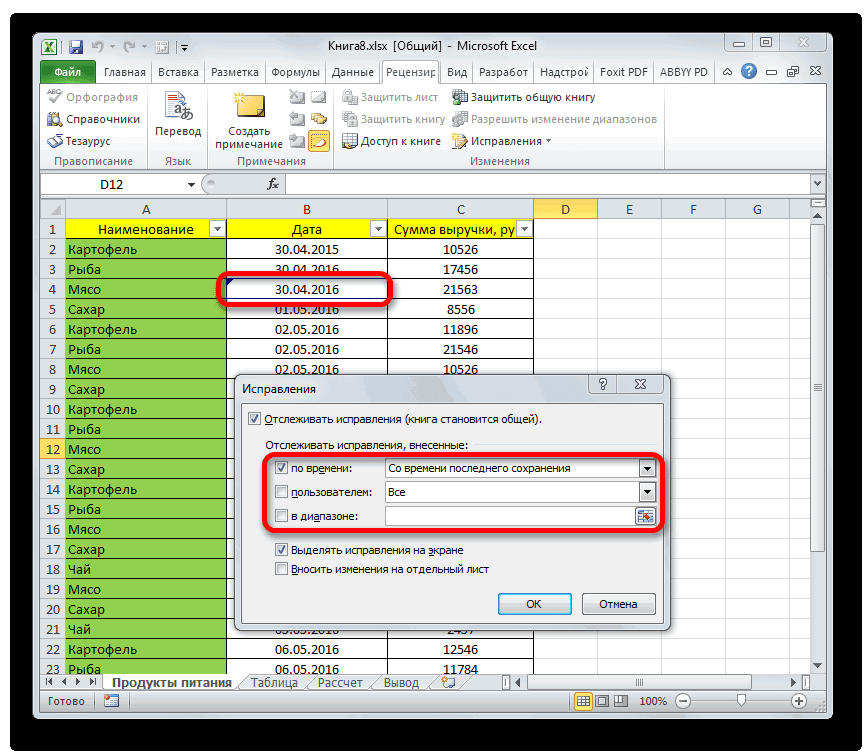
You can also make other changes by checking the appropriate checkboxes in the right places.
The list of changes is not dead weight. The main user can review the edits of other participants, confirming or rejecting them. How to do it?
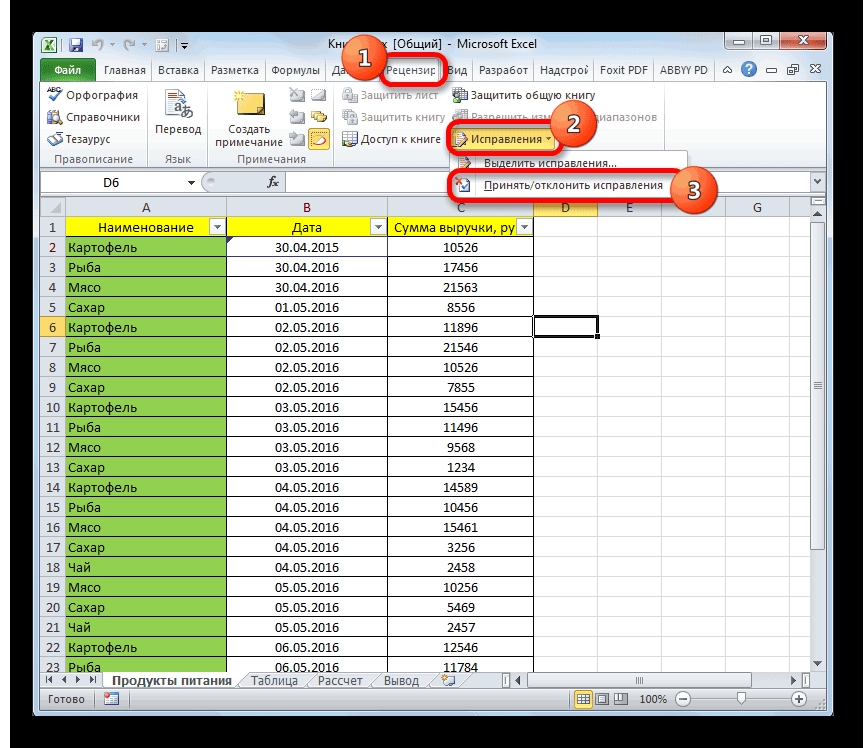
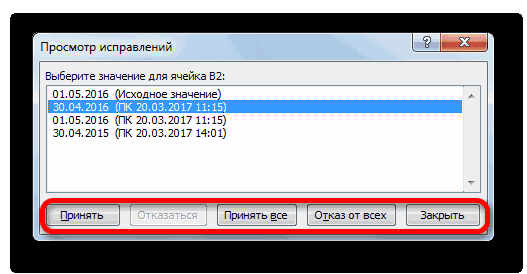
- Go to the “Review” tab. There is a “Fixes” menu where the user can manage fixes. In the pop-up panel, you need to select the option “Accept / reject corrections”, after which a window will be displayed in which corrections are displayed.
13 14 - The selection of edits can be carried out according to the same criteria as described earlier: by time, by a specific user, or within a certain range. After setting the required parameters, press the OK button.
- Next, all adjustments that meet the conditions set in the previous step will be displayed. You can agree to a particular edit or reject it by clicking on the appropriate button at the bottom of the window. It is also possible to batch accept or reject adjustments.
15

Now the necessary adjustments have been left, and the extra ones have been removed.
How to remove user from excel file
From time to time it becomes necessary to remove users from co-authoring. There can be a huge number of reasons: they were given another task, the participant began to make edits from another computer, and so on. Implementing this task in Excel is not difficult at all.
First, open the “Review” tab. There is a group “Changes”, where there is an option “Access to the book”.
After that, the same window that we saw earlier will appear on the screen. A list of all the people who can make changes to the table can be found on the Edit tab. To remove a user that we do not need at the moment, you need to find it in this list, select it by pressing the left mouse button and click on the “Delete” button, which is located below.
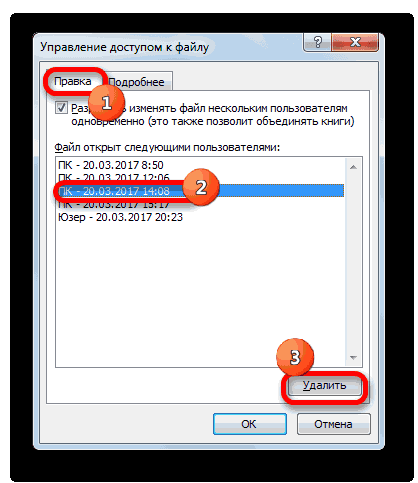
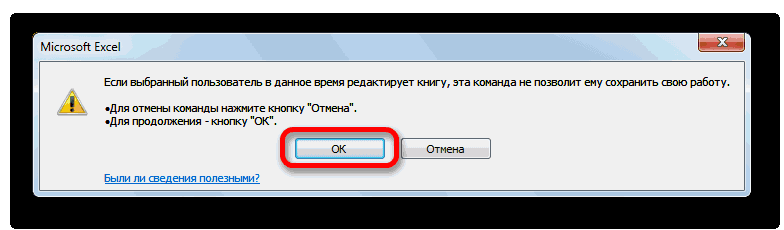
Next, Excel will warn the user that the corrections made by this participant may not be saved if he is currently making changes to the workbook. If you agree, then click “OK”, and the user will no longer be shared.
The best way to limit the use of a shared ledger is to remove the user. If this is not suitable, you can set the right to view or edit the book by a specific participant.
That being said, it’s important to remember that some limitations are built into sharing by default. They have been described above. Let’s remember them, because repetition is the mother of learning.
- It is forbidden to create smart tables that automatically update data and have many other features.
- You can’t manage scripts.
- There is a built-in restriction on deleting sheets, connecting or disconnecting cells.
- Perform all operations on XML data. In simple words, there are restrictions on structuring a large amount of data, including editing their arrays. XML is one of the most obscure file types for beginners, but it’s really quite simple. With this type of file, you can transfer data by making batch changes to the document.
Simply put, co-authoring allows you to perform standard operations on a document, but more professional options are available only for one person. This is because the same macros or XML batch changes are somewhat more difficult to roll back.
Disabling sharing and then re-enabling it is another way to limit what Excel users can do. You can make the necessary changes yourself, thereby temporarily depriving other people of the opportunity to edit something.
To do this, you must follow these steps.
- Open the “Review” tab, go to the “Corrections” item and select the “Highlight revisions” item from the pop-up menu.
- After that, a window appears in which you need to uncheck the boxes next to the items “User” and “In the range”.
- After that, a changelog appears, which is necessary for data backup.
After that, you can turn off sharing. To do this, on the same tab on the ribbon, select the item “Access to the book” and uncheck “Allow multiple users to modify the file.”
That’s it, now sharing is disabled.
So it’s pretty easy to set up co-authoring in Excel. Of course, there are some restrictions that do not allow you to use the document to the fullest. But they are solved quite simply, it is enough to turn off sharing for a while, and then turn it on when the necessary changes have been made.