


Contents
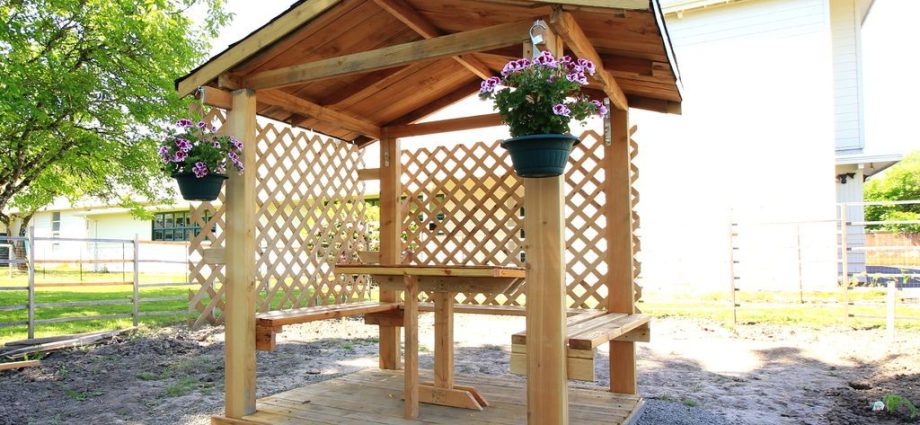
The decoration and organic part of any suburban area is a gazebo. Here you can take a break from work in the midday heat, drink tea at sunset or sit with a book. You can equip the dining and barbecue areas or a place for children’s games. We tell you how to build a gazebo with your own hands – advice from craftsmen and people who have already erected their structures and are ready to share their experience.
Step-by-step instructions for building a gazebo
Decide on a place
Think about where you want to see the future gazebo. Are there paths laid there, is there enough room for maneuvers during construction and is it convenient to carry building materials there? Maybe it’s time to donate a couple of beds that you are too lazy to cultivate and arrange a dream gazebo in their place.
Organize an inventory of tools and materials
Often, in summer cottages or in the garage, materials accumulate that are left over from an old repair or migrated by inheritance from past owners. Inspect the bins – suddenly you have valuable things that will come in handy. Plus, you need a minimal set of tools. If something is missing, do not forget to take from a friend or add to the shopping list:
Go to the construction market or shop
On your hands or in your head, you should have a list of what you need to purchase. All this today can be found in any construction hypermarket. From the pros: you can pay by card, you will have a receipt and a guarantee, as well as the ability to order reliable delivery of all purchases. The second option is to go to the construction market. We’ll have to walk around the departments and choose. But the range is larger, the prices may be more profitable. But prepare cash. And in the event of a marriage, sellers may not be ready to return money and accept claims, rather than in a large store. Therefore, collect all receipts and checks.
Decide on the foundation of the gazebo
First of all, piles are needed. This is the fastest and most reliable foundation for a gazebo. They can be purchased at hardware stores. Screw piles are used for the gazebo – a pointed auger comes out of a large diameter pipe.
Here are their benefits:
How many piles will be required and how long? Proceed from the formula that four screw piles are needed for a 3 × 3 meter gazebo. For a square gazebo from four to six meters, nine pieces are already recommended. For sandy soil or loam, a length of 2500 mm is enough. For peat soils, you need longer. Do not forget to purchase caps (plugs) for each pile.
A bag of cement will also come in handy. Sand-concrete mix is ideal for strengthening piles, if you want to do it. One bag of brand M-200 should be enough. Remember if you have mixing containers and if not, then take them too.
Decide on the type of roof
– It is necessary to decide what properties the roofing will have. First of all, it’s about aesthetics. The roof can be made of any material: ceramic tiles, metal, copper, shingles, roll materials. It is more practical from the point of view of price-quality ratio to work with bituminous coatings, since, with a beautiful appearance, they are practically waste-free during installation. It is convenient to mount such materials on a wooden base, which is the easiest to process. This is true if the gazebo has a complex shape, says Alexey Vorobyov, technical specialist of TechnoNIKOL.
In large hypermarkets, you can find self-adhesive bituminous roll material with colored basalt dressing. These can be small plain rolls with a service life of more than 15 years, or rolls 1 m wide and with colored basalt dressing imitating classical tiles and a service life of more than 20 years. The only restriction on the use of this material is the laying temperature, which must be at least +10°C.
The hardware store will help you calculate the amount of materials, based on the planned area.
Other materials
Buy a wood preservative. They should cover the foundation frame. It will protect the timber from moisture, insects and even ignition. Some antiseptics come immediately with the addition of color. Then you can not take the paint. A can of yacht varnish will come in handy. Cover the floor with them for better preservation.
Also, if you do everything according to our instructions, you will also need:
Arrange delivery and get started
When all the materials have been purchased, the logistics to the site have been calculated, you can choose the X day and, after a hearty breakfast, start the long-awaited work on building a gazebo with your own hands.
What work will need to be done when building a gazebo
Foundation layout
So, you have decided on a place to build a gazebo and firmly decided to do everything with your own hands. Start by marking the contours of the foundation and drive in pegs at the places where the piles are to be installed – in the corners. It is not recommended to drive them closer than two meters to each other, but it is better not to go beyond the mark of three meters. The foundation is arranged in such a way that the load from subsequent installed structures can be evenly distributed over its area.
Piling installation
Everything is ready to start work. Install the piles strictly vertically. Take a level to control. Start rolling into the ground. Ask an assistant to supervise from the side. It is better to turn it alone, since with four hands there is a greater risk that it will go unevenly. Already at the end, the pile will stand almost level, so a second person can help by force.
Note that in the ground there may well be natural obstacles – boulders, snags and other debris. If the pile does not go at all, then you will have to get it and carry it. But since the density of the soil will already be broken, it is recommended to indent at least three to four blade diameters.
Adjust the twisting height based on the chosen height of the plinth of the future gazebo. Better to be around half a meter. Keep in mind that you have almost no margin for error. Unscrewing the pile back is fraught with a violation of the strength of the soil.
Alignment
As a result, all piles must be brought to a single level. To do this, you need a tool of the same name. The most convenient and accurate option is a laser level. You can fix the marks with masking tape. Cut off the excess height with a grinder.
concreting
Do not spare your efforts, time and money and be sure to add strength to the foundation of the gazebo. Especially on shaky ground. To do this, the prepared solution must be poured into the trunk. Don’t forget to put a funnel in so you don’t spill it. If you work in the cold season, be sure to add anti-frost additives. They will not allow the mixture to expand excessively when frozen. And one more point “under the asterisk” – for those who want maximum strength. Before pouring, you can install reinforcement inside along the length of the pile. But for this you will need the poles themselves and a tool for sawing them.
Installation of the head
This is the name of the plug, which is installed on top of the pile. You need to put it after the mixture has solidified. When this happens, you should look at the package from the mixture.
Tiling and laying the floor
This is the connection of piles into a single base frame. You can make it with a wooden beam. It is necessary to fix it with anchor bolts through the holes in the base.
– It is better to take a beam with a section of 15 cm, then you can be calm and not count the number of people in the gazebo. Put logs on top – boards on which the floor will lie. They need to be attached by placing the end part on the base so that they do not bend. And on top you can put the floor itself. It is better to make it from larch. So it will be more durable. For everything else, you can use pine. But it’s better to treat both with an antiseptic for wood, ”said furniture designer in loft, urban, rustic style, founder of a carpentry workshopViktor Sharov.
Another option is to use a metal frame. Suitable for those who know how to work with welding.
– You can simply weld the metal frame of the future gazebo to these piles. All welding joints are then additionally cleaned and treated with protective agents against the occurrence of rust. This can be done with special paints or enamels, – shares Alexey Vorobyov.
The floor covering can be made of deck board, which has shown itself well during operation in open space and is not susceptible to decay.
Roofing
The installation of the roof begins with the device of the crate and the laying of a solid base. The crate is usually made of an inch board, 10-15 cm wide. The step of laying the board depends on the structure of the building frame and is usually 20-30 cm. Before laying, the crate is treated with special antiseptics to prevent it from rotting during operation. After mounting the crate, a solid base is laid on it from a moisture-resistant OSB board or plywood of the same composition.
When the solid base is mounted, then metal strips are installed around the perimeter of the structure in order to properly organize the drainage of water from the roofing. On the lower overhangs of the roof – cornice strips, and on the side – end. They are attached to the base with ruffed roofing nails with a wide hat and with a fastening step of 15 cm. The fastening is performed in a checkerboard pattern. This is necessary to create rigidity.
When the installation of the strips is completed, the laying of the material itself begins. More and more self-adhesive products are appearing in stores, which, within the framework of “self-building”, are more practical and do not require hiring specialized teams to perform work. With such materials you can handle yourself and at the same time save a lot.
Walls and cladding
When the roof is finished, the gazebo is completed by creating side partitions, the edges of which can also be made of metal or edged boards. Inexpensive plastic siding can be used as a cladding. However, there is not much aesthetics in it.
You can make a solid wooden base and lay stone or bituminous tiles. At the same time, for stone tiles, it is necessary to create a fixed, low-shrinkage base of DSP boards so that the tiles keep even and do not peel off. For bitumen, OSB is suitable, to which it is attached with nails.
expert Tips
“I don’t like going to the gazebo somewhere far away. Suddenly it rains, but you want to take hot tea with you? Therefore, I decided to make a gazebo in the garden, but with access to the kitchen – right into the house. Instead of a window, he cut an opening for a door. This is safer for the structure of the house than making a new hole in the wall. But the gazebo itself, so that there was no threshold, had to be raised one and a half meters from the ground. This is good for the gazebo, less dampness and under it it was possible to organize a small warehouse of garden utensils. And the whole plus of the gazebo next to the house is that you can use the roof of the house as the roof of the gazebo. This will save time and materials. Such a gazebo can be assembled together in one day, – says Viktor Sharov.
– If we are talking about a place of rest, say, for reading books or daytime sleep, then materials made of metal and wood are suitable for the frame. If the gazebo will be used as, for example, a summer kitchen, then it is necessary to consider materials made of brick and stone. They are non-combustible, the frame of them is more durable. In addition, a stove made of stone fits nicely into structures made of similar materials, rather than into a metal frame, notes Alexey Vorobyov.
Here are some more tips that will come in handy for those who decide to build a gazebo.
Popular questions and answers
What can you save when building a gazebo?
Order a typical gazebo. It’s like a constructor, which was kindly carved in the workshop. You just have to assemble it with your own hands.
Cut down on materials. To do this, you will have to reduce the area.
Choose cheaper materials. For example, instead of WPC (this is such an expensive and beautiful composite that is laid on the floor), replace it with larch or pine, as in our guide. The roof can be made gable, not four-slope.
Avoid glazing. This is one of the most expensive parts of the project.
Make furniture for the gazebo with your own hands or bring old benches and a table.
For those keen on crop production, you can save money and make a living gazebo. You only need to assemble the foundation and frame. From above, you can start up climbing plants, for example, a vine. Ideal for those who use the gazebo only in the warm season. But you have to care for and cultivate bindweed.