


Contents
The snow blower is more in demand by residents of regions where there is a large amount of rainfall. Factory-made units are expensive, so most craftsmen make them themselves. There is a wide variety of designs for such homemade products. The most common mechanisms are of the screw type. However, the home-made rotary snow blower is no less popular, in which the snow is captured by the fan blades.
Varieties of rotary snow blowers
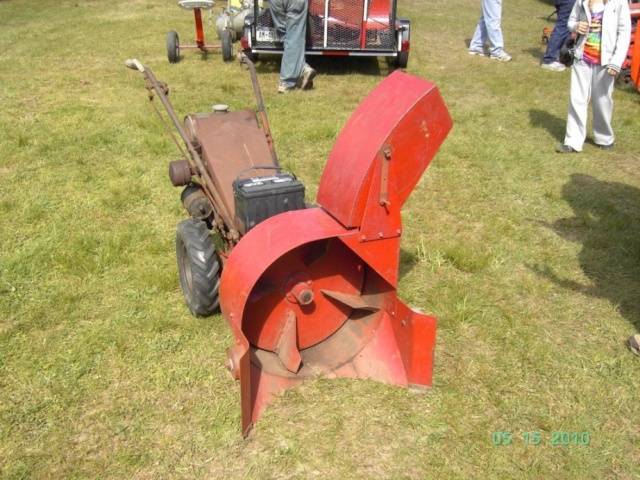
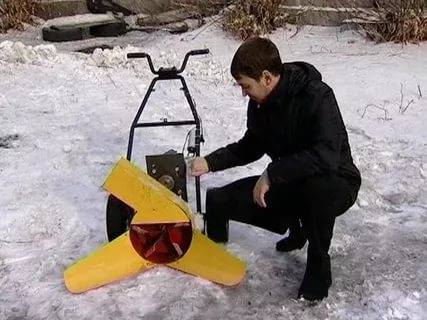
The rotary snow blower is quite simple. The unit consists of a round body – a snail. Above is a sleeve for ejection of snow. Guide vanes are welded to the front of the body. Inside the snail of the snow blower, the rotor rotates at high speeds. It consists of an impeller mounted on a shaft with bearings. The engine drives the mechanism. When the snow blower rotor begins to rotate, the impeller blades capture the snow, grind it inside the snail, and then throw it a few meters to the side through the sleeve.
Homemade rotary snow thrower can be made of two types:
- With a permanently installed motor. In this case, the snow blower works like a full-fledged machine.
- As a hitch for other equipment. The engine is not installed on such rotary homemade products. The snow blower is attached to a walk-behind tractor or a mini-tractor. The drive is carried out through a belt or chain drive.
Rotary snow blowers differ by engine type:
- Electric rotary models operate almost silently. They are easier to maintain and do not require consumables. The inconvenience is the cable constantly dragging behind the snow blower. You can give preference to the battery model, but the operating time of such a unit is very limited. All electric snow blowers are low power. They are usually used in cottages and private yards to clear paths from freshly fallen loose snow.
- Petrol rotary models are much more powerful than electric snow blowers. Their only drawback is the more complex maintenance of the engine, regular refueling of fuel and lubricants and the presence of exhaust gases. However, the petrol snow blower is not tied to an outlet. The power of the motor allows the production of a rotary mechanism of large dimensions. Such a rotary unit has an increased working width, is able to cope with thick snow cover and even snowdrifts.
By the type of movement, rotary snow blowers are:
- Non-self-propelled units move by pushing them by the operator. Electric snow blowers usually belong to this category, but there are also low-power gasoline models. The technique needs to be nudged slightly. Due to the capturing of the cover by the impeller, the snow blower itself will gradually move forward.
- Self-propelled cars most often run on a gasoline engine. The snow blower itself rides on wheels. The operator only gives him direction.
It is also reasonable to refer the rotary snow plow hitch to self-propelled equipment, although it does not even have a stationary drive. However, you do not need to push it with your hands. The hitch will move with the walk-behind tractor or mini-tractor.
Rotary snow blower drawings
Blueprints are required to properly assemble snow removal equipment. In the photo, we suggest that you familiarize yourself with the device of the simplest rotary snow blower.
The following diagram is more suitable for owners of a mini-tractor. The fact is that it is unreasonable to attach a rotary hitch to such a powerful technique. Most often, a combined mechanism is made for a mini-tractor. The hitch consists of an auger and a rotor. Such a snow blower will cope with large snow drifts.
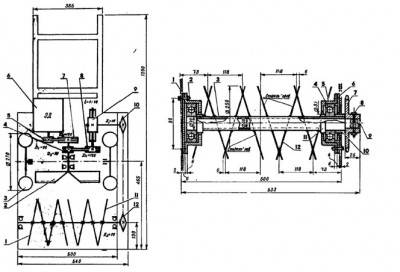
In the combined snow blower, the snow is processed in two stages. The auger captures and grinds the cover, and the rotor mixes the loose mass with air and throws it out through the sleeve under strong pressure.
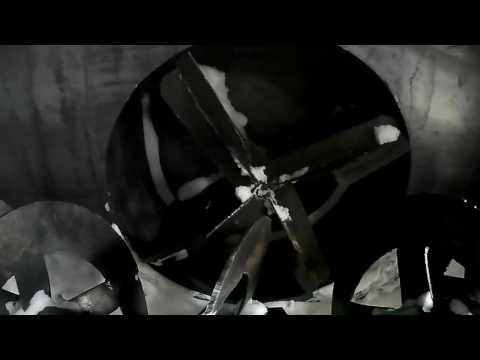
The principle of operation of the auger snowplow is presented in the video:
Self-made rotary snow blower
The process of making a rotary snow blower with your own hands can be conditionally divided into the following steps:
- frame assembly;
- manufacturing of a rotary mechanism;
- casing welding – snails.
If the snow-clearing structure is not a hinge for other equipment, then the craftsman has one more action – the installation of the motor.
When determining the size of a rotary snow blower, it is optimal to stop at such parameters as to obtain a grip width in the range of 48–50 cm. The design of the snow blower will turn out to be not bulky, but productive. With such a snow blower, you can quickly clear the territory adjacent to the house, the yard and paths in the garden.
Assembling the snow blower frame
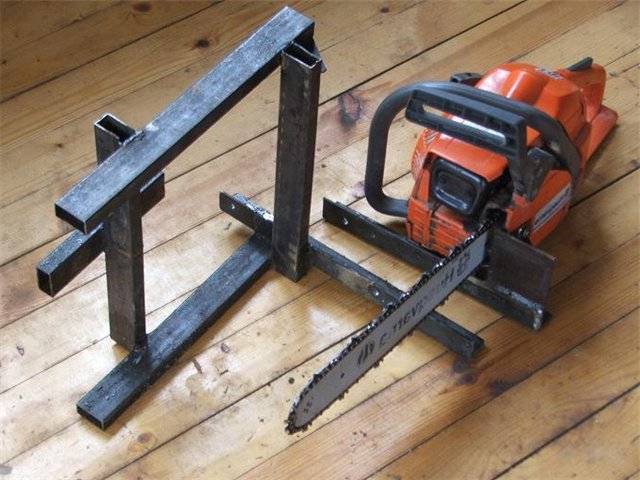
The frame serves as the base for the snow blower. All working bodies are fixed on it. In general terms, the snow blower frame is a rectangular structure welded from corners and a profile. It is not possible to give clear instructions for its manufacture, because everything will depend on the spare parts used. Let’s say the motor can be taken from a chainsaw, a cultivator, or, in general, put an electric motor. For each unit, you will have to individually come up with a mount. If the rotary snowplow will be used as a hitch on a walk-behind tractor, then the motor will not be installed. This means that the frame is made shorter so that there is enough space to fix only the rotor with the volute.
If the rotary machine is self-propelled, then a wheel pair mount is provided on the frame. A non-self-propelled snowplow is easier to put on skis. To do this, fasteners are welded from below the frame, and wooden skids are fixed to them.
Snow blower rotor assembly
The most complex part of a snow blower is the rotor. The main requirement is for the impeller. It can have from two to five blades. But that’s not the point. Their number depends on personal preference. The main thing is that each blade has the same mass. Otherwise, there will be an imbalance. During the rotation of an unbalanced impeller, the snow blower will throw up in place from strong vibration.
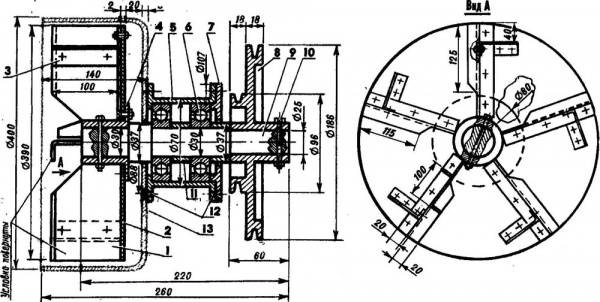
If it is not possible to order the manufacture of a snow blower rotor, all work will have to be done independently. The drawing provided can be used as a guide.
The process of self-manufacturing of the rotor consists of the following steps:
- First you need to find the shaft. The impeller and bearings will be fixed on it. This part will have to be turned only on a lathe. There is no other way out, unless the farm has a suitable shaft from other equipment. It should be taken into account that in a home-made snow blower rotor there will definitely be at least a small imbalance. It is better to choose a shaft in thickness for large bearings. They will be less broken by vibration.
- The rotor impeller is made of metal 2–3 mm thick. First, a circle of the required diameter is drawn on the sheet. Usually stick to a size of 29–32 cm. The workpiece is cut out with a grinder or a jigsaw. It is undesirable to use welding, as the metal will lead from heating. The cut disc is processed on a grinder and a file so that a perfectly even circle is obtained.
- Strictly in the center on the disk, a hole is drilled along the diameter of the shaft. The axis can simply be welded to the workpiece, but then the rotor will turn out to be non-separable. This will make it difficult to repair in the future. It is reasonable to cut the thread on the axis and clamp the disk with nuts.
- Now it’s time to make the blades themselves. They are cut from the same metal. You should get perfectly identical blanks. It is advisable to weigh each blade. The smaller the difference in grams, the weaker the vibration of the snow blower from imbalance will be felt. Finished blades from the center of the disk to its edge are fixed at the same distance from each other.
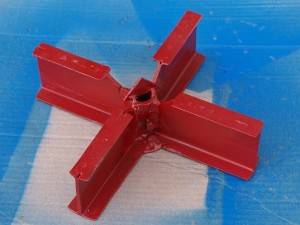
On this, the blanks for the snow blower rotor are ready. Now it remains to put two bearings on the shaft. They need a hub. It can be made from a piece of pipe of the appropriate diameter. Four lugs are welded on the hub. You can simply fix the finished flange with holes. With this place, the hub will be fixed to the back wall of the cochlea.
Making a snail
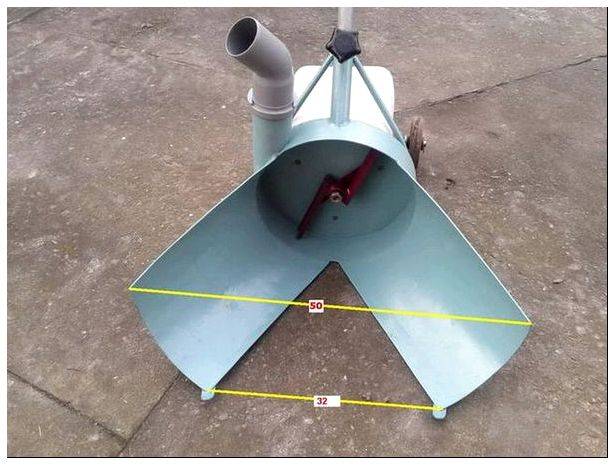
The shape of the casing of a rotary snow blower is a bit like a snail, which is why it was called that. To make it, you need a piece of pipe of a suitable diameter, 15–20 cm long. One side of the ring is tightly welded with a sheet of metal. This will be the back wall of the snail, to which the hub of the rotor bearings is attached. Two guide vanes are welded to the front of the ring on the sides.
A hole is cut in the upper part of the ring and a branch pipe for the sleeve is welded. The front part of the snail must be closed by 1/3 so that the snow does not fly in front of the rotor, but is discharged through the sleeve. It is better to make the plug removable on studs. This design will allow you to conveniently get to the impeller.
Now it remains to fix the rotor inside the casing. To do this, a hole for the shaft is drilled in the center of the back wall of the snail. The rotor is put in its place, firmly pressing the bearing hub to the casing. On the eyes of the flange mark the location of the mounting holes. The rotor is removed from the casing, drilling is performed, after which the mechanism is put in place and the hub is bolted to the rear wall of the snail.
So, inside the round case, a protruding rotor shaft turned out. An impeller is placed on it and carefully tightened with nuts. On the outside of the snail, there was a hub with bearings and the second protruding end of the shaft. A belt drive pulley is mounted on it. If preference is given to a chain drive, an asterisk from a moped is attached instead of a pulley.
The finished rotary mechanism is installed on the frame, after which they proceed to the further configuration of the snow blower, depending on the model chosen. That is, they put the motor or connect the hitch to the walk-behind tractor and equip the drive.
Conclusion
The advantage of a rotary homemade product is the ability to manufacture a snowplow with the required working width, as well as significant cost savings.