


Contents
So, you have created a workbook in Excel full of data. It is clearly organized, the information is up-to-date, the formatting is exactly as intended. You decided to print a paper version of this table… and everything went wrong.
Excel spreadsheets don’t always look great on paper because they’re not designed to fit the printed page. They are designed to be as long and as wide as required. This is great for editing and viewing on screen, but it’s difficult to print documents because the data doesn’t always fit perfectly on a standard paper sheet.
All these difficulties do not mean that it is impossible to make an Excel spreadsheet look good on paper. Actually, it’s not difficult at all. The following 5 tricks for printing in Excel will help you solve this problem. They should all work the same in Excel 2007, 2010, and 2013.
1. Preview the page before printing
With a tool Print Preview (Preview) You can see exactly how the table will look on the printed page. In terms of saving time and paper, Print Preview (Preview) is your main printing tool. You can even make some adjustments, such as dragging the print borders to make them wider or narrower. Use this tool after adjusting your print and layout options to make sure your spreadsheet looks the way you want it to.
2. Decide what should be printed
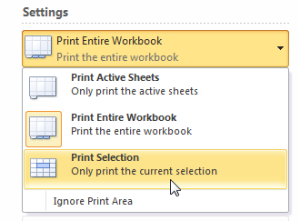
If you only need a small part of the data, don’t print the entire workbook – print the selected data. You can print only the sheet that you are currently viewing by choosing in the print settings Print Active Sheets (Print active sheets), or select Print Entire Workbook (Print Entire Book) to print the entire file. In addition, you can print a small portion of your data by highlighting the desired area and selecting Print Selection (Print selection) in print settings.
3. Maximize available space
You are limited by the size of the sheet of paper you print on, but there are ways to get the most out of its area. Try changing the page orientation. The default orientation is good for data where there are more rows than columns. If your table is wider than it is tall, change the page orientation to landscape (landscape). Still need more space? You can change the width of the borders around the edges of the page. The smaller they are, the more space is left for data. In the end, if your table is not too big, try playing with the tool Custom Scaling Options (Scale) to fit all rows or all columns, or risk fitting the entire table onto one printed sheet of paper.
4. Use headline printing
If the table spans more than one page, then it becomes difficult to understand what specific data refers to, since Excel only prints column headings on the 1st sheet by default. Team Print Titles (Print Headers) allows you to print row or column headings on each page, making the data much easier to read.
5. Use page breaks
If the table spans more than one sheet of paper, we recommend using page breaks to determine exactly what data will fall on each sheet. When you insert a page break, everything below the break is separated from everything above the break and goes to the next page. This is convenient, because You can split the data exactly the way you want.
By using these tricks, you can make your spreadsheets easier to read. You will find more details about the techniques described above in the lessons of our tutorial:
- Print panel in Microsoft Excel
- Set the print area in Excel
- Setting margins and scale when printing in Excel