


Contents
Microsoft Word can automatically create a backup copy of a document every time you save it. In addition, you can configure Word to automatically save a document at specified intervals using AutoSave. In the future, you can use these automatically saved files to restore your changes in case they are lost.
Turn on autosave
To enable autosave, click the tab File (Queue).

In the menu on the left, click Parameters (Options).

On the left side of the dialog box Word options (Word Options) click Preservation (Save).

Check the box for the option Autosave every (Save AutoRecover Information every). The minutes entry field will become active. Enter a value for the time interval (in minutes) between automatic saves of the edited document.

To change the location of autosaved files, click the button Review (Browse) to the right of the input field AutoRecovery Data Directory (AutoRecover file location).

In the dialog box Change location (Modify Location) open the folder where you want to automatically save files and click OK.

In the dialog box Word options (Word Options), also click OKto close it too.

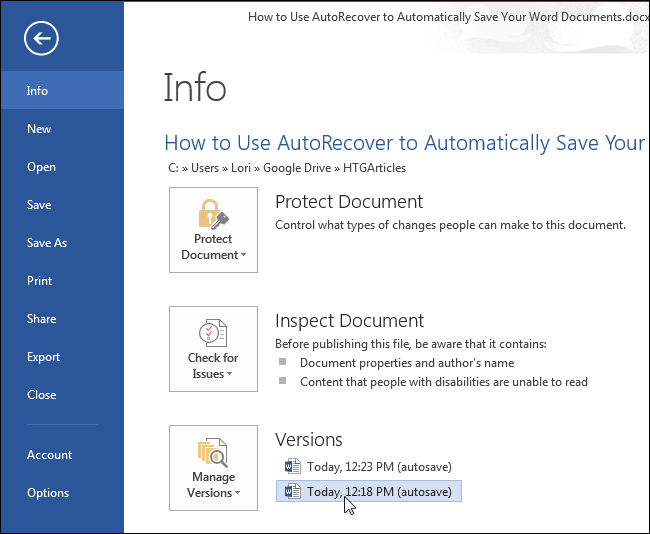
After Word automatically saves the document, in the window Intelligence (Info) under heading Versions (Versions) You will be able to see a list of autosaved versions of your document that were automatically created at the time interval you specified.
Note: Previously created autosave files are available even after you save your document manually during the same Word session. However, if you close and reopen the document, all autosave files for it will become unavailable.
Restoring changes made to an existing document
To restore the last changes you made but forgot to save, open the document and go to the tab File (File). In the window Intelligence (Info) under heading Versions (Versions) contains a list of files that were closed without saving or automatically saved using AutoSave.
Autosave only applies to files that have already been saved at least once.

The unsaved version of the file opens in read-only mode, with a message at the top of the window stating that this is a temporary recovered document. To fully restore this version of the file, click on the yellow bar Reestablish (Restore).

A message will appear warning you that you are about to overwrite the last saved version of the file with the version you selected. If you are sure you want to do this, then click OK.

After restoring the selected version, Word remains in read-only mode. To switch to the usual editing mode, press Edit Document (Edit Document) tab View (View).

Restoring a New Unsaved Document
It’s one thing to recover some lost changes made to an existing document. But what if you created a new document, added a large amount of information to it, and suddenly an error occurred in the program or the electricity was turned off before you remembered that the document needed to be saved? There is a way to recover unsaved documents.
To restore an unsaved document, open the tab File (File) while in the window of another document, and in the menu on the left, click Open (Open).
Note: If you started Word without opening an existing one or creating a new document, then click Ctrl + Awhile on the Home screen. A window will open Intelligence (Info) and the item will become available. Open (Open).

Scroll the list Latest Documents (Recent Documents) to the very bottom and click Recover unsaved documents (Recover Unsaved Documents).

Note: You will also find this command in the dropdown list. Versioning (Manage Versions) windows Intelligence (Info).

A dialog box will appear Opening a document (Open) with open folder UnsavedFiles, which will show all unsaved documents available for recovery. Select the desired file and click Open (Open).
Note: The names of the files available for recovery are sets of numbers, so it is rather difficult to find out which one is the document that needs to be recovered. You may be able to find the desired file by the date and time of creation.

The selected file will open in read-only mode, and a yellow box will appear at the top of the window stating that this is a temporary restored file. To save this file, click Save as (Save As) on the yellow bar.

In the dialog box Saving a document (Save As) open the folder where you want to save the recovered file, and in the field Filename (File name) Enter a name for the document. Click Save (Save).

After the recovered document is saved, Word will still remain in read-only mode. To switch to the usual editing mode, press Edit Document (Edit Document) tab View (View).

If you regularly save documents manually, then you probably don’t need to enable AutoSave. If you tend to forget about saving your work, then one day it may save you.