


Contents
There are many useful features to make your work easier in Excel. Often, working with tables and entering a large amount of data manually takes time and effort. It is to simplify this task that Excel software developers have introduced the “Autocomplete Cells” function. With its help, you can automate the process of entering data into tables and make sure that the system automatically substitutes the necessary data and speeds up the process of work and complex calculations.
How autocomplete works
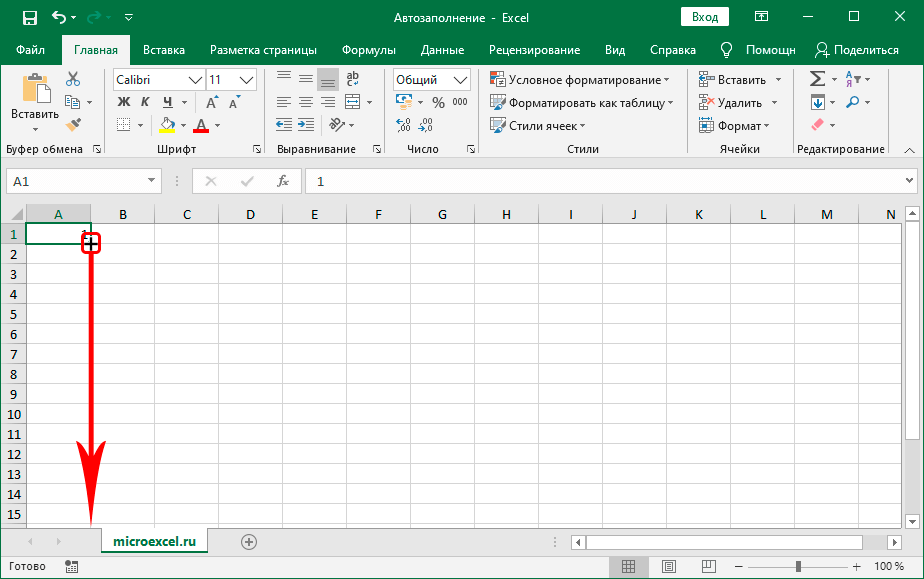
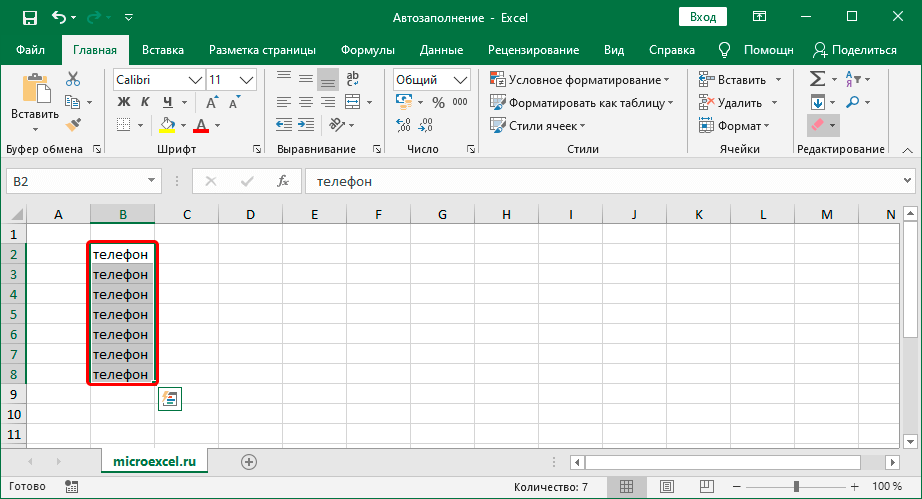
If you need to autofill cells while working, you need to use the Fill Marker. To use this function, follow the following algorithm:
- Select the desired cell (which will start autocomplete) and move the cursor to its lower right corner.
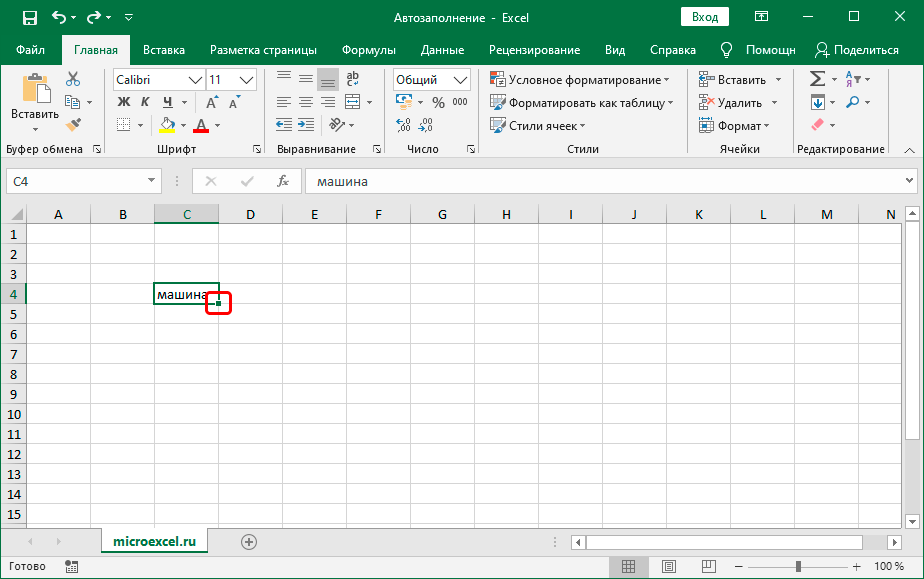
- Wait for the black plus sign to appear (this is the “fill marker”). Hold the left mouse button on it and drag it down (or up, right or left – depending on which direction you need to fill).
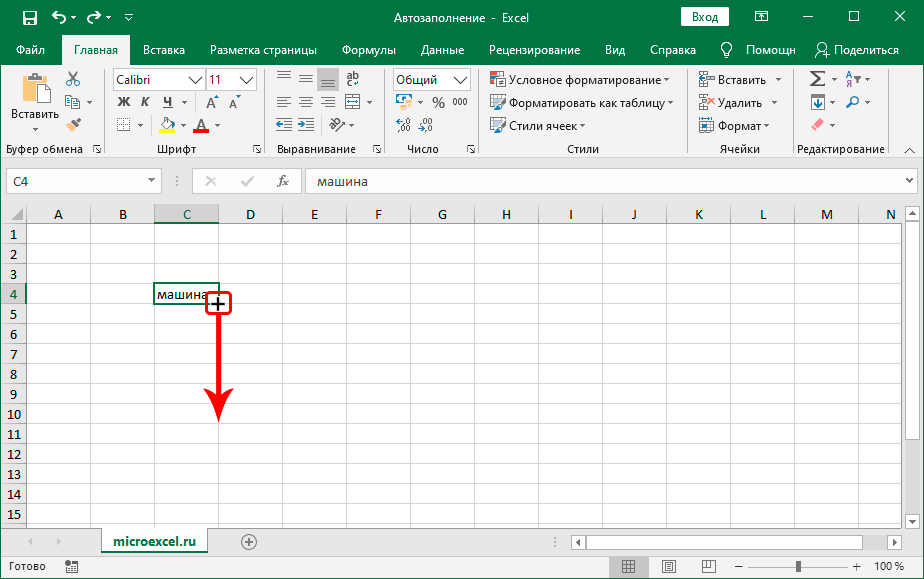
- Drag the plus sign to the cell that will be the last one for autocompletion and release the mouse button.
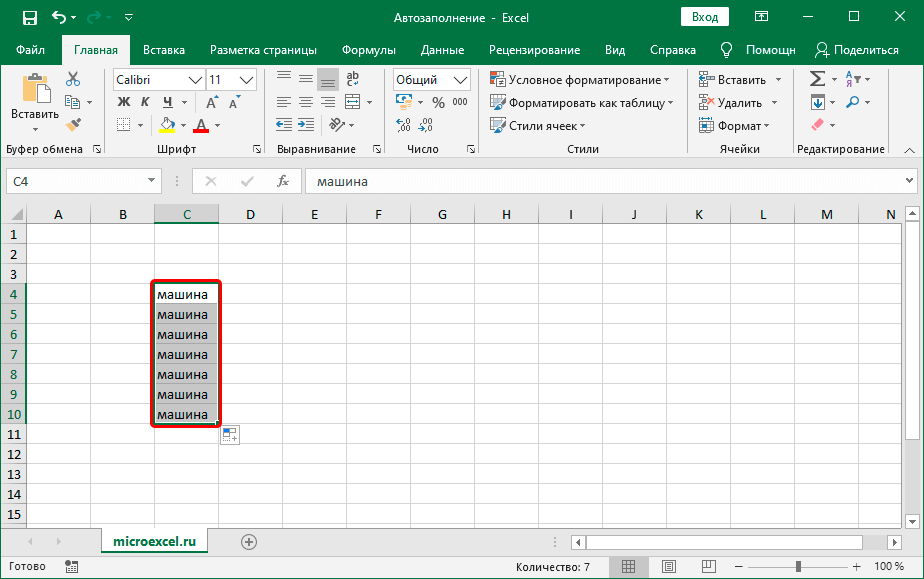
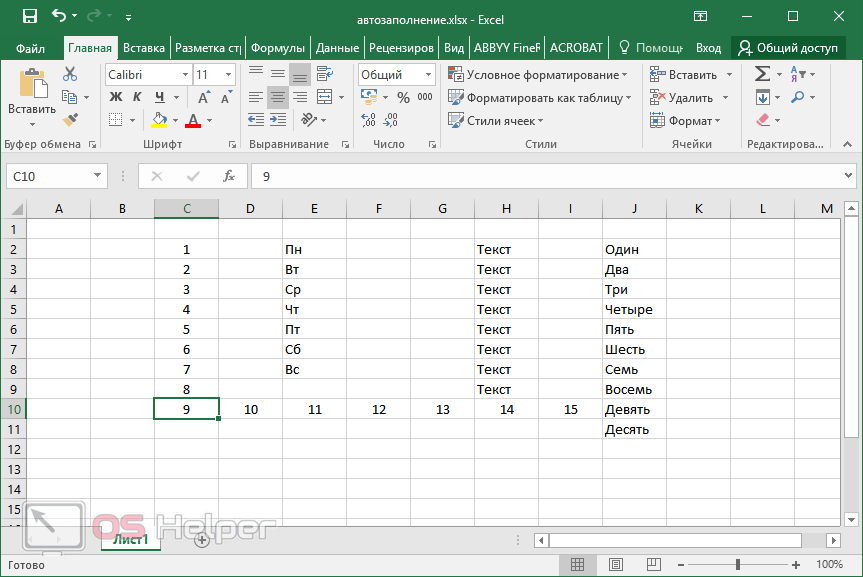
Autofilling cells with the “Fill Marker” varies depending on the data. In our example, there is text that has been copied to other cells. If you substitute numbers instead of text and select “Start the process” – all cells will be numbered in order.
Automatic filling with numbers
Using the “Marker” method to fill the table with numbers, you can automatically achieve the placement of consecutive numbers in the desired cells. Let’s use this function using the numbers from 1 to 25 as an example. Instead of manually placing 25 digits, use the following method:
- In the first cell, enter the number 1 and click on the cross in the lower right corner of the cell, dragging it down to line 25.
- Release the mouse button. After filling in, the number 1 is automatically set in all cells. An icon appeared to the right of the cell, click on it and select “Fill” from the drop-down list.
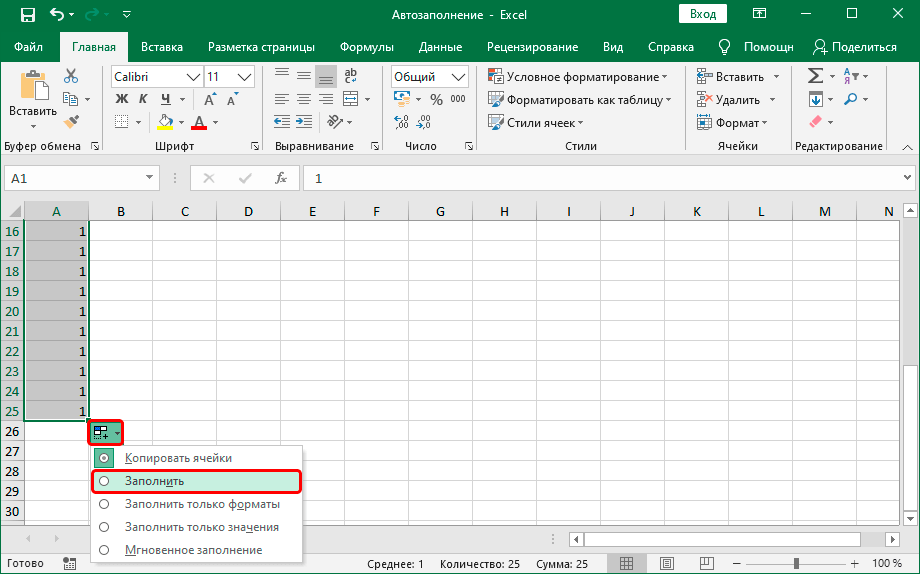
- In this simple way, you can quickly fill cells in Excel with the numbers you need, which can save a lot of time.

Using the “Fill” function
To use “Autofill” you can also resort to the special “Fill” function. To do this, follow the following instructions:
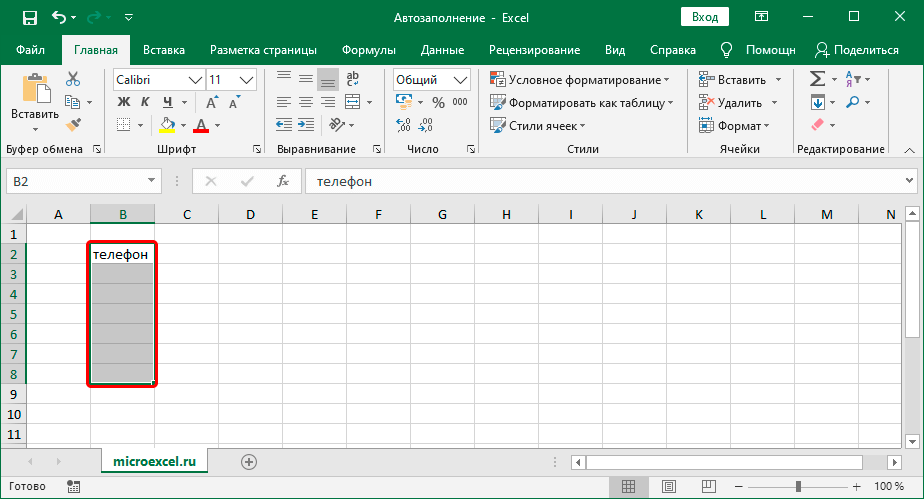
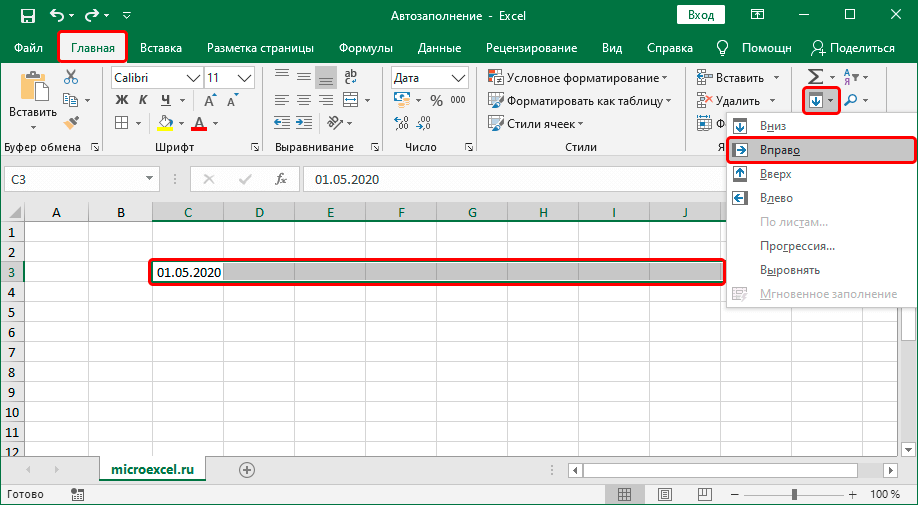
- Enter the information you need in a specific cell and select the area of cells that you need by holding the left mouse button.
- On the Home tab, go to the tool group and select Editing. Click on the down arrow button (this is the Fill tool).
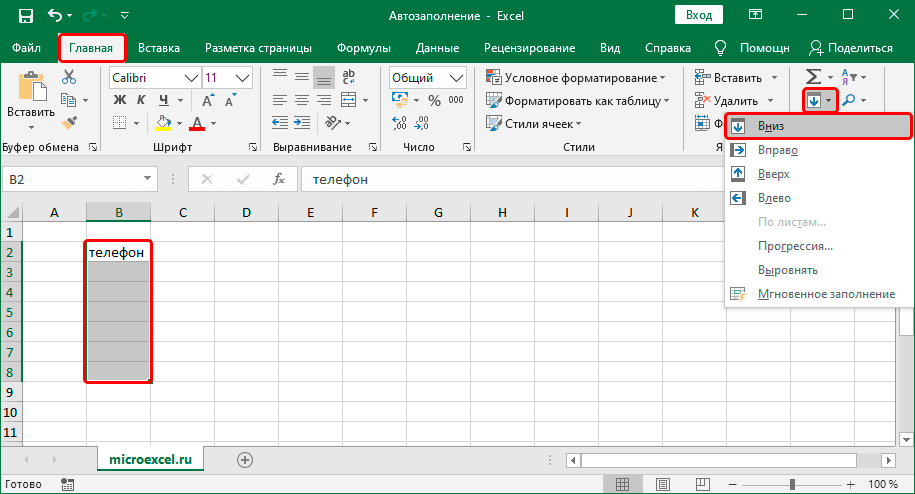
- Thus, it is also possible to use autocomplete in Excel tables, this is an alternative way to the one indicated earlier.
Autocomplete cells with formulas/functions
If you are a more advanced user, you can use another, also common option to enter and arrange data automatically. This option allows you to fill cells with formulas. In this case, relative and absolute links that are in a particular cell are taken into account.
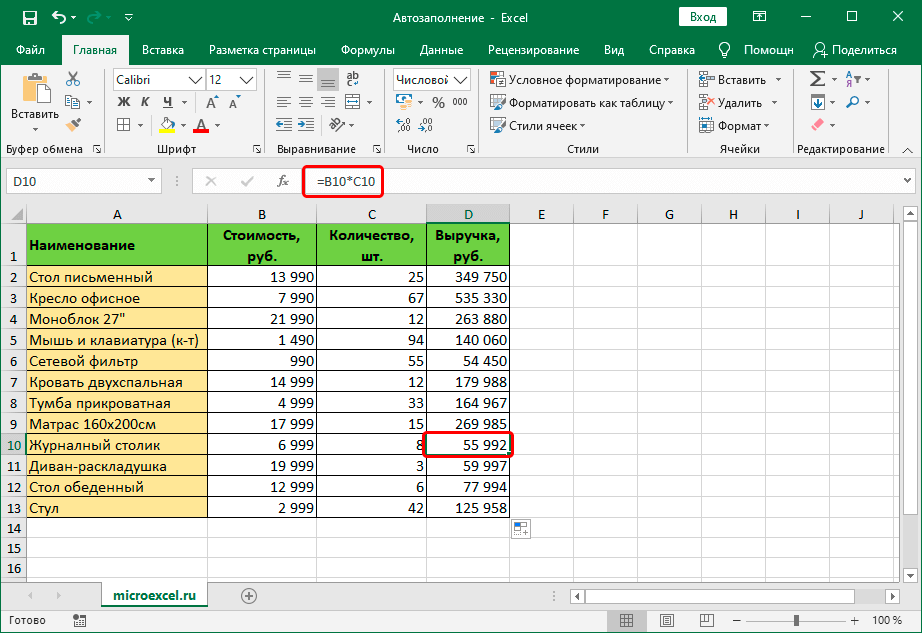
For example, you have your own store or you are a hired accountant. You are faced with the task of calculating the revenue for certain products, while you have the cost of each item and their sale. You can calculate the total as follows:
- Enter the following combination in the formula bar =B2*C2 (the product of the price and the number of units sold).
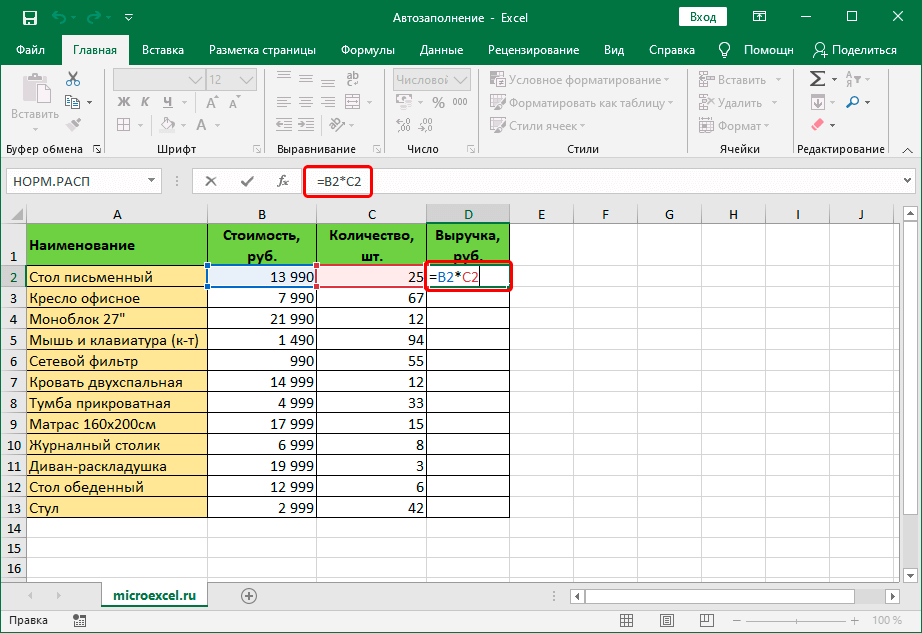
- After entering the formula, press Enter. The result of multiplication appeared in the “Revenue” field. Now, in the lower right corner of this cell, hold the cross with the left mouse button and drag it down to all the necessary lines.
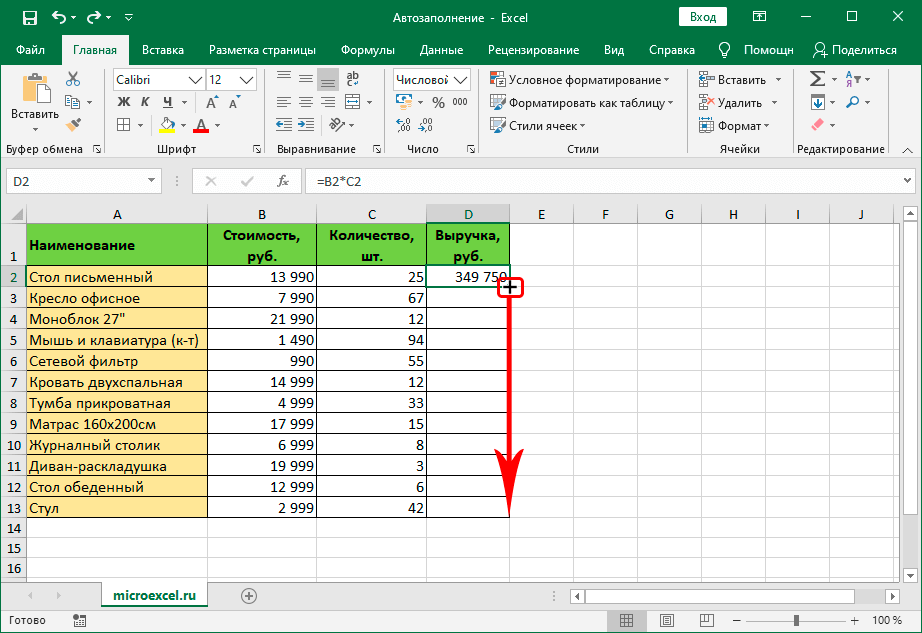
- The table has an autocomplete result for all cells, and you can see the total revenue for each position.
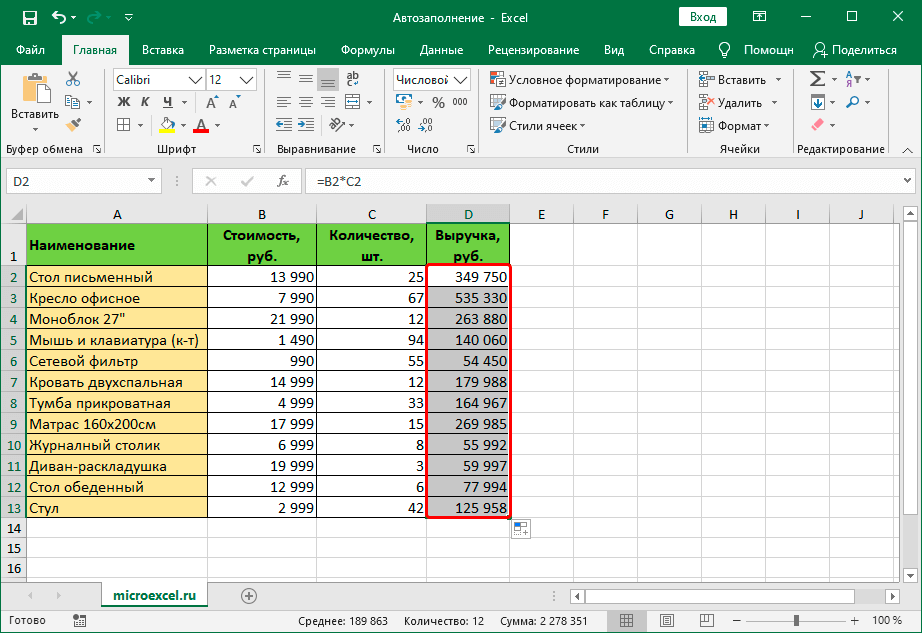
- If you click on an arbitrary cell, it will become clear that the program has automatically inserted the correct formula for each product separately.
Pay attention! All formulas in Excel must begin with an equal sign; without it, the formula becomes just text with no further action.
Autofill in Excel from list of data
When working with entering a lot of data, it often becomes necessary to enter not only numbers or days, but also other data that is not in the standard lists. For example, you need to enter the names of several dozen cities in a certain order, the name of various goods or names.
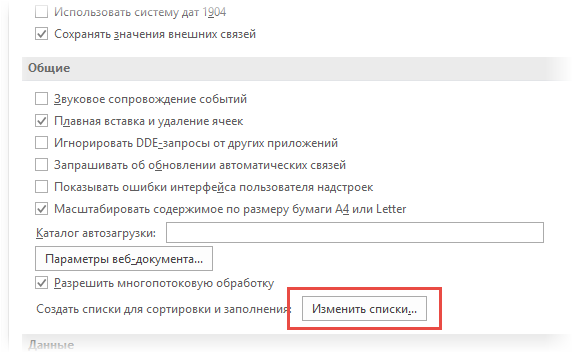
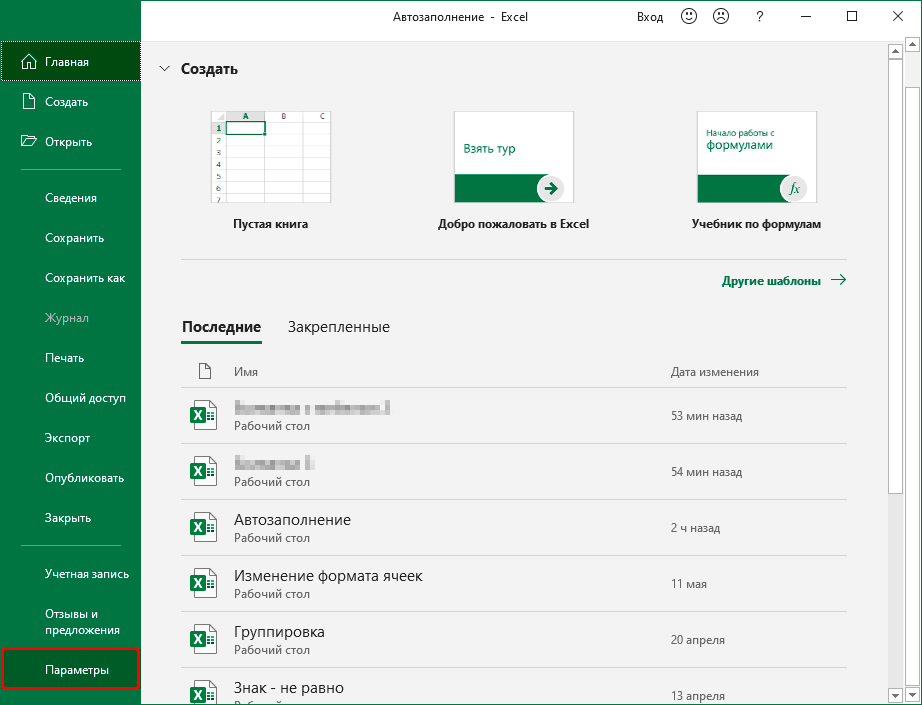
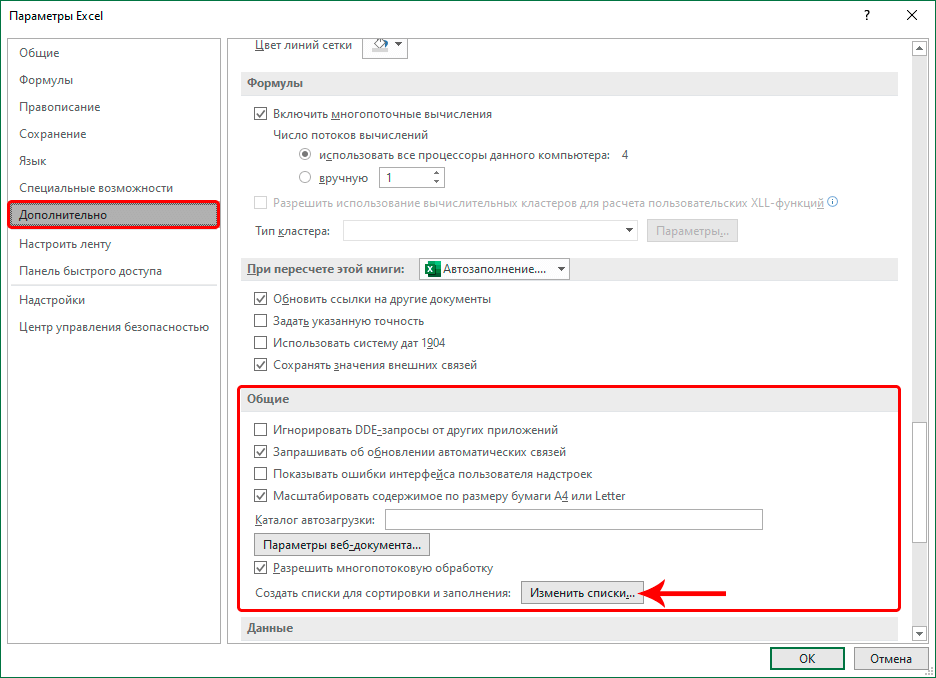
- To automatically enter such data, you first need to create a list with the names of cities (or other data) in the order you need. To do this, go to the “File” tab, then to the “Options” section, from there go to the “Advanced” tab and select the “General” section, click “Edit Lists”.
- You see already created lists, this is a standard set, which is not always sufficient for productive work.
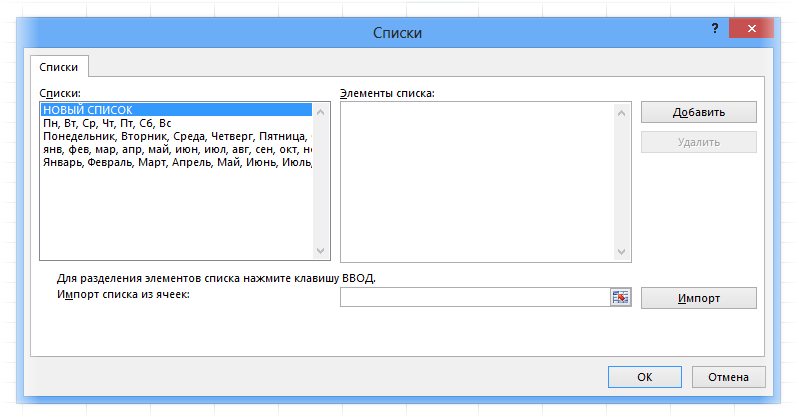
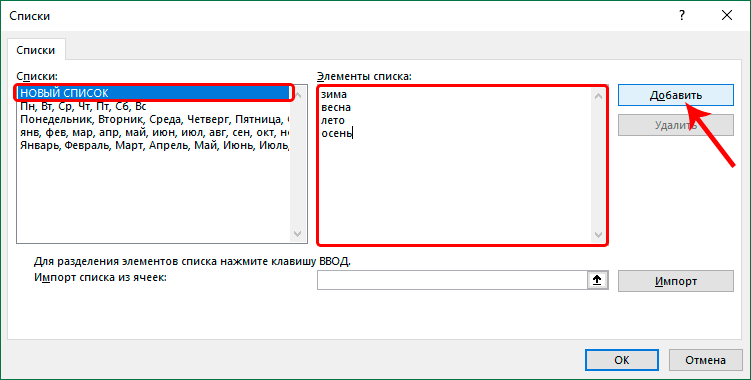
- If none suits you, create your own. In the “List Items” field, you can manually enter the data you need for the new list (in the example, the names of cities). If there is a lot of data, first create a separate sheet in Excel with this data and copy the link to the created sheet with data, and then paste it into the “Import” field.

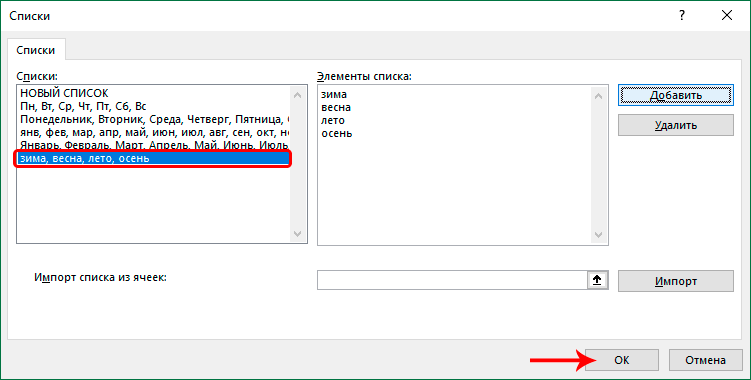
- Click OK. Your list has been created and saved. Return to worksheet. Now you can quickly fill in the cells with the required data from the new list.
Autofill dates with mouse
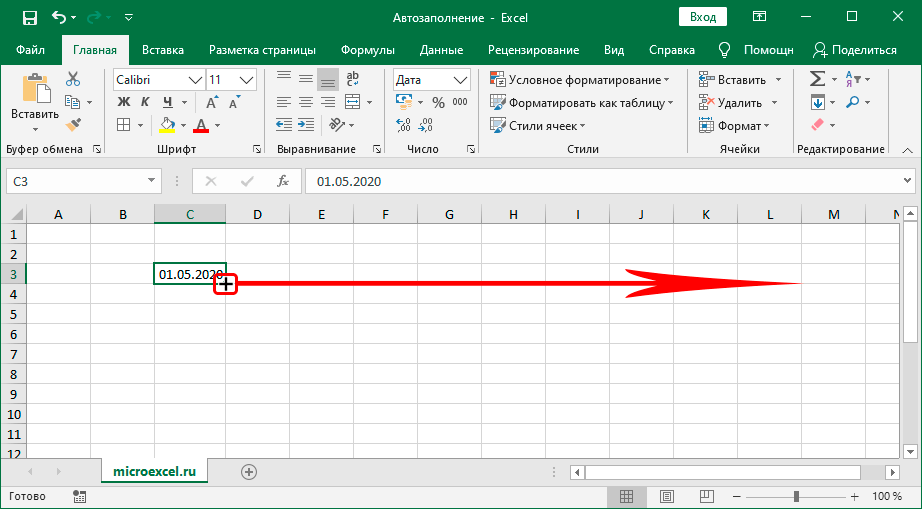
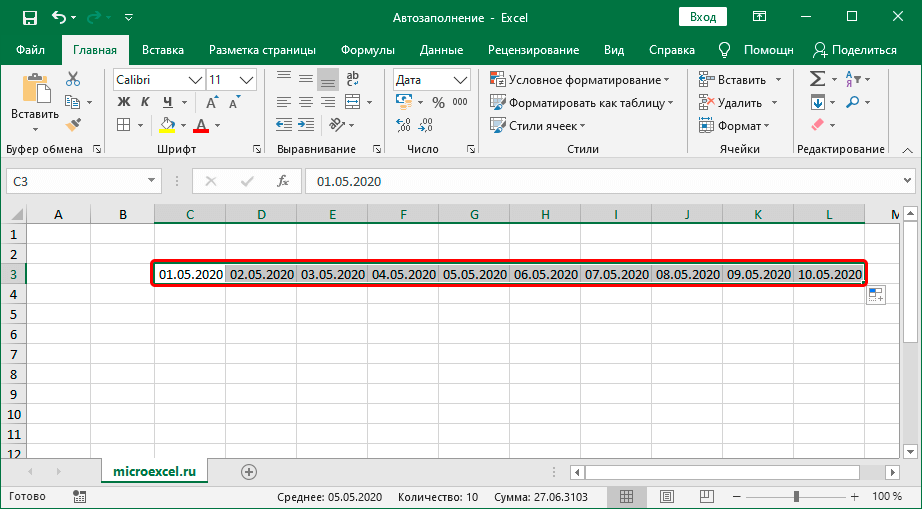
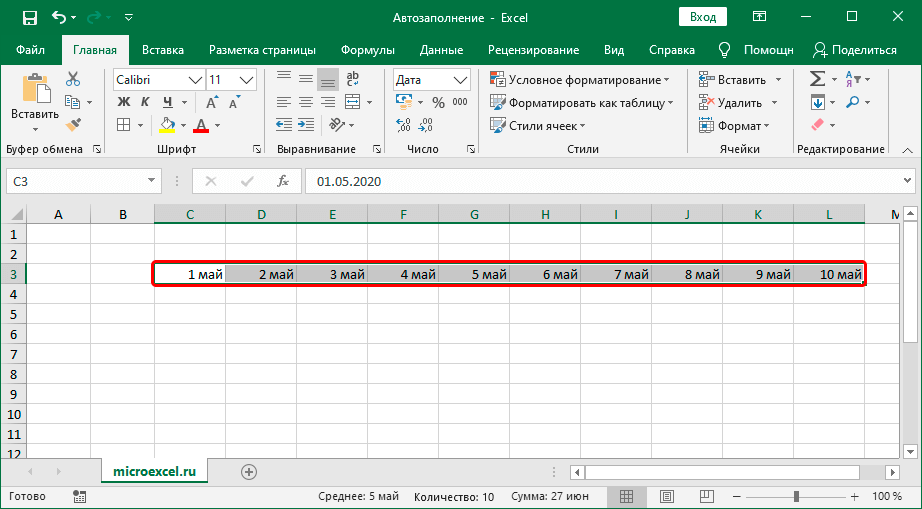
If you need to extend the list of dates, use the following hint:
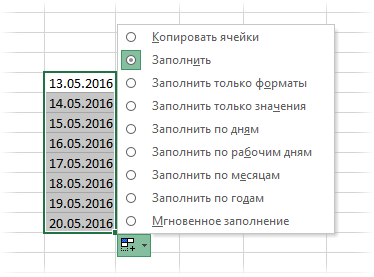
- Enter the date you want in the cell.
- Click on a cell.
- In the lower right corner, hold down the left mouse button and drag in the required direction for the required number of cells. You will see a list on the side, select the “Fill” option in it.
- If you need to schedule payments that come in on the 15th and last of each month, select the cell with the numbers 15 and 31 and drag it down.
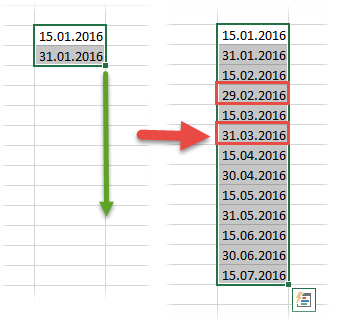
At the same time, the number 15 remains unchanged, and the number 31 changes automatically depending on the number of days in each particular month.
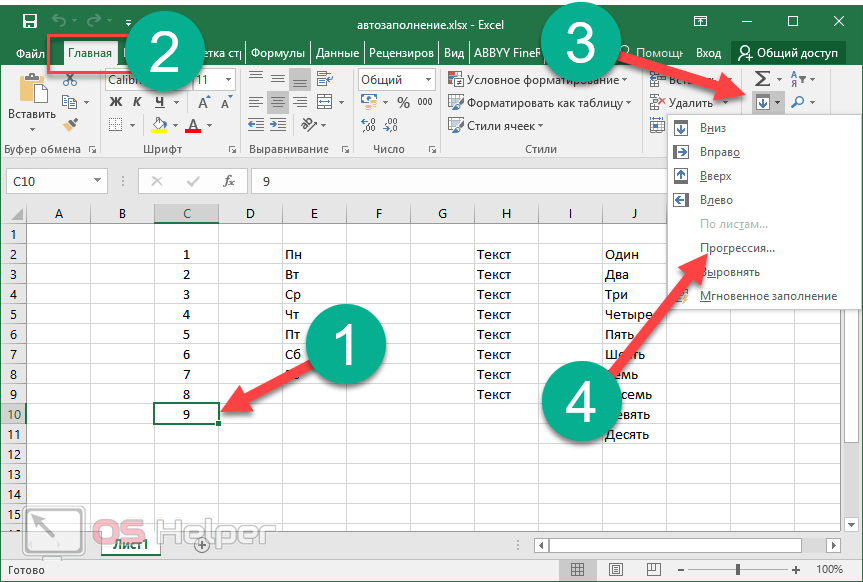
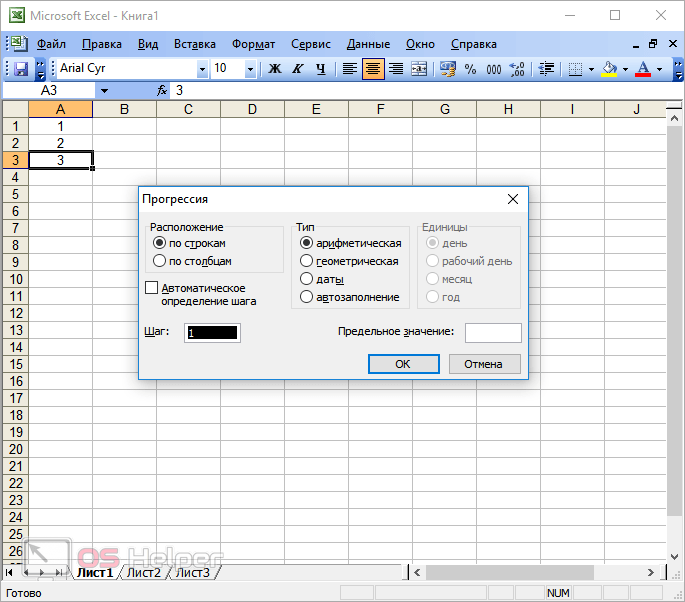
Using progression
If there is no time or desire to manually transfer the contents of cells, you can use a special function for this – progression. To use it, follow the instructions below:
- Select the cell you need (for example, take the cell with the number 9).
- Go to the “Home” tab.
- Click on the “Fill” icon (down arrow icon).
- From the drop-down list, select the “Progression” option.
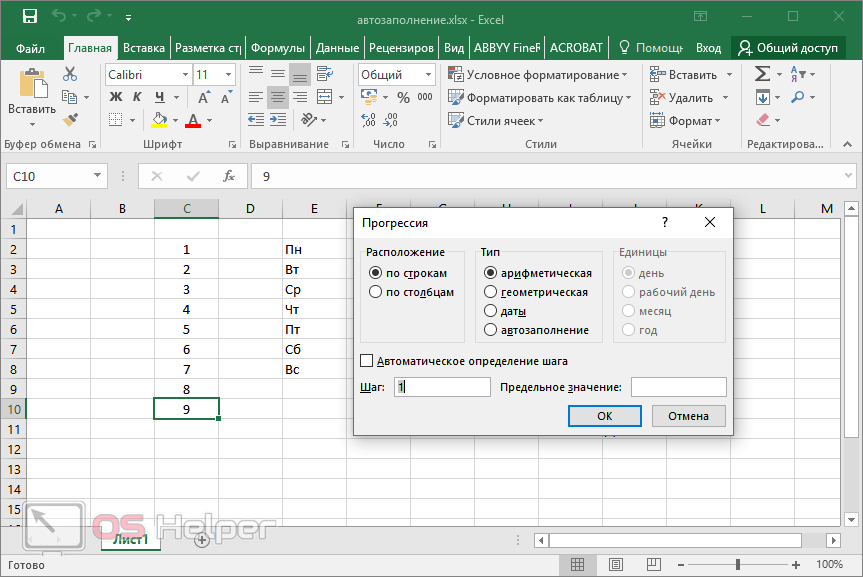
- You can customize: the location of the fill, the type of progression, the increment for new numbers, and the maximum value.
- For example, we will specify the number 15 as the limit value. Click OK.
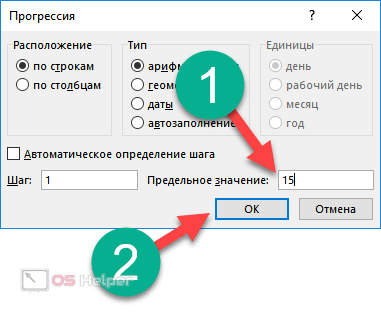
- Having done all the above manipulations, you get the following result:
Other types of autocomplete
Excel is a practical and useful program that allows you to fill in order not only numbers, but also other similar data. The algorithm of actions is the same as described above.
Entering dates
- Enter the date you need in the cell and move the “fill marker” in the direction you need – down, up, left or right (for example, move it to the right).
- The dates in the table are automatically entered in a row.
- The same result is obtained when using the “Fill” option instead of using a marker.
Important! The format of the cells can be changed depending on our goals.
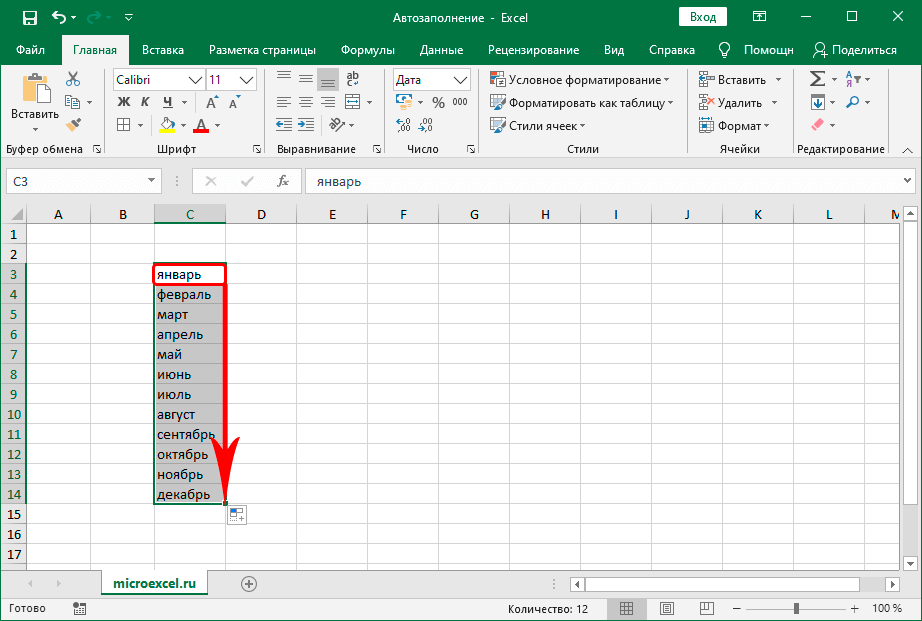
Using the same functions, you can automatically enter the days of the week or months in the desired cells.
Create your own lists
If during the work it turned out that the option you need to automatically fill in the data is not in the program, you can create the one that suits you yourself. Follow the instructions below for this:
- Go to the “File” menu.
- From the listed list, select Options.
- All available options are open to you. Go to the “Advanced” tab and then to the “General” group. Select the Edit Lists option.
- You are presented with all existing standard lists. Select the “New List” option and start entering the data you need in the “List Items” field. When all values are entered, click “Add”.
- The list you created will now be displayed in the list of standard lists and will be ready for use. Exit the Options menu.
- In the cell you need, enter any word from the newly created list and use the Fill Marker function.
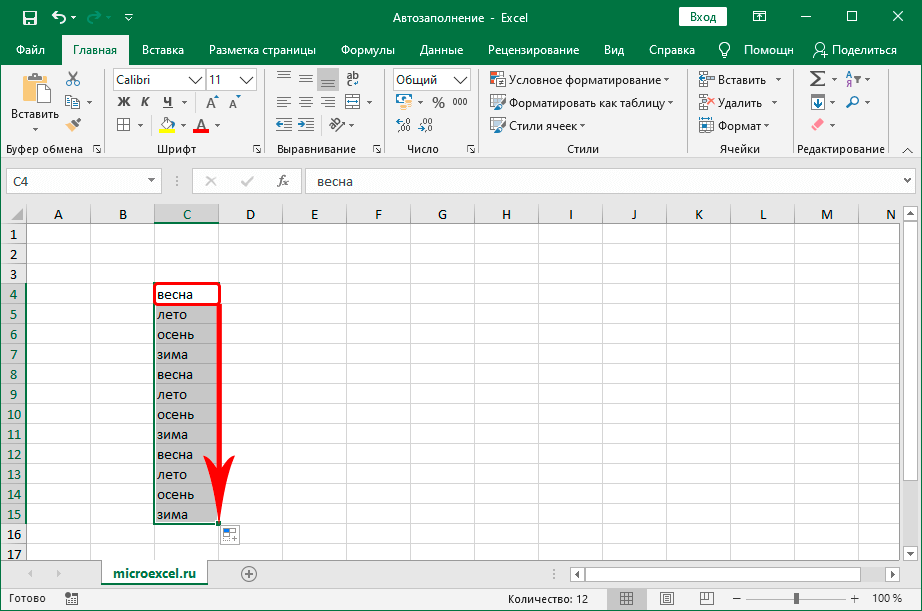
Thus, you get cells filled with the location of the values in the list you created. Filling is done cyclically – after the last word from the list, it is played again, starting from the first word.
How to number rows in Excel
To number rows in Excel, follow these tips:
- Enter the number 1 in any cell.
- Select the range of cells you need (use the Fill Marker and hold down the Ctrl key at the same time).
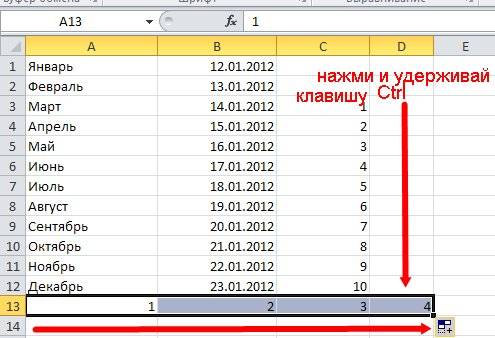
In the same way, you can number the columns in the Excel table.
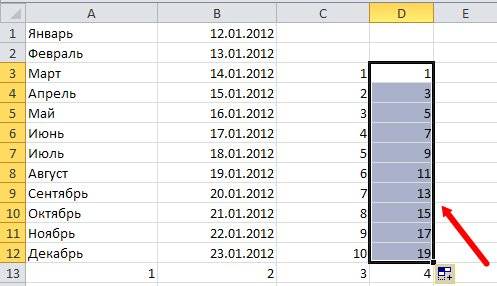
How to set a list of odd or even numbers
- In cell D3, enter a value – for example, 1, and in cell D4 – 3.
- Select cells D3 and D4.
- Move the mouse cursor over the square in the lower right corner of the selected cells and drag the slider while holding down the Ctrl key to cell D12.
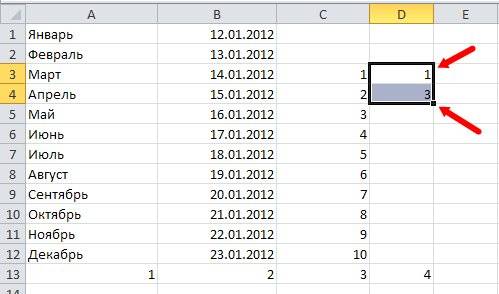
- You get a list of odd numbers.
Excel version differences
All of the above instructions apply to newer versions of Excel – 2007, 2010, 2013, 2016. In the 2003 package, the “Progression” feature is in a different section of the “Menu” tab. The rest of the principle of operation indicated above is suitable for Excel 2003. To customize the filling of cells in Microsoft Office Excel 2003 using Progression, follow these instructions:
- Select the cell you want with the number.
- Go to the “Edit” tab.
- From the drop-down list, select the option “Fill” and “Progression”.
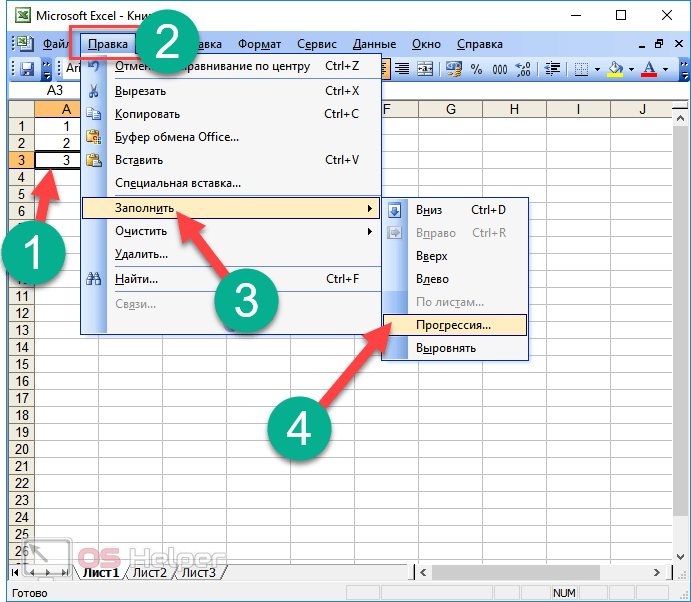
- Next, you will see a window identical to newer versions of the program. The next steps are the same as those previously described.
Conclusion
Although mastering the AutoFill Cells tool may seem complicated and time consuming, it is always important to know how to use it, and the time spent mastering this feature will fully pay off in the future work. This function helps to optimize the process of entering the same type of data, doing it for you, which saves a lot of time.
Using this tool, you can automatically enter various data – from standard (dates, numbers, days of the week) to non-standard (by creating your own lists). The number of lists you can create is unlimited – you can make as many as you want. All created lists are saved and become available for further work, if necessary, they can be deleted.