


Contents
During repairs, you don’t always want to get involved with “wet” work – laying tiles, for example. There is a simpler technology – wall decoration with plastic panels. You can cope on your own even without much experience in construction work and in a day or two carry out repairs in the bathroom, toilet, balcony / loggia and kitchen.
Types of plastic panels for wall decoration
This type of finishing material is made of PVC – polyvinyl chloride. In a semi-liquid state, this polymer is extruded into a mold. A drawing is applied to the finished panels. It can be first printed on film, then glued and varnished (laminated panels). Moreover, these panels may not have a flat, but a textured surface. The drawing applied using this technology retains paint for a long time, but such materials cost about two times more.
Another technology is to apply the drawing directly to the plastic, after which it is covered with two layers of varnish. Cheaper technology, but the service life and quality of the pattern is lower.
Ceiling and wall
There are two types of plastic panels – for ceilings and for walls. Those designed for the ceiling have a thickness of 5 mm and thinner partitions, and wall ones – from 8 to 10 mm and a greater thickness of walls and partitions. You can determine which view is in front of you by looking at the cut. This type of finishing material differs in that it has a flat surface and, with a tight joint, the seams are not very noticeable.
There is another standard size, which is also called plastic lining – with a thickness of 10 mm, the panel has a width of 10 cm and shaped edges, which are more typical for plastic lining. If you finish the walls with this material, the surface will not be flat, but embossed, similar to a wooden lining.
Sizes and prices
In width, plastic wall panels are most often 25 cm and 37 cm, length – 2700 cm and 3000 cm. There are other non-standard sizes, but these are most common. For the price, you can observe a rather strong spread – it depends on the wall thickness, type of printing, manufacturer, complexity of the pattern, etc.
Thin PVC wall panels
Above we talked about products that consist of two layers of plastic connected by jumpers. Along with a lot of advantages, they have a rather serious drawback: if you apply enough force, they can be pushed through. This is often the reason for not using them. Therefore, thin wall plastic panels appeared on the market not so long ago. Their thickness is 3 mm and no cells. Only a layer of plastic with a pattern applied to the surface. Accordingly, there is nothing to push through. The dimensions of this type of panels are 950*480mm or so.
The method of installation is different for them – they are glued to the walls. Due to the fact that this finishing material has a very small thickness, it is cut with scissors and, moreover, takes up very little space from the room – 3 mm.
What to look for when choosing
It is clear that the choice begins with color and pattern. But in order to avoid difficulties during the installation process, when buying, you need to track some points:
- Inspect the cut of the selected plastic panel. The thicker the lintels and the front and back polymer layers, the stronger the finish will be. You can also focus on weight – the larger it is, the thicker the panels will be.
- The thickness of the plastic is the same everywhere, without thickening and thinner places. This is a sign of normal quality.
- Pay attention to the geometry. The cells should not be crumpled, the edges should be absolutely even. Even if everything is packed, it does not interfere with unpacking and inspecting – so that there are no problems later.
- Examine the front surface. The drawing should be applied evenly, clearly, without smeared spots.
- If you choose panels from different packs, but of the same color, carefully look at the colors – they may differ.
To make the wall decoration with plastic panels beautiful, check the quality in the store
It is also worth checking the quality of the polymer used. It is necessary to take one bar so that it bends by about 30% and straighten it. After that, inspect it. If there is no damage to the plastic or pattern, everything is fine.
Correct technology for mounting plastic panels on walls
What is good about decorating walls with plastic panels is that you can do it yourself, it takes a little time. Well, and one more plus – you need the usual tools:
- drill with drills (install dowels) and a wood crown (drill holes for sockets, etc.);
- screwdriver or screwdriver, construction stapler, glue – depending on what type of fastener you prefer;
- saw with a blade for metal – cut plastic panels;
- building level;
- sharp knife – cut to length.
The crate for wall panels should be in the same plane
This is all that may be needed when installing PVC panels on the walls. It takes time – one or two days, depending on the experience and repaired areas.
What to make a crate
The installation of PVC panels on the walls according to the technology should be carried out on the crate. The crate is made from:
- Wooden bars. The optimal section is 40 * 20 mm. Before mounting on the walls, it is desirable to treat the wood with antiseptic compounds. If the wall decoration with plastic panels is planned in a humid room, then special treatment against mold is also necessary. Panels are attached to wooden planks with wood screws, nails with a wide head, staples from a construction stapler.

Wooden planks for pvc panel battens - metal profiles. Use wall profiles for drywall with a width of 40 mm. In wet areas, it is better to use galvanized metal. In this case, the fasteners are self-tapping screws for metal. The disadvantage of this type of crate is that it takes up too much space – each wall has at least 3-5 cm, which is critical in a small room.

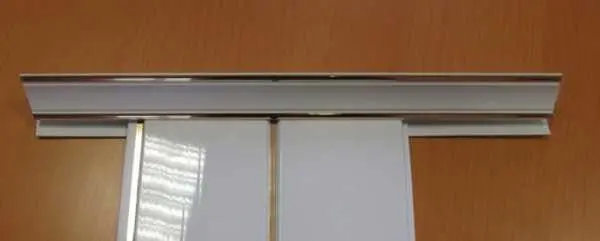
Metal profiles (galvanized) - Plastic mounting strips and clamps (mounting plates). This type of fastening is designed specifically for PVC panels. Fastening is quick – the plastic is simply snapped into the groove on the profile with clamps. No additional fasteners are required. If necessary, the entire finish is quickly disassembled – you just need to pry the kleimer with a screwdriver (with a little effort) and it will come out of the groove. What else is good about this type of crate is that it takes only 1 cm (this is the thickness of the profile).

This is what the mounting strips for PVC panels look like
Of the three listed materials for mounting plastic panels in the bathroom, it is best to use plastic. It reacts little to temperature changes, does not react in any way to changes in humidity, does not rot or crack. Galvanized feels good in a humid environment, but it must be of good quality, otherwise it will rust anyway. The most unimportant material is wood, but with proper processing, they also cost years. And for this to be true, follow the recommendations for application on the antibacterial composition exactly. In some cases, it is enough to smear with a brush a couple of times, in others – soak for a while and then dry.
How to make a crate
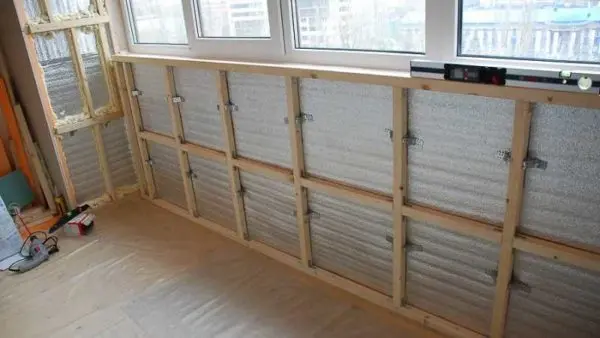
Before starting the installation of the sheathing under the PVC panels, the walls must be prepared. First, remove the old finish and everything that can fall off. If there are large indentations on the surface, it is better to close them up, and strongly protruding parts can be cut off. After the wall has become more or less even, it is treated with a primer with an antibacterial component (against fungi and mold). After that, you can already proceed with the installation of the crate.
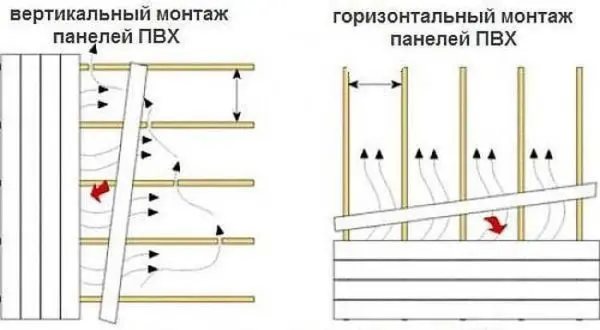
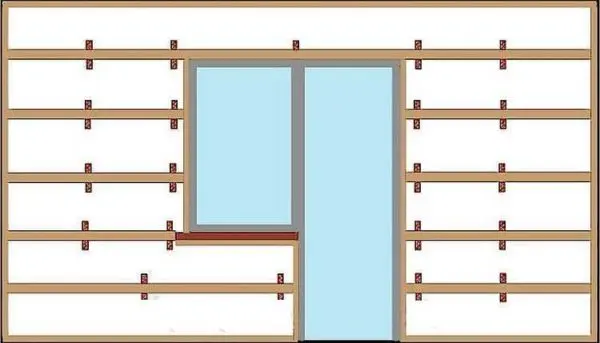
Lathing slats are located perpendicular to the PVC panels. That is, if you mount the panels vertically, the crate – horizontally and vice versa. Lathing battens are installed at a distance of 30-50 cm from each other. The optimal distance is 30 cm (the panel will “walk” less). Planks are attached at the beginning and end of the wall, as well as around window and door openings.

The crate is fastened under the plastic panels, most often on dowels. They put 6 * 40 mm in a concrete wall (so that a piece does not fall out on the back of the concrete partition), 6 * 60 mm in a brick wall. Fasteners are installed in increments of 50-60 cm.
In order for the wall decoration with plastic panels to be even and beautiful, the crate must be set in the same plane. To do this, wooden strips are installed under the wooden planks where necessary (you can – pieces of plywood), only they also need to be treated with a composition from fungi and mold.

You can also use perforated hangers for plasterboard ceilings. They are used when placing metal profiles in the same plane, but they can also be used when installing wooden bars.
If you decide to make a crate from plastic mounting profiles, then you should take into account one point: they must be strictly perpendicular to the PVC panels. Even a slight deviation can lead to the fact that the clamps simply do not snap into place and will not hold anything. Therefore, check the verticals / horizontals very carefully. One more thing: along the perimeter of walls, doors and windows, it is better to install wooden planks of the same thickness as plastic guides: we will attach starting profiles to them.
Installation of plastic panels
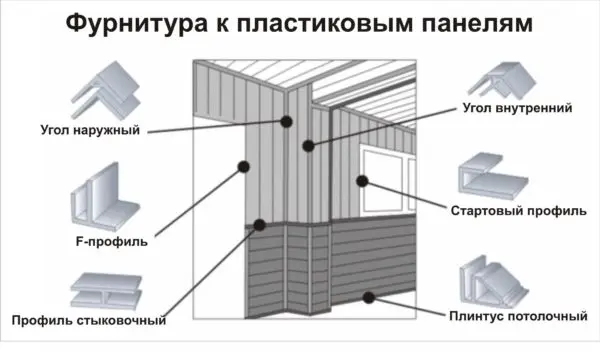
In addition to the actual wall plastic panels in the store, you will need to buy some more fittings – these are corner, starting and F-shaped profiles. They are necessary in order to give the finish a finished and neat look.

At the level of the floor and ceiling, you can use either a starting or ceiling plinth. The starting one is just a narrow strip of plastic, and the ceiling plinth is a shaped product that has a characteristic cut.
Finishing walls with PVC panels begins with the installation of selected profiles in one of the corners and at the top / bottom. They are attached to the installed slats of the crate. Fasteners are selected depending on what material was chosen for the crate. The result is something very similar to a frame. We will insert panels into it.
Next, cut the first panel along the length or height of the wall. Cut plastic wall panels with a saw blade for metal. When working strongly with your hand (and even more so with your foot), do not lean – push through. In order for the strip to stand in its place without problems, carefully measure the length, subtract 4-5 mm and cut it off.
A protruding spike is cut off from the first strip, after which it is inserted into the corner profile with the cut side, tucking the edges into the upper and lower. Lightly tapping with the palm of your hand, drive the bar all the way, check the verticality with a level by applying it to the edge of the installed strip. Then they are fixed to each plank of the crate.
Having installed and fixed the first strip, cut off the second one, join it with the first one, fix it, etc. No complications. Problems can only arise with the last panel on the wall. It usually has to be cut in width, and then try to fill it immediately into the groove of the previous bar and into the corner or starting profile. It does not always work out neatly – often the plastic is jammed. This situation can be avoided without fixing the second corner profile. Then, a corner profile is put on the panel cut to size, all this is joined together with the previous bar, and only then the corner profile is fixed. This is not entirely correct, since only one half of the corner profile is attached, and the second remains loose. But having suffered, trying to do the right thing, you don’t pay attention to it. Then everything repeats – further wall decoration with plastic panels occurs in the same way.
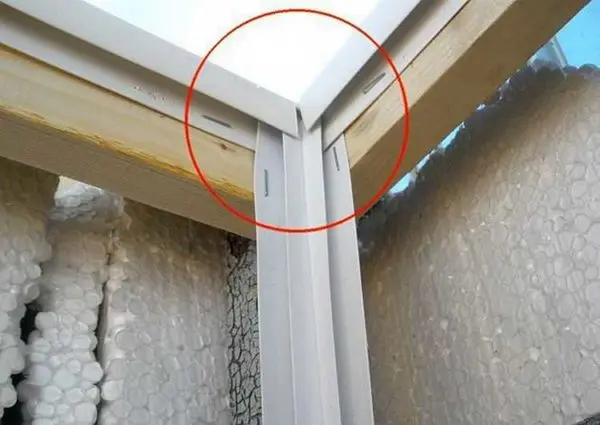
How to do without corner profiles
If the presence of skirting boards at the top and bottom of the wall is familiar to us, then not everyone likes the corner profiles. When decorating walls with plastic panels, you can do without them. You will need a sharp wallpaper or clerical knife. If a strip of plastic is cut from the back in the right place, the panel can be bent. From the front side, this will not be visible in any way, and torment with the last panel can be avoided. And outwardly, many people like this way more.
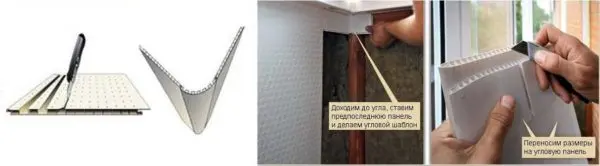
To correctly determine where to cut, insert the penultimate panel, fasten it. We take a piece of panel a few centimeters wide, insert it into the already installed one and mark where the corner is. We take it out, cut out a strip of plastic in the marked place, try it on. If everything is fine, use this piece as a template, transferring exactly the place of the cut. This is also not according to technology, but such wall decoration with plastic panels looks, it seems to me, better. Especially if the color and texture of the corner profile is different.
How else can you fix PVC panels on the walls
Although the method of decorating walls with plastic panels described above is not very complicated, it is not suitable for everyone. For example, the walls are perfectly smooth after plastering on the lighthouses or leveling the walls with drywall. It is clear that the crate is not needed. It will only take up space. In this case, they go to the violation of technology – they glue plastic panels on silicone or on mounting foam.
Starting profiles in this case will still have to be installed, but they will need to be fixed to the appropriate dowels. After that, foam (zigzag) or silicone (islets with a step of 10-15 cm) is applied to the back side of the panel, the bar is inserted into the profiles, pressed, fixed in one or two places with the appropriate fasteners. Continue in the same spirit.
The advantage of the method is very fast, the disadvantage is that it only works on flat (or almost) walls. But the most important thing is that it is simply impossible to remove the trim without destroying the plastic panels.