


Contents
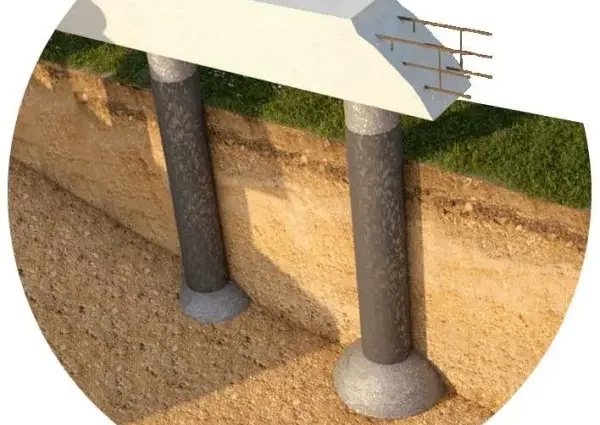
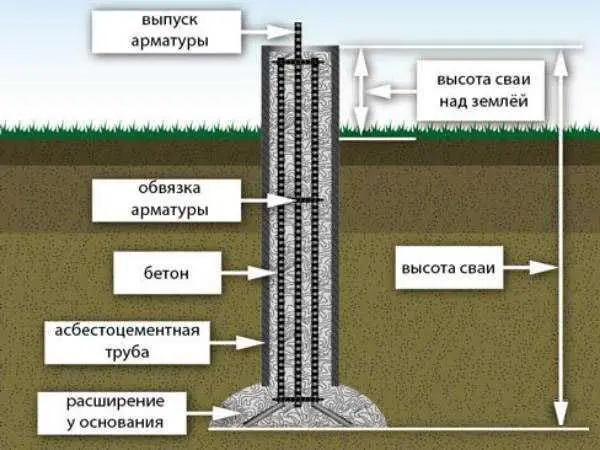
One of the types of pile or pile-grillage foundation is the foundation of TISE. Its main difference is that at the end of the pile there is a hemispherical (dome-shaped) thickening. This form allows the use of pile foundations on heaving soils, while the amount of land work remains very small.
Piles TISE
The main disadvantage of the classic pile foundation is that with strong heaving, the support can simply be pushed out. But since the idea itself is very attractive – it is built quickly at a minimum of costs – on difficult soils they began to make a sole at the bottom of the pile – a rectangular reinforced plate. But with this option, the volume of land work immediately increased several times: for each pile, it is necessary to dig a foundation pit larger than the planned sole. But the building stands normally even on soils with severe frost heaving.
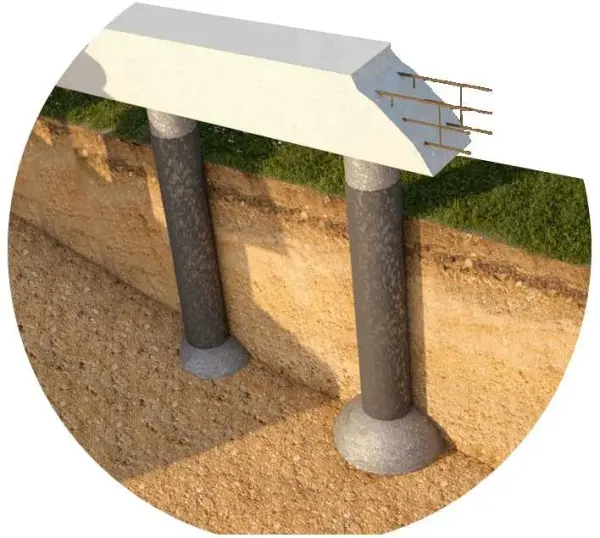
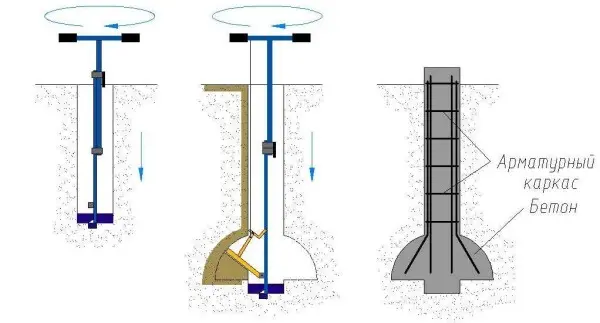
Under piles made using TISE technology create a similar thickening. But there is no need to dig pits. This extension is formed using a special knife, which is attached to a branded drill. This knife forms an expanded dome. Further, the whole technology almost exactly repeats the process of erecting a pile or pile-grillage foundation.
Previously, expansions were also practiced, but they tried to do them with the help of microexplosions or by picking with a blade on a long pole. The main innovation in TISE technology is a drill with an adjustable blade that opens. With it, making the expansion of the sole much easier.
Advantages and disadvantages
TISE foundations are rapidly gaining popularity: at minimal additional cost, a more reliable foundation is obtained. So, its advantages:
- increased resistance to heaving forces;
- the load from the house is transferred to a large area, which reduces the possibility of uneven drawdowns;
- low cost with good performance;
- can be designed for houses from different materials, up to 3 floors in height;
- small amount of land works.

TISE pile manufacturing procedure
If a pile or pile-grillage foundation is recommended for your house, it makes sense to make TISE piles. With a small increase in the amount of work, you get a significant increase in reliability. After all, designers do not like pile foundations because it is impossible to find out what kind of soil is under each support. Therefore, it will not work to predict how reliable and stable the foundation will be. And the TISE foundation has a wider support, which reduces risks. It is still impossible to predict anything, but a large load distribution area is always good.
However, there are also disadvantages. Main: the heel of the TISE pile cannot be well reinforced. You can lower the reinforcement cage to the very bottom, but the expansion cannot be reinforced. Therefore, there is a possibility that this thickening will collapse.
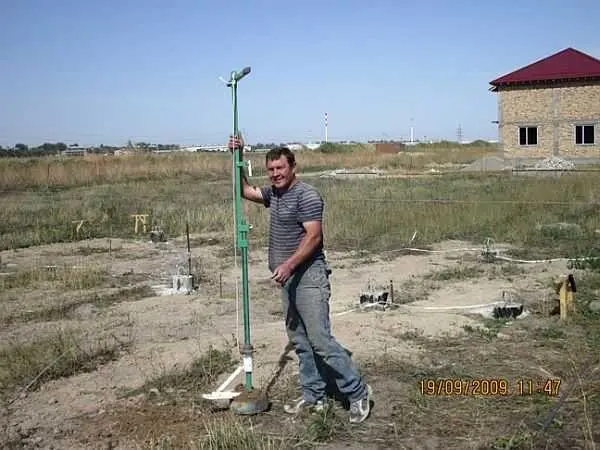
There is another drawback, but already from the practice of using a drill: it is not easy for them to work. The design itself is interesting. This is not a blade wrapped around a rod, but some kind of container with a composite bottom. On the plates that form the bottom, four blades are welded, set at an angle. When you spin the drill, they loosen the ground. Since the bottom is not solid, the soil gets into the body, from where it needs to be removed.
The order of work is as follows: they twisted the drill several times around its axis, took it out, shook out the soil. They lowered it into the hole again, turned it several times, and so on. The technology is simple, but the work is tedious. The device itself weighs 7-9 kg, plus soil. Raise, lower it often. In general, tedious. Plus – no mechanisms are needed. Minus – the work is physically difficult. Especially if the soil is rocky or made of dense clay.
Where to use
There are no restrictions on the types and materials of buildings: you can make a TISE foundation for wooden, frame, brick and block buildings. Floors – up to three.
For soils, the restrictions are the same as when using pile foundations: it is necessary that the piles transfer the load to the soil with a normal bearing capacity. To decide whether or not to use TISE, a geological study of the site is necessary in the place where construction is planned.
Since the base of the pile is expanded and the resistance to pushing forces is greater, this technology can be used on heaving soils. But at the same time, you need to consider: it makes no sense to put piles closer than 1,5 meters. If placed closer, one outsole extension will overlap the other. On the other hand, a pile diameter of more than 30 cm cannot be done either – there is no such drill. If the bearing area with such parameters is not enough, you need to use a different type of foundation.
Reviews of the corporate storm
The main questions of developers are related to how realistic it is to drill wells manually using a proprietary drill. Looking at the video, it seems that this task is not easy. But here are some reviews.
In my area, the soil turns out to be different: where is loam, where is dense clay, and such that it can only be chopped with an ax. At first I thought about renting a motor drill, but decided to try it right away with a drill. And nothing, not very hard. As a result, I decided that a motor drill would slightly speed up the process, so I made all 40 pieces by hand. During the day, 5-6 2-meter wells were obtained. They were drilled easily, but with the expansion it was hard: I already had dense soil there, it was difficult to turn with an open blade.
Oleg, Kharkiv
I modified the purchased TISE drill: I welded additional teeth, instead of a rope that opens the blade, adapted a rod – now you can put pressure on it, and not just pull it. And most importantly – lengthened the handle so that you can twist it together. While drilling expansions, they twisted it by 90 °, but then it became much easier to work. In general, I’m satisfied.
Nikolai, Krasnoyarsk
Calculation of the TISE foundation
The method of calculation is no different from the calculation in the general case. The load from the house is calculated and then compared with the total bearing capacity of the planned number and diameter of piles.
First, place the piles on the plan of the house. They must be in the corners and at the junction of the walls. If the distance between the piles is more than 3 meters, intermediate ones are placed between them. So arrange all the supports on the plan, adhering to the rule:
- the minimum distance is 1,5 meters;
- maximum 3 m.
Then calculate the load from the house. To do this, you first need to calculate the weight of the house (all building materials + furniture, plumbing, heavy household appliances).
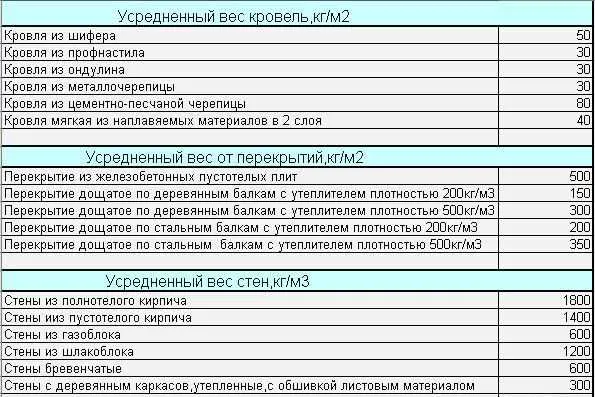
Speaking on an average, for buildings made of brick or shell rock, 2400 kg can be taken for each square of the area, 2000 kg from light building blocks (foam concrete, aerated concrete, etc.), from wood and carcasses – 1800 kg. These averaged norms can be preliminarily guided. If you decide to take everything seriously, you will need to follow the entire methodology: count the materials of walls, floors, roofs, finishes, etc. Since different technologies and materials can be used, the discrepancies can also be significant.
The resulting value is multiplied by the correction factor – 1,3 or 1,4. This is a margin of safety. The resulting figure is the load that will need to be transferred through the piles.
Now, according to the table, select what diameter the pile should have so that it can transfer the necessary weight.
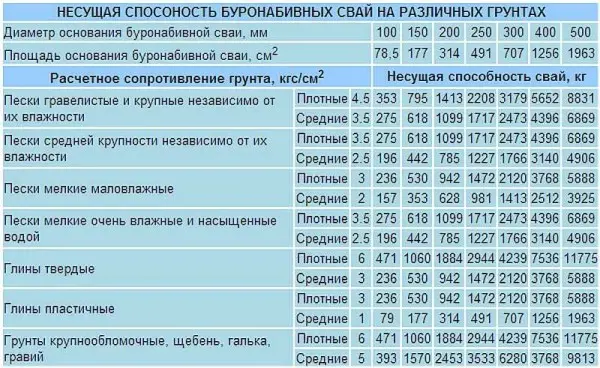
If the planned number of columns with an expansion of the selected diameter can transfer the required load, you do not need to redo anything. If the transferred mass is too small, it is necessary to either increase the number of piles or make the “heel” of a larger diameter.
TISE foundation: work order
There are some recommendations in the TISE methodology itself:
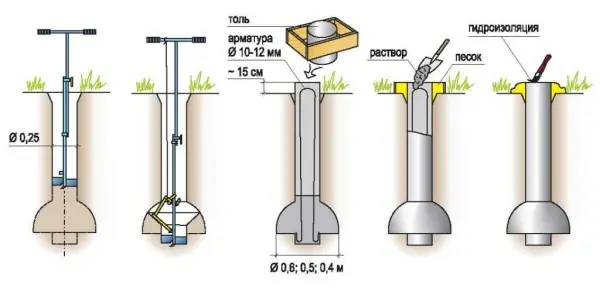
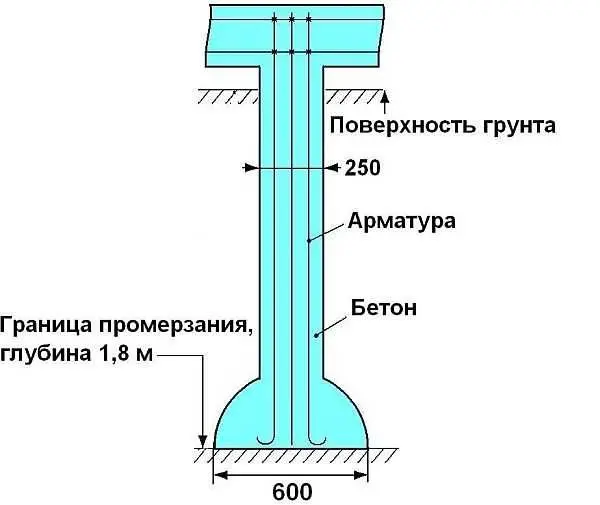
- Piles should be buried approximately 20 cm below the freezing level for the region.
- To reinforce the pile, four rods of ribbed reinforcement with a diameter of 10-12 mm are used. The rods should be placed no closer than 4 cm from the edge.
- If the slope of the site is more than 10%, the release of the reinforcement must be associated with the grillage.
- Use a grillage either high – raised 150 mm above the ground, or make a pile-strip foundation with a shallow tape. The second option is used for heavy buildings, the weight of which cannot be transferred by means of piles, then a tape is made that increases the transfer area.
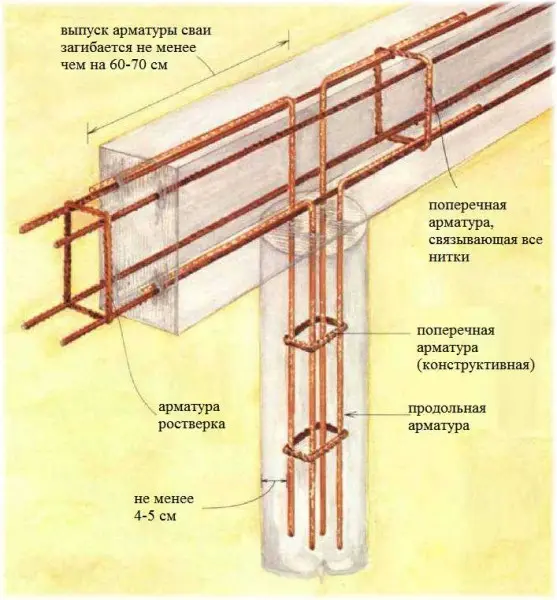

Scheme of reinforcement of a pile-grillage foundation with a reinforced concrete grillage (pile-tape) - It is not necessary to make sand bedding at the bottom of the well: it will not have a normal density and will not work.
- To ensure that the support is reliable, use vibrators for concrete. Manual vibrating with a rebar is ineffective. If there is no such device on the farm, rent it for the time of pouring the foundation: strength increases significantly.
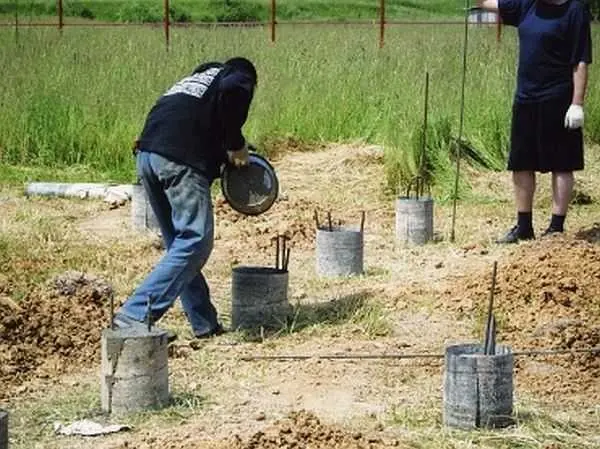
- You make the formwork for the pile from roofing felt, roofing felt or glassine rolled into a tube. It is better that it has several layers (2-3). They do not need to be fastened with anything: they twisted a little less than the diameter, inserted them. The height of this formwork is 15 cm above the ground level, regardless of whether there is a slope on the site or not. It is advisable to sprinkle this protruding piece with sand or soil, and compact it around. This will prevent the roofing felt from falling apart when pouring concrete.
Foundation TISE – a subspecies of the pile-grillage foundation. And the technology of its manufacture is no different. The difference is in the drilling process. No others. The order of work and the manufacturing technology of the pile-light foundation are described here. In this article, we’ll give you some practical advice.
Difficulties in drilling
If the soil is very loose – fine sand – the walls of the well may crumble. To prevent this from happening, pour water. The sand will compact and hold its shape. Water will help even if the soil is very dry and dense. After drilling a few tens of centimeters, fill the well with water. It will soften the soil, it can be chopped with a shovel or other device, and then removed with a drill.
Difficulties are created by powerful roots of trees and bushes. They need to be cut down. To do this, the ax handle is welded (attached) to the handle. Dropping it sharply into the hole, crush the roots.
How to generate an extension
After reaching the design depth of the well, a plow is attached to the drill. It can be fixed in two positions: to form a heel of 50 or 60 cm. The plow is tied to a rope.
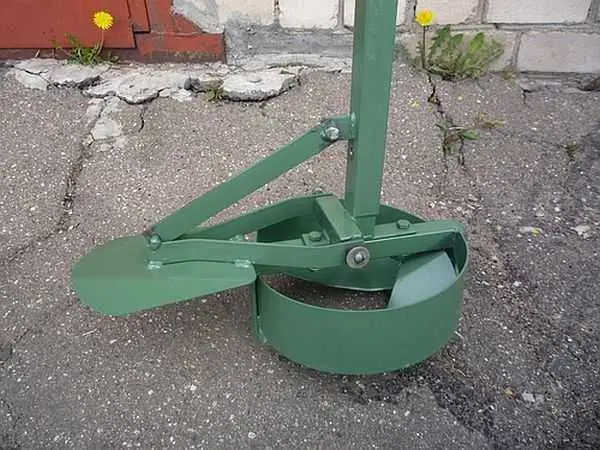
Lower the drill down, the rope is taut, the plow is pressed. The rope is released, it falls down under its own weight. You start to rotate (it’s hard – the cutting surface is large), the blade cuts the ground, forming a thickening.
You can rotate both clockwise and counterclockwise. If clockwise, then try not to push down: you don’t need to go deep. When rotating counterclockwise, only cutting the soil without deepening occurs, but another problem arises: the soil is poured under the drill, pushing it up.
The optimal order of work is as follows: they scrolled several times counterclockwise. When you feel that the blade has rested against the vault, make a few turns clockwise, picking up the cut soil into the drill body. Pull out the drill, pour out the soil. Repeat several times until an expansion is formed (the soil stops picking up).
On hard soils, working with an open plow can be problematic. Then you can form the extension in stages. First set the plow to the smallest distance, then increase it to the desired size.
Filling with concrete
If the groundwater level is low, no problems arise: fill in, process with a vibrator. All.
If the groundwater level is high, the heel can be poured immediately after it has been formed. It will only be necessary to insert the armature. Then knit it before drilling. The filling of the main part of the well can be left “for later”.
If there is a lot of water and it arrives quickly, you will need a large bag of thick film with a hole at the bottom. Insert it into the well and pour concrete. Since it is denser, it displaces water. Bay heel, pull out the bag. It will come in handy for the following piles.
The video below demonstrates the technology for building a foundation with TISE piles and a high grillage.