


Contents
If there is a sandbox in the yard of the house or in the summer cottage, then the kids will always find something to do, because the child’s fantasy in playing with sand is absolutely unlimited. Toddlers and older children build castles, highways, sculpt Easter cakes. Caring parents can provide such an opportunity for them by buying or building a sandbox on their own. The shape of the construction of this object of the playground may be different, however, for giving a children’s sandbox with a lid is the best option, since an additional structural element will protect the sand from debris, dirt, “adventures” of pets, heavy rains. There are a lot of options for such sand frames with a lid, and each parent can independently decide what size and what materials the structure should be made of, as well as what original features it should have.
DIY
There is nothing difficult in making a sandbox with your own hands. To do this, you just need to decide on its shape and the material that you plan to use. When choosing a material, it is necessary to take into account its durability and adaptability to street conditions:
- The most popular building material is wood. It is easy to process, it is durable, environmentally friendly and affordable.
- If it is decided to use plywood or sawdust boards (OSB) in the construction of the frame, then it is necessary to take care of their moisture resistance, because the material without special treatment quickly loses its qualities in unprotected conditions. The advantage of materials from chips and sawdust is ease of processing, which allows you to cut out parts of the structure of any shape.
- The easiest option for creating a sandbox for children with your own hands is to install a frame from a machine tire.
Such an element of the sandbox as a lid can not only protect the sand, but also perform some other important functions. So, you can build a transforming sandbox, where the lid becomes a comfortable seat or a canopy that protects from the sun during the baby’s play.
Having decided to create a children’s sandbox with a lid for giving, you should not forget about its aesthetics and visual appeal. It is much more interesting for kids to play not just in the sandbox, but in a bright and original design filled with sand. Creating interesting objects of the playground will not take much time and effort, but at the same time staying in them will bring a lot of pleasure to children.
Simple version with removable lid
The easiest option to make a sandbox in the country with your own hands is to install a machine wheel tire. This material is not particularly attractive, but with some effort, you can create a fun, colorful sandbox from it. To do this, you need to cut off completely or partially the tire rim on one side and paint the rest with multi-colored paints. As a cover to protect the sand in such a frame, you can use a piece of polyethylene, tarpaulin or plywood, as shown in the photo. Such a cover, of course, will not carry an additional functional load, but it will not require financial and time costs either.
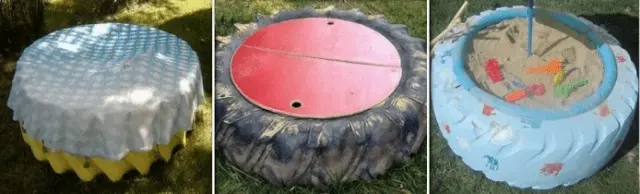
These sandboxes are very easy to make, however, their size will always be limited by the diameter of the wheel. At the same time, the advantage of such frames for sand is mobility, since, if necessary, the structure is not at all difficult to move from one place to another.
Wooden sandbox using a simple method
Every parent can make a wooden sandbox with a regular, hinged lid. The technology is quite simple and does not require effort and time. We will try to describe the stages of creating such a frame for sand in detail:
- First you need to choose a place to install the sandbox. This should be a well-visible place with a flat surface, possibly in the shade of tall trees, the crown of which will protect children from direct sunlight.
- The second stage of work should be the marking of the area and the removal of fertile soil under the entire surface of the future sandbox.
- You need to start assembling the structure by installing bars in four corners. In order to make it easier to hammer them into the ground, you can sharpen the bases. When installing the bars, you need to monitor the preservation of the geometry of the frame, with a shutter speed of 900 at the corners of the building.
- After installing the main bars, you can proceed with the installation of the frame. To do this, along the perimeter of the sandbox, a board is nailed to the bars from the outside. It is worth noting that the lower side board of the frame should be slightly buried in the ground, which will prevent the sand from being washed out by rainwater.
- At the bottom of the sandbox around the entire perimeter, you need to lay a material that will allow water to pass through, but at the same time will not allow sand to mix with the ground and prevent the germination of weeds. As such a material, you can use geotextiles or polyethylene (linoleum) with holes made for the outflow of water.
- Along the perimeter of the assembled structure, a horizontally oriented board should be fixed. It will serve as a bench. In the corners of the sandbox, you can also fix pieces of the board rotated by 450.
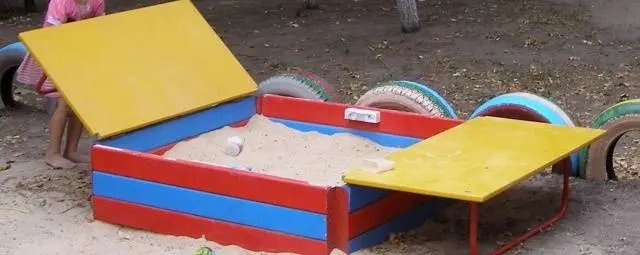
- Already on the finished structure, with the help of self-tapping screws, hinges and a cover of two wings are attached, as shown in the photo below. As a cover, you can use sheets of laminated, moisture-resistant plywood or boards nailed together.
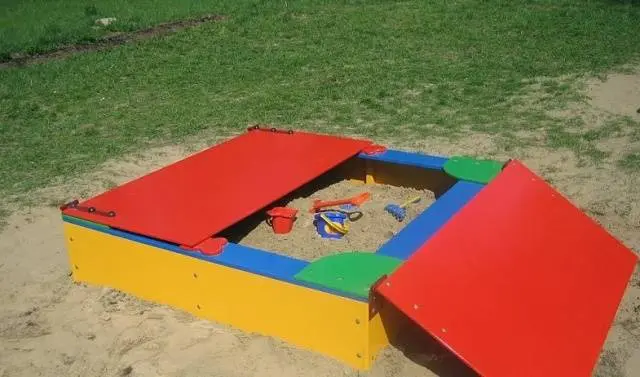
You can upgrade such a simple model of a homemade sandbox with the help of supports that will support the lid flaps when the sandbox is opened. On such flaps of the lid it will be possible for children to sit during the game or use them as tables. Supports on the lids can be made using bent pieces of reinforcement, hammered together wooden blocks, legs of an old cot. An example of such a functional sandbox with a lid can be seen below in the photo:
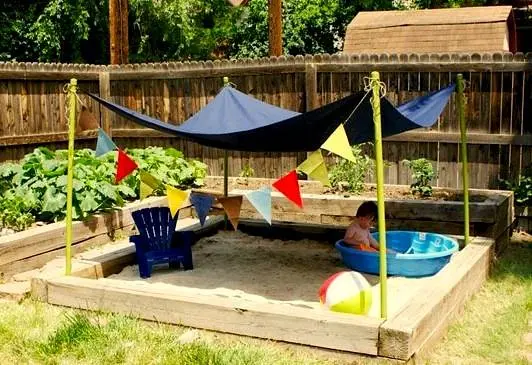
An ordinary sandbox, represented by a wooden frame made of beams, can also be covered with a tarpaulin or a moisture-resistant cloth, which during the game will act as a roof and protect the child from the sun’s rays. To do this, in the frame of a wooden structure in the corners, you need to install bars on which the tarpaulin is fixed at a time when the sandbox is open.
Thus, using one of the above simple technologies, you can create a sandbox with a lid with your own hands without any problems and financial costs. At the same time, the child in such a design will play comfortably and interestingly, and most importantly, safely, because under the shelter the sand will always remain clean.
Complex multifunctional structures
A multifunctional sandbox with a lid, working on the principle of a transformer, can be done with your own hands, guided by the recommendations of experienced professionals. Sand frames are the most widely used, in which the lid rises up, becoming the roof of the sandbox, or leans to the sides, becoming comfortable benches for children.
Design with comfortable benches

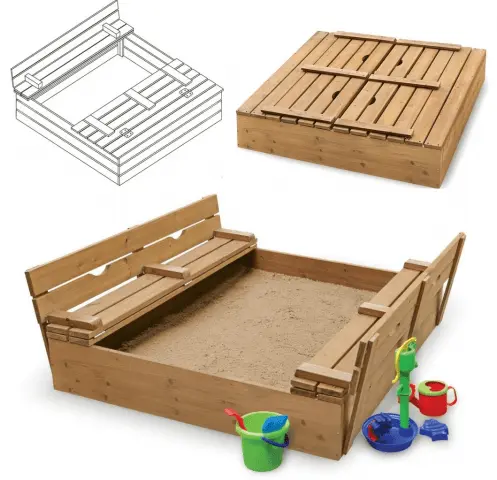
To build such a sandbox, you will need, first of all, boards. Their thickness should be approximately 3,2 cm, width more than 12 cm. You can buy such a board up to 6 m long. A frame will be assembled from it, therefore, after acquisition and processing, the board is cut into pieces of a long, equal to the width and length of the sandbox, as a rule , the dimensions of the structure are 1,5×1,5 or 2×2 m. Also, for construction, you will need bars, with a cross section of 5×5 cm and a length of 50 cm (4 pcs). The lid in this design will be bent with hinges (6-8 pcs). The assembly of such a sandbox with a lid is carried out according to the following technology:
- A sandbox frame is assembled from planed, polished and treated with an antiseptic board. Fasten the boards in the corners to the bars with self-tapping screws. The height of the frame should be short of the width of the board, for example, using a board of 12 cm, the height of the frame will be 36 or 48 cm. In order to prevent sand from waking up in the cracks, a self-adhesive sealant can be placed between the frame boards.
- The assembly of the bench begins with the installation of two boards on the edge of the sandbox. They are fixed rigidly with self-tapping screws. The third and fourth boards are also rigidly attached to each other with taverns or bars on the inside, which makes it possible to obtain a bench seat. It is attached to the second board with the help of door hinges. The rotary mechanism should “look” inside the sandbox.
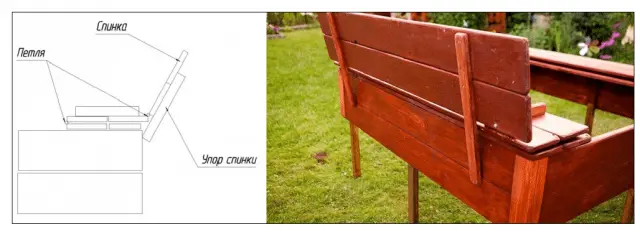
- The back of the bench is also a rigid connection of two boards. They are attached to the seat with two more door hinges. On the back side of the backrest, 2-4 stop bars are fixed, which will not allow the backrest to recline completely.
Work on the assembly of such a sandbox can be seen in the video:
A diagram of such a shop can be seen below. Having understood the drawing, you can understand that the construction of a transformer cover is not particularly difficult.
The transforming sandbox can be made in two versions: with two benches or with a bench and a table. To create a table, you need to fix two boards rigidly to the sandbox frame, and two more rigidly to each other, but movably relative to the outer boards. Mobility is provided by two door hinges.
By choosing the parameters of the sandbox and the board, it will be possible to create the correct, harmonious design.
By creating such a sandbox in a summer cottage, a parent will provide his child with the opportunity to play with convenience and comfort, showing his imagination and skills.
Drop-down canopy design
Such an original, multifunctional and easy-to-use sandbox can be rarely seen in summer cottages. This feature is associated with the complexity of creating a design and novelty in the market.
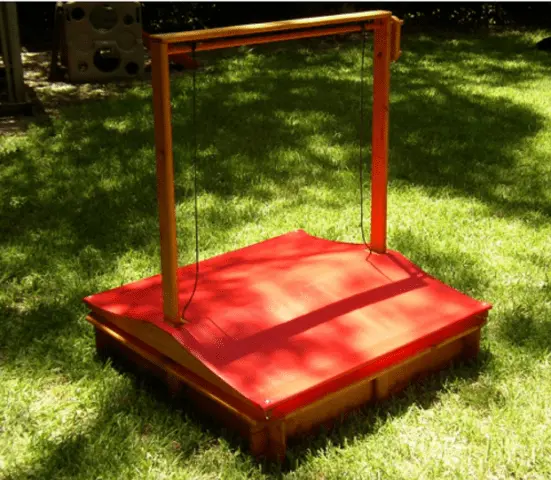
The sandbox shown in the photo above is a conventional wooden frame for sand, made according to the technology already given above, a plastic cover and a device for raising and lowering it. It is worth noting that the lid itself can be made not only of plastic, but also of wood, moisture-resistant plywood.
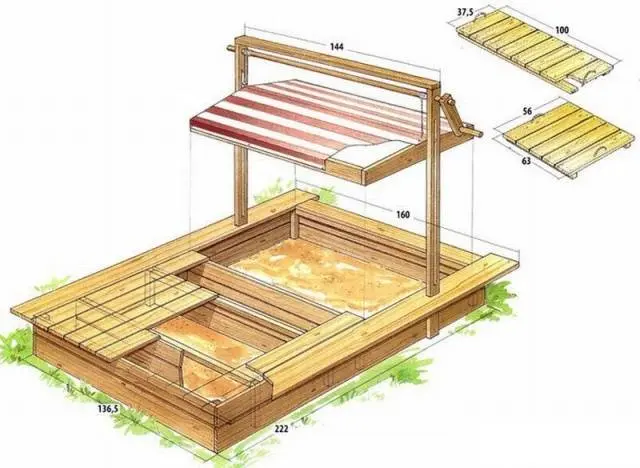
The principle of operation of the lifting mechanism in such a design is similar to that used in the construction of wells for lifting a bucket of water: when the handle is rotated on the side around the circumference of the rope, the rope or chain is wound around the beam, thereby lifting the lid of the sandbox. What mechanism can be created using the following technology:
- It is necessary to securely fasten vertical bars to the sandbox frame (2 pieces from opposite sides).
- Make holes in the lid in the place where the bars will “walk”, as well as holes for fixing the rope or rope. In some schemes, the sandbox lid is not put on the bars, but a hole is made in them along the entire height, into which the runners mounted on the lid are inserted.
- On the bars, 10 cm lower than the top point, make round holes and insert a shaft of slightly smaller diameter into them.
- At the exit from one hole, the round shaft must be locked by inserting a pin into it or screwing in a screw with a bolt so that it cannot move towards the center of the sandbox. On the other hand, a handle is mounted on the shaft, consisting of a vertical and horizontal part. An example of a twisting handle is clearly visible below in the photo.
- Ropes or ropes must be firmly fixed along the edges of the round shaft. When the handle is rotated, the shaft will wind the rope around itself, thereby lifting the lid.
- You can fix the lid in the raised position by sliding the twisting handle into the hole made below on the bar.
- To obtain high structural rigidity, a horizontal strut must be fixed on top of the bars.
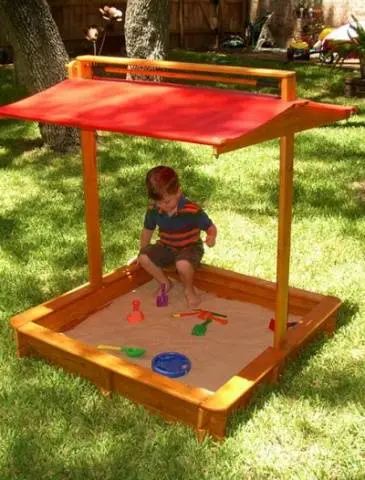
The photo above shows a whole play complex that combines a sandbox with a lid and boxes for storing toys. The photo clearly shows the lifting mechanism of the lid, which transforms into a reliable shelter from the sun while children play.
Such a scheme for building a sandbox is quite complicated, not all craftsmen can implement it. The above detailed description and diagrams will allow, if desired, to understand a complex structure and, having understood the principle of its operation, to bring the idea to life.
You can buy a ready-made sandbox
Today’s market offers a wide range of sandboxes that you can buy in the country. This way of solving the problem of creating a playground is the simplest, but at the same time the most expensive. You can find on sale various options for sandboxes made of different materials:
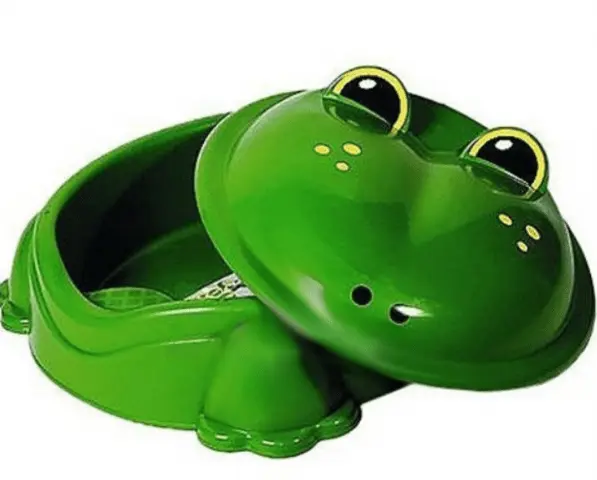
- small plastic sandboxes with a lid in the form of a frog or turtle will cost the buyer about 2-2,5 thousand rubles;
- a wooden frame for sand with benches, made using the technology described above, can also be found on sale for 9-10 thousand rubles.
- A sandbox for a summer residence with a canopy lid that descends along the bars costs 17 thousand rubles.
Thus, a sandbox for children in the country is much more profitable and more convenient to do it yourself. This will allow not only to save money, but also to independently choose the best material, make your own improvements and adjustments to the design, and demonstrate to your family and friends that you care for children. The kids, in turn, will surely remain satisfied and grateful for the painstaking work to create a unique sandbox, realizing that no one else has exactly the same.