


Contents
Increasingly, the roof has not only a functional purpose. Often this element is the highlight of the building. Such roofs have many planes that connect at different angles. Part of the joints – with positive angles – is made in the form of a ridge, part – with negative angles – in the form of valleys. To ensure that the attic is always dry, the roof valley must be done correctly.
Valley roofs
On roofs of complex shapes, when constructing protruding dormer windows, sharp corners are formed. They are obtained at the junction of two slopes. The junction is called a valley, and the roofs are called valleys.
Roofs of complex shapes look very decorative and are a decoration of the building, but their design and installation is not an easy task – it is not easy to make pairing of planes. Due to the design features, these sections of the roof have a heavy load: there is always a lot of snow and water. Therefore, the crate is made reinforced, and waterproofing measures are much more serious than on the rest of the surface.
Features of truss systems
Rafters from different slopes in the valley can be connected at different angles (depending on the shape of the roof). At the junction, a rafter leg is installed, to which the rafters from the slopes are attached. With a small length (up to 2 m), it is enough to mount them on nails (2 on each side), with a significant length of the joint, they are reinforced with metal plates.
In places of greatest load (at the widest point), the rafter leg of the valley is supported from below by a jib.
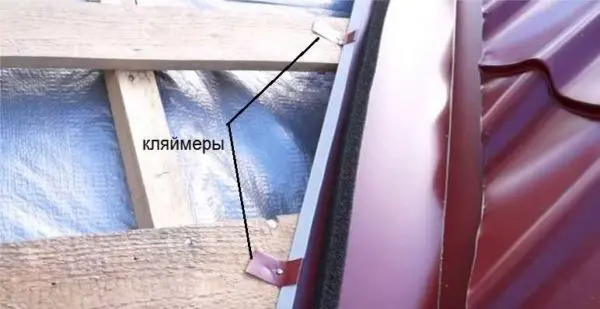
Rims
At the junction of two roof slopes, the crate needs to be reinforced, and its device depends on the type of roofing material:
- Under the metal tile in the valley, intermediate strips are installed – in the middle between the main ones. That is, in this place the step is two times less. The length of the additional planks must be greater than the width of the bottom plank of the valley.


Lathing is done twice as often - Longitudinal boards are nailed under the profiled sheet, slate, ceramic tiles – along the entire joint. The width of the boards is at least 100 mm, two or three are nailed closely on each side. The width depends on the size of the selected substrate.

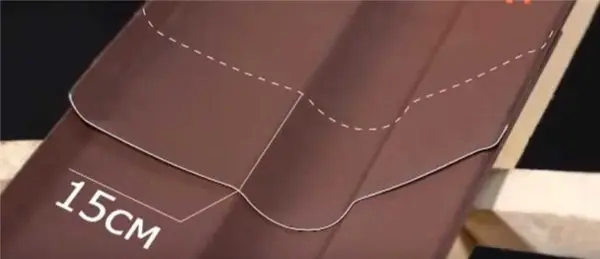
Under the profiled sheet, slate and ceramic tiles, two or three boards are needed on each side - Under the ondulin, two boards with a width of at least 100 mm are needed. But in this case, they should be located at a distance of 15 cm from one another. A valley gutter is laid in the resulting opening.

Under the ondulin between the two boards there should be a gap of 15 cm - When installing a soft roof, the crate on the slopes is solid, so there are no features here.
We have shown typical requirements and dimensions, but some manufacturers may have specific requests. When buying roofing material, you will be given instructions that will describe the entire installation process and the requirements for the crate, and other technical points. Of course, you need to follow their recommendations.
The device of the valley
Talking about the device in general does not make much sense, since each roofing material has its own characteristics. Therefore, we consider the most popular separately.
On a metal roof
As already mentioned, under the metal tile at the junction of the slopes, the crate is made twice as often. The lower plank of the valley is laid on this crate – this is a galvanized sheet with a fold line in the center and sides along the edges. This element belongs to the extensions, it is painted in tone with the main material. He goes in two-meter pieces.
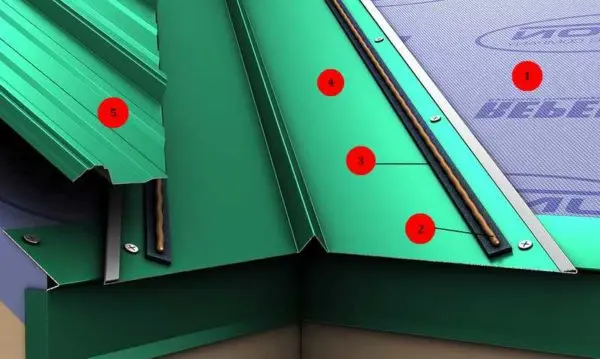
Installation of the valley strip starts from the bottom. The edge of the element extends a little beyond the roof overhang, cut off 20-30 mm below the overhang, and a flanging (edge) is formed from this “remainder”. Please note that the valley bar should end behind the overhang, if there is a drain gutter, then above it. If it is made shorter than the overhang, then water will flow into the roof.
The next sheet is laid on top, with an approach of 20-30 cm, the joint is smeared with sealant (you can smear the entire overlap with bituminous mastic). Lay as many sheets as necessary, cut and fasten near the ridge.
There are two ways to attach the valley sheet
- special self-tapping screws closer to the edge;
- clippers for the side.

Fastening to the side with clamps
When constructing a valley, the main task is to ensure tightness. From this point of view, the second mounting option is more correct – after it there are no holes left, even if they are closed with a rubber gasket.
One more moment. In the lower bar there should be sides on both sides, the height is preferably more than 2 cm. They are needed so that water flowing from the slope cannot get under the metal tile.
A sealing tape is glued onto the fixed bar, at a distance of about 20 cm from the place of inflection. She goes on a self-adhesive tape. Before installation, the protective coating is removed and the tape is glued. Next, a metal tile is laid, which is cut so that it is 60-100 mm to the center of the valley. Manufacturers do not recommend placing slices closer to the center.
The sheets are attached to the crate in regular places – in the lower part of the oxen 20-30 mm below the step. The distance from the fastener to the bend is at least 250 mm.
After fixing the metal tile, the roof valley is ready and can remain in this form. But the appearance of the cropped sheets does not suit everyone. In order to close them there is a decorative overlay, which is called the upper valley. It performs a decorative function – it closes the sections, it is often simply not used.
Features of the withdrawal of the valley above the dormer window, see the following video.
From corrugated board and slate
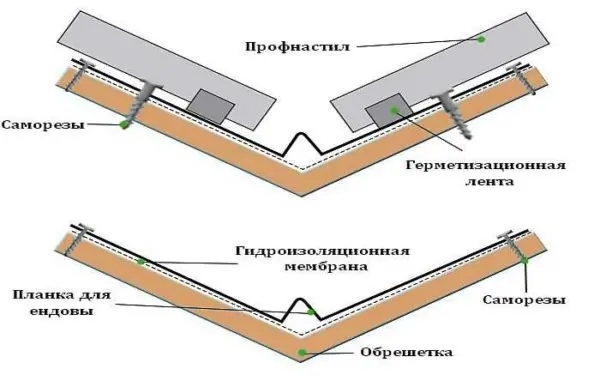
Under these materials in the valley, several boards are laid along. A strip of waterproofing is fixed on them, which is then connected to a waterproofing membrane fixed on the slopes. The overlap should be at least 10-15 cm, the joints are connected using double-sided tape.
Further, the installation is similar to that described above: the lower valley strip is also laid, to which a universal sealant is glued, then the roofing material is mounted.
In this case, the sealing tape can be supplemented with a sealant. A strip of sealant is applied on both sides of the place of the inflection of the roof. After installation of the roofing material, a large free space remains in the ledges of the wave. Water, snow, debris can get there. To prevent this from happening, the gap is filled with sealant, applying it in layers.
In the case of a profiled sheet, there are several options for designing a valley:
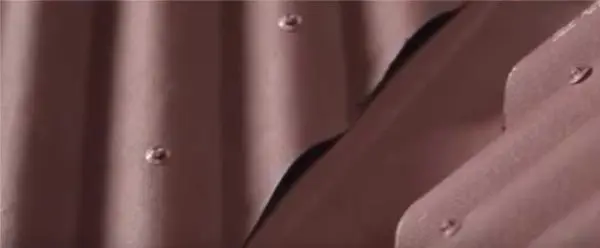
- Open. This is when corrugated sheets are cut at a distance of 60-100 mm from the inflection line. In this case, the bar and slices are visible. To close this “economy”, a decorative gutter is laid on top of the roofing material, covering the cut lines. It is attached to the crate with nails.

Open valley from corrugated board - Closed. The corrugated board is cut off strictly along the line of the middle of the valley, joined practically without a gap. No additional elements are required.
- Intertwined. Difficult for self-assembly method. The space of the valley is covered with sheets of material that go to the other side in turn. This method is practically not used with hard coatings, as it is more suitable for soft roofs.
You choose an open or closed type of slope connection, the device of the whole pie remains the same. Only the way of cutting the corrugated board changes.
Roof tiles
The roof valley of the tile has exactly the same structure as in the case of a profiled sheet. The difference is that the solid crate should be larger – at least 35 cm wide on both sides of the joint. The tile fastening in the valley has special features – some fragments are cut so much that it is impossible to fasten them with a standard lock. Then a hole is drilled in the upper part of the tile, a soft acid-resistant wire is threaded into it. They drive a nail into the crate, winding the wire onto it, fix the tiles in the required position. The second version of the device of the valley with tiles.
Ondulin
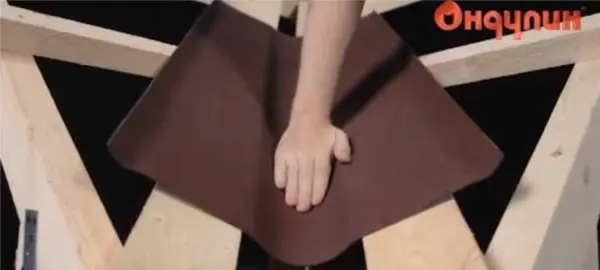
In the case of ondulin, the crate under the valley is not continuous, but two boards located at a distance of 15 cm from one another, symmetrically with respect to the center of the valley. A special chute is laid between them.

Installation starts from the bottom, moving up. The first sheet of the valley gutter is laid flush with the edge of the roofing material, and the shape is corrected. Nailed to the crate with nails from the top side. The next sheet is laid with an overlap of at least 15 cm.

After the entire gutter is laid, the installation of roofing sheets begins. First, they cut with a margin – the mark is placed 5-6 cm further than necessary. Cut along the intended line (jigsaw or grinder). They are laid in place, mark the exact line of the cut – along the ledge on the gutter. Cut off a second time and put back in place. Since the ondulin sheet weighs a little, all operations are easy to perform.

The laid sheet is fixed with special roofing nails with a hat painted to match the coating. It is necessary to fasten in each wave, stepping back as far as possible from the middle line of the valley.
Installation of a valley on a roof from Ondulin is available in video format.
tin roofs
In private housing construction, this type of roofing material is rare, however, there are such roofs. The tin roof valley is connected manually, using a mallet and a special tool.