


Contents
In this article, you will find several ways to move columns in Excel. You will see how to drag columns with the mouse and other ways to move columns in Excel sheets.
If you use Excel spreadsheets extensively in your daily work, then you know that no matter how logical and thoughtful the structure of the table is, columns will still have to be moved. For example, you will definitely need to move two columns in order to arrange side by side and compare the data they contain. Of course, you can try to hide neighboring columns for a while, but this is not always a good solution, since you also need to see the data from these columns in certain cases.
Oddly enough, Microsoft Excel does not provide a direct way to perform this mundane operation. If you try to simply drag a column by its header (which seems like the most obvious way to move a column), you will get very frustrated because it won’t work, even in Excel 2013.
Anyway, here you will find three effective ways to move columns in Excel, namely:
How to drag columns in Excel
As I mentioned at the beginning of the article, dragging columns in Excel is a bit more involved than we’d like. In fact, this is one of those cases where it’s easier said than done. Perhaps this is just a lack of dexterity of my hands 🙂 However, with a little practice, I have mastered this skill, which means that you can definitely do it too.
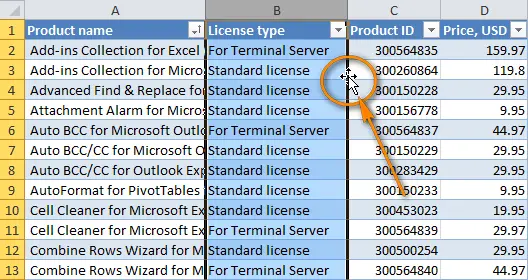
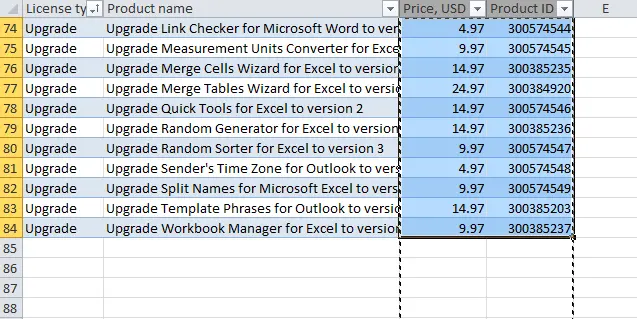
Suppose there is a table with information about your company’s products, and you want to quickly swap a couple of columns in this table. I will take the AbleBits price service as an example. Columns need to be swapped License type и Product IDto id Product ID followed immediately after the product name (Product name).
- Select the column you want to move.
- Hover your mouse over the edge of the selection, and it should change from a regular cross into a four-sided arrow. It’s best not to do this next to a column heading, as the pointer can take on too many different forms in that area, which can be confusing. However, this technique works fine on the left and right edges of the selected column, as shown in the screenshot below.

- Press and while holding the key Shift, drag the column to a new location. You will see a gray vertical bar along the entire column and a pointer with information about where the column will be moved to.
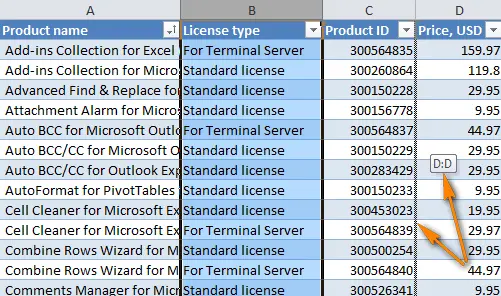
- Ready! Release the mouse button, release the key Shift – Your column has been moved to a new location.
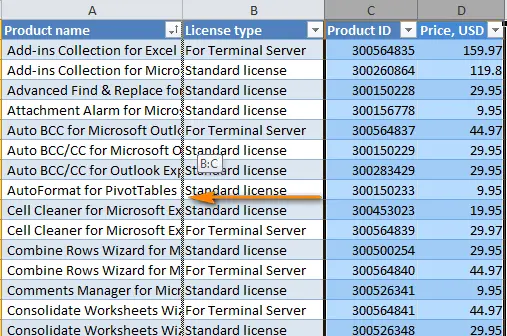
In the same way, you can drag and drop multiple adjacent columns into Excel. To select multiple columns, click on the heading of the first column, then press and hold Shift, click on the heading of the last column. Next, follow steps 2 – 4 above to move the selected columns as shown in the figure below.
Note: It is not possible to drag nonadjacent columns and rows in Excel worksheets, even in Excel 2013.
The drag and drop method works in Microsoft Excel 2013, 2010 and 2007. You can drag and drop rows in the same way. It may take a little practice, but once you master this skill, you’ll save a lot of time later on. I think the Microsoft Excel development team is unlikely to win the “most user-friendly interface” award for implementing this method 🙂
Moving columns using Cut > Paste
If manipulation with the mouse is not what you dreamed of, then you can change the order of the columns using the commands Cut out > Insert. Just keep in mind that there are several features here, depending on whether you want to move one column or several columns at the same time.
How to move one column in an excel spreadsheet
- Select an entire column by clicking on its heading.
- Cut the selected column by clicking Ctrl + X, or right-click on it and select the command from the context menu Cut (Cut out). In fact, you can skip the first step altogether and just right-click on the title, and then select the command from the context menu Cut (Cut out).
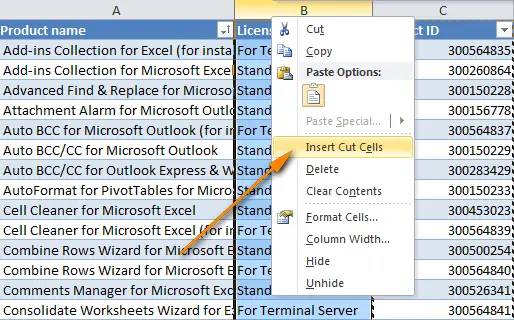
- Select the column before which you want to insert the cut, right-click on its heading and select the command in the context menu Insert Cut Cells (Insert cut cells).
If you like to work with keyboard shortcuts in Excel, then you will like the following method more:
- Select any cell in the desired column and click Ctrl+Space (Space) to select the entire column.
- Press Ctrl + Xto cut the column.
- Select the column before which you want to insert the cut.
- Press Ctrl and the sign «+” on the numeric keypad to insert a column.
How to move multiple columns in Excel
Method Cut out > Insert, which works fine for a single column (or adjacent columns), doesn’t allow you to move multiple non-adjacent columns at the same time. If you try to do this, you will get an error message prompting you to select one contiguous range: The command you chose cannot be performed with multiple selections (This command is not applicable for disconnected ranges).
If you need to swap several columns on a sheet, then you have at least 3 options to choose from:
- Drag multiple columns with the mouse (in my opinion, this is the fastest way)
- Cut and paste each column individually (probably not the best way when you need to move many non-contiguous columns)
- Copy, paste and delete (allows you to copy several adjacent columns at once, and then delete the extra ones)
Moving Multiple Columns with Copy, Paste, and Delete
If the method of dragging columns with the mouse for some reason does not suit you, then you can try to change the order of the columns in Excel in this way:
- Select the columns you want to move (click on the heading of the first column, click Shift and click on the heading of the outermost column). An alternative way is to select only the headings of the columns to be moved and click Ctrl+Space (Space). In this way, only cells with data will be selected, not entire columns, as shown in the screenshot below.
Note: If you are moving columns in a normal range, then both methods will work. If you need to move columns in a full-fledged Excel spreadsheet, then use the second method (only cells with data), otherwise you may get an error message: The operation is not allowed. The operation is attempting to shift cells in a table of your worksheet (Unable to perform operation. An attempt is being made to change part of a table row or column in an illegal way.)
- Copy the selected cells. To do this, click Ctrl + C or right-click on the selected columns and select command Copy (Copy).
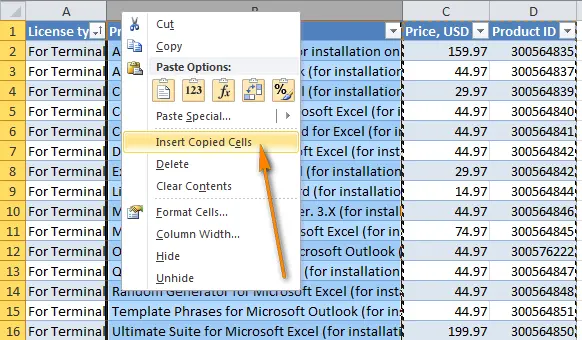
- Select the column before which you want to paste the copied columns. Right-click on it and select the command from the context menu Insert copies cells (Paste copied cells), or press simultaneously Ctrl and the sign «+» on the numeric keypad.
- Delete the original columns as well as the ones you don’t need.
Of course, this process is a little longer than dragging columns with the mouse, but it is suitable for those who prefer using keyboard shortcuts to mouse manipulation.
How to Change the Order of Columns in Excel Using a VBA Macro
If you know at least a little VBA, then you can try to write a macro that will automatically move columns on Excel sheets. It’s in theory. In practice, it will likely take you longer to figure out exactly which columns to move and where to insert them than to manually move those columns. Also, there is no guarantee that a macro will always work correctly. Therefore, you will be forced to check the result every time. It seems that the VBA macro is not the right tool for this task.