


Contents
Often there are situations when the information provided in the spreadsheet needs to be used to create contracts, reports and other important documents. This difficult process can be automated by merging data from MS Excel and Word.
What is Excel and Word Merge?
Merge refers to the transfer of data from a spreadsheet to Word.
How to merge Word and Excel data?
The merging of data is carried out in several steps. First, the table data is prepared at the Excel level, after which the information is transferred to Word.
There are several requirements for the original table that must be met:
- It is imperative that each column of the table that is transferred to the Word file be titled. In this case, the names must be different, repetitions are not allowed.
- In addition, the table must not contain cells that were previously joined. Otherwise, when wrapping, the lines may shift, which will cause many additional difficulties.
In simple words, already at the stage of creating an Excel table, it should be in the same format as a table in Word.
Step 1: Preparing Excel Spreadsheet Data (Data Source)
So, let’s understand a little about how to prepare a table. It is advisable to convert the range to the smart table format using the Ctrl + T key combination. After that, you need to directly configure and prepare the data.
Setting up a data source
After creating a smart table, you need to configure it. This can be done using standard Excel tools. Ultimately, it should look like this.
The main rule for preparing a data source is to check compliance with the requirements described above and adapt the table for them. This is done manually by splitting the cells and adding headers to the columns.
Шаг 2. Подготовка шаблона документа Word
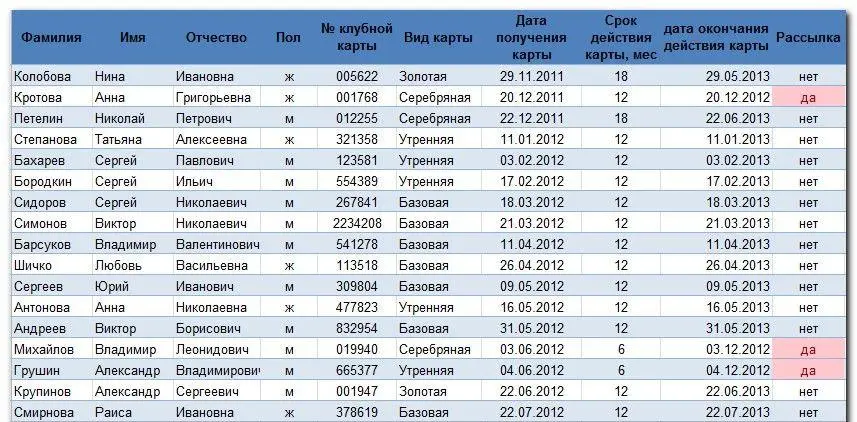
As part of this step, you need to create a Word document in which data from the Excel spreadsheet will be entered. Suppose we need to make a newsletter in which to insert the appropriate data. Accordingly, at the stage of preparing a Word document template, you need to write a letter that has common lines for all data.
Let’s say we need to send a letter to those customers whose club card expires within the next month. In this case, the text will be similar, with the only exception that the number of the club card, its expiration date will be different. In this case, you can use the merge, and the data will be imported into the appropriate places from the Excel document.
In the screenshot below, this information is displayed in color.

It is highly recommended that you set the Margin Shading option to Always for a more comfortable experience. This will make it much easier to distinguish which data was inserted automatically and which was already in the template. Just the corresponding places will be grayed out. Naturally, this selection is not saved when printing, the data looks as if the letter was typed by hand.
Working with the Word Merge Wizard
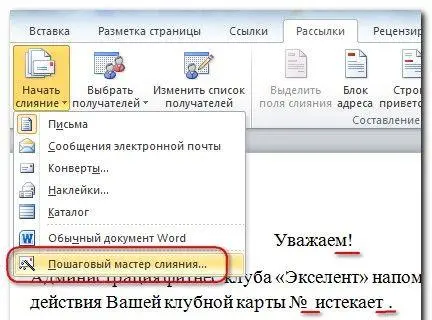
It is most convenient to use the influence wizard to transfer part of the data from Excel to Word. To do this, open our template in Word, and then click the “Start Merge” button, which is located on the “Mailings” tab (all this applies to Office versions starting from 2007).
Next, you need to select the item “Step-by-step merge wizard”.
If you are using an old version of Microsoft Office, then this function is still there, but to access it, you need to use the following menu items: Tools – Letters and Mailings – Merge. You can also display the corresponding button on the toolbar to make your work more comfortable.
It is important to especially emphasize that the template that was created in the previous step must contain general text. That is, even the word “Dear” must be written without ending – “Respect”. Then it will be inserted automatically.
And now we will describe in practice how the merge master is used:
- First, the document type is selected. It can be both email and regular letters. A number of other types of documents can also be selected.


4 - Next, you need to select the document that will be used to send letters (or the one you chose at the previous stage). It can be either the current document or one located in another file. You can also select Template. In the last two cases, you will be prompted to select a file into which data from the Excel spreadsheet will be automatically inserted. In our example, we will select the “Existing Document” item.


5 - Select recipients. In the case of us, the list of contacts from the Excel spreadsheet will be used as recipients. Accordingly, we are interested in the item “Using a list”. And you can directly select the list that will be used as a data source using the “Browse” button, which is located a little lower.


6 - Next, you need to select a file with a data source. After it is selected, a dialog will appear in which there will be the same table that we have in the excel document. Next, you need to select those records that are of interest to us at a particular point in time. If everything, then just press the OK button. If such a need arises, you can sort the list, filter the relevant data, or use the appropriate commands to find them. Of course, the built-in filter in Excel is much more functional, but in general, you can filter out a series of data based on text or numeric values. Also, with the help of checkboxes, you can select those records that will be used for manual mailing. In our case, the field by which filtering is carried out is the “Mailout” field. The value “yes” is used as a criterion (in our table, this value appears if the club card expires in the current month).


7 - Now you need to proceed to the stage of inserting the appropriate fields in the appropriate places. But before that, do not forget to put the cursor where you want. If you forgot, you won’t have to close the wizard anyway. In this case, you can simply move the field to the place you need after inserting the field. In our case, the cursor was placed near the exclamation point after the part of the word “Respect”. Since we need separate fields, we need to select the “Other elements” item.


8 - After we have selected the appropriate field (in our case, this is the name), you need to confirm your actions by clicking the “Insert” button. A similar operation must be performed with all other fields. That is, if we need to insert a middle name, then we need to click on the corresponding field in the list and click the same button to insert it into the document.


9 After that, close the window and add spaces between the inserted words. If before that you set the “Field Shading” option to “Always”, then the labels will be displayed on a gray background. Similar actions must be done with the next field with the club card number.
First, the cursor is placed after the No. icon, after which we open “Other elements”, having previously completed the steps described above, after which the field with the club card number is selected. Next, click on the “Insert” button. And the same with the expiration date of the card.
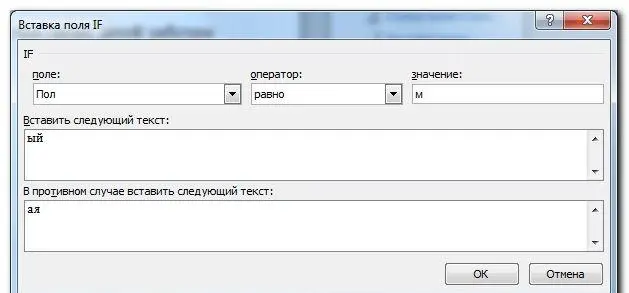
- The last step is to insert the end of the word “Respect”, depending on what gender the person is. To do this, when merging, a special field, “Rules”, is used. There are several varieties of it, but we are interested in the form “IF … THEN … ELSE”. You can find it on the Mailings tab. But in older versions of the office suite, it was also on the toolbar, as shown in the screenshot.


10 - После этого задаем параметры в появившемся окошке. Сначала выбирается поле, которое используется для проверки на предмет соблюдения определенного условия, после чего выставляется логический оператор (в нашем случае равно), а потом уже значение, на соответствие которому нужно проверять это поле. Затем нужно добавить текст, который нужно вставлять, если значение оказывается правильным и тот, который добавляется в случае возвращения результата «ЛОЖЬ». И после нажатия на кнопку ОК получаем такой текст.


11
And here is an example of filling in the fields, which was in our case.
На следующем этапе нужно получившиеся в результате слияния документы пересмотреть. Для этого в окне есть кнопки навигации, нажимая которые можно проверить, все ли правильно сделано. Также с помощью специальных флажков можно отобразить лишь некоторых получаете.
After performing these steps, it turns out that some data was transferred incorrectly.


Zeros at the beginning of the number have been removed. Instead of displaying the number 001768, the result is just 1768. Same story with dates where the month and number have been swapped. Similar problems can happen with any other formats: decimals, money, and so on. It’s just that the formatting that was in the Excel spreadsheet is not preserved when merging. But there is a solution to this problem.
First you need to understand that each date, time, and so on has its own code that can be viewed and corrected. To do this, you need to right-click on the corresponding field, then click on “Codes/Field Values”.
In the case of the club card number, the result will be as follows.
(MERGEFIELD “M_club_card” }
Мы не будем вносить никаких коррективов в код, обойдемся только добавлением формата.
If you have tried at least a little bit different formats in Excel, then you should not have any problems adding it. To make a number six-digit, you need to put six zeros in the format. You will get the following code.
{ MERGEFIELD “M_club_card” # “000000” }.
После этого делаем правый клик мышью по соответствующему полю и нажимаем «Обновить поле». После этого проблема должна решиться автоматически.
The date code is entered like this:
{ MERGEFIELD “date_end_of_action_card” @ “DD.MM.YYYY” }
Now everything is correct.
At the final stage, it remains only to manually edit some letters if there are errors that cannot be corrected automatically. After that, they can be saved to your computer or printed immediately.
Combining Word and Excel Tables
Let’s imagine a situation that we need to make a table in a Word document so that part of the data is from Excel. At the same time, it is important to make sure that after calculations in Excel, the data in Word is automatically updated.
To do this, you must first make a table in Excel, after which this range is selected and copied.
After that, you need to use the “Paste Special” function of Word, which can be found in the “Insert” menu and the option with the Microsoft Excel sheet is selected there.
To link tables, you need to use the function of the same name.
Merging texts in Word and Excel
Imagine the following task: we have an Excel table that lists people (their last names, first names, patronymics), as well as their contact numbers. There is also a Word document in which you need to fill in the gaps with the appropriate names and phone numbers.
To do this, you need to open the “Tools – Merge” menu, then select the data source and select the “Add Merge Field” item. After that, the appropriate fields are inserted in the appropriate places. After pressing the “Combine” button, the action can be considered completed.
Conclusions
Thus, the merging of Word and Excel data allows you to make your work more convenient. This greatly simplifies life in situations where there is a large amount of data (for example, personal data), and on their basis it is necessary to create a large number of documents according to a template.
As you can see, professional knowledge of the office suite includes not only the ability to create spreadsheets or text documents, but also to exchange information between two applications.