


Contents
Making a cozy place out of a balcony or loggia is not so difficult. Most often they decide to sheathe the balcony with clapboard. There is a lot of work, but it is not difficult and you can handle everything with your own hands.
What lining to use
Basically, when they talk about lining, they mean wood products. Much less often, this term is also called PVC panels, adding the word “plastic”. Probably, the whole point is in a very similar principle of connecting the planks to each other and the method of their installation, and also in the fact that outwardly it looks like long boards with a spike on one side and a groove on the other. When choosing which lining to use for a balcony, they usually proceed from cost, aesthetic or practical considerations.
In some regions, wooden lining is a cheap material, in others it is expensive. So you have to compare the price of plastic and wood yourself. Wood is often preferred because it is natural. This is true, but in order to maintain its attractiveness, it is impregnated with protective compounds, and this is chemistry. Then it is painted or varnished. The compositions, as you understand, are also far from natural.
Based on practical considerations, PVC clapboard sheathing is definitely ahead: it is easy to clean, does not require additional care or processing, and has retained its unchanged appearance for many years. Unless it fades on the sunny side, so it is better to take light colors: on them, the loss of color is almost imperceptible.
Wooden lining is more capricious during operation: before installation, it must be coated with protective impregnations. If you are only going to give it some shade, you can choose an impregnation that will immediately give you the desired color. Then this will be the end of her processing. If you decide to paint or varnish the finish, then you need to do this after installation (but before installation, soak it with antiseptics anyway). During operation, it will periodically be necessary to remove the old coating and re-coat everything: the varnish or paint may crack, the balcony finish will lose its attractiveness. This is such a mess.
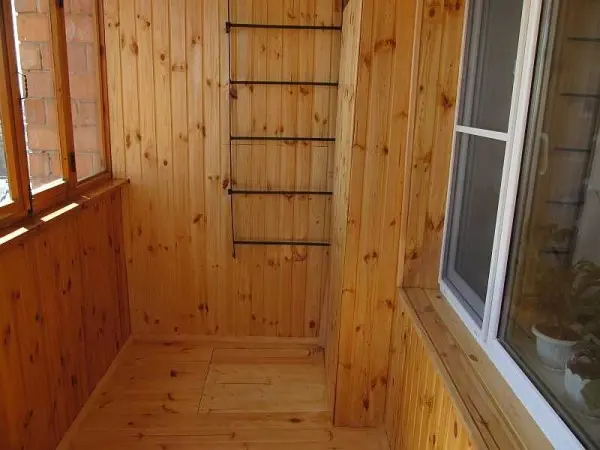
Despite all this, when deciding which lining is better for a balcony, wood is preferred. Tastes, of course, are different for everyone, but according to the general opinion, a room sheathed with wood is much more comfortable. As a result, the desire for beauty outweighs practical considerations.
How to cover the lining on the balcony so that it remains attractive for a long time, read the article “How to cover the lining inside the premises”
Which is better
Let’s talk about wood products. Let’s talk about breeds first. The cheapest lining is made of pine and spruce. Despite the relatively low cost, it is durable: coniferous wood contains a large amount of resins, which are antiseptics and preservatives. In regions with hot summers, this can lead to the fact that on the sunny side, in places of intense heating, resin will be released in places. Another disadvantage is soft wood. If you hit it (decently, for example, with a hammer), a dent will remain. If this does not scare you, you can sheathe the balcony with pine or spruce lining: these are all the disadvantages of this type of wood.
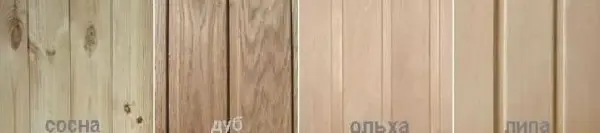
There are also expensive varieties of conifers: larch and cedar. They have a much denser wood, are more durable, and resist weather conditions well. But these qualities are absolutely not needed for lining the balcony inside. A more compelling argument is the beautiful color and structure of the wood, as well as a smaller amount of resins. Sheathing with clapboard made of such wood is beautiful and for a long time.
Pleasant to the eye hardwood. Here choose according to your taste: linden has a slightly pinkish tint, aspen becomes silver-gray, alder has a beautiful pattern, oak is generally unrivaled in terms of decorativeness and reliability, but also at a price.
Profiles and appearance
Now for the technical specifications. Let’s start with profiles. On sale there is just lining, but there is eurolining. The main difference is that there is one or more longitudinal grooves on the back of the “euro” variant. They provide air circulation, which prolongs the life of the finish. Also, in theory, lumber with the prefix “euro” has standard sizes and should be produced from high quality wood. In practice, everything is different: both the sizes “float” and the quality is far from always good.
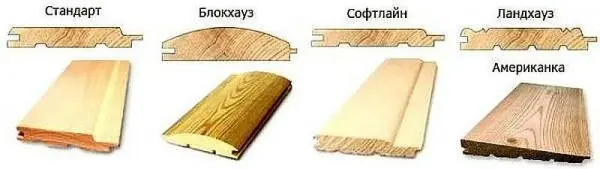
Profiles, there are a couple of dozen. Different chamfers, “waves” of different sizes and other figured surfaces allow you to get walls that are different in appearance. In the photo above – the most common, usually produced in large quantities.
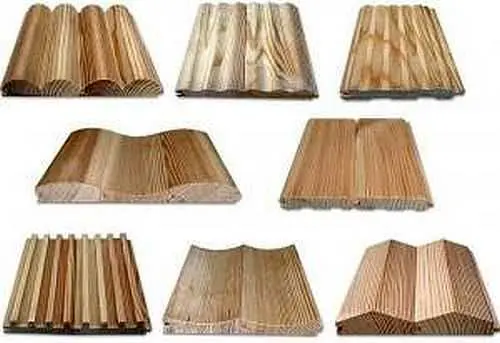
There are several other types that can be made to order. Such a “custom” batch will cost much more: you will have to reconfigure the equipment.
Varieties and humidity
The grade of lining depends on the number of knots, cracks and color changes that have fallen on the plank. Grade A or “Elite” should not have them at all, or in very small quantities. Grade “B” – no more than 4 knots of brown color and color changes of a small area, grade “C” can have many knots.
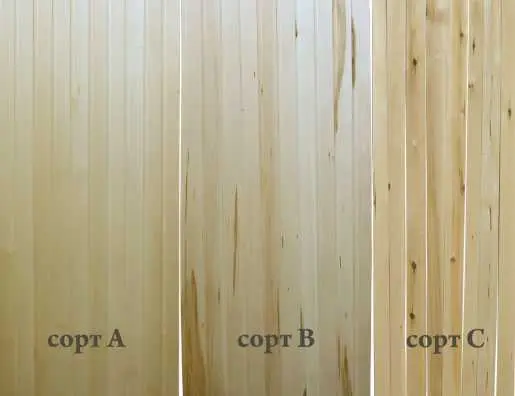
The presence of knots does not mean that the wood is bad. The main thing is that they should be brown, not black, and not have signs of destruction. And in general, knotty wood sometimes looks great. All this is a matter of taste and preference.
Here with humidity the situation is much more serious. Buying raw wood lining for interior decoration can be much cheaper, but also much more troublesome. If you nail planks of trim with high humidity, it will gradually dry out, shrinking in size. Slots will appear between the boards, some of them will unscrew or bend. You will have to remove everything, sort it out and mount it again. Moreover, maybe twice: it is difficult to predict when the shrinkage will end. Therefore, for the interior decoration of the balcony with clapboard, it is better to take chamber-drying lumber. Humidity then is not higher than 7-10%, it will no longer “lead” and will not bend: these materials were rejected after drying. That’s why the prices are higher.
About the thickness and width of the slats. For interior decoration of premises, you can take a thin board: the conditions of the atmosphere are stable. But the balcony is not quite an interior room, temperature and humidity fluctuations are more serious. Even with good insulation of the balcony. Therefore, the average thickness is suitable – 14-16 mm, but 12 mm can also be used.
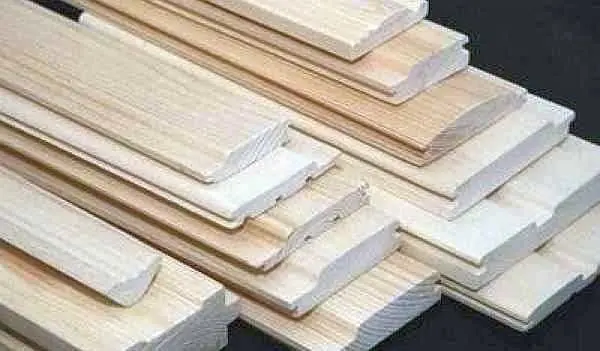
The width of the board can be from 60 mm to 150 mm. It takes longer to nail a narrow one, less work from a wide one, but in a small room wide stripes “eat up” the volume. So for cladding a balcony, the optimal lining width is average, about 90-120 mm.
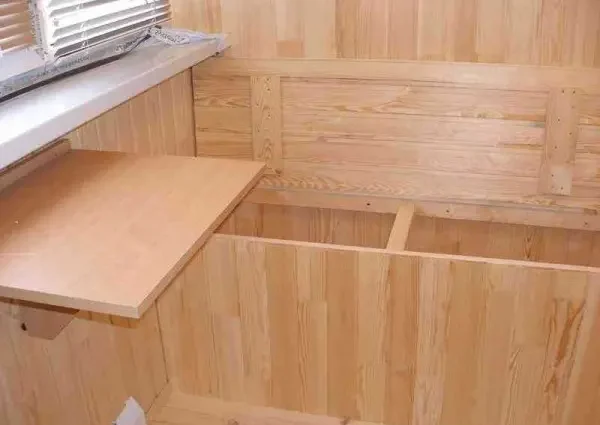
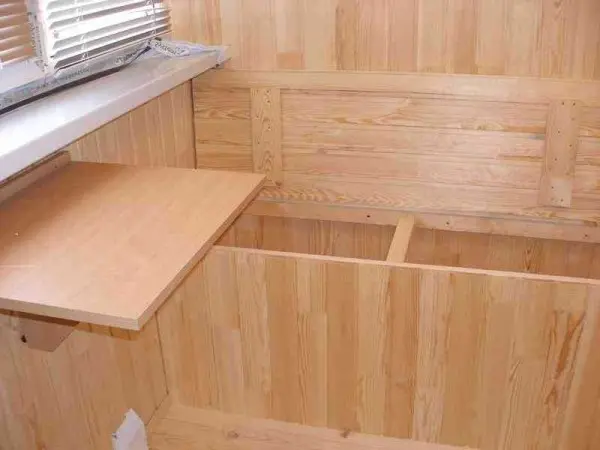
How to sheathe a balcony with a clapboard with your own hands
First of all, you need to decide whether you will insulate the balcony or not, if so, what parts of it and with what material. The structure of the crate and the thickness of the bars used depend on this. The order of work will change slightly – there will be no installation of insulation. All other stages and their sequence will be similar.
Work order – step by step instructions
First, all the old finishes are dismantled, plaster, paint, tiles, which do not hold well, are removed. Anything that is firmly held can be left untouched. For greater reliability, before sheathing the balcony with clapboard, it is worth priming the walls, floor and ceiling with an antifungal compound. This is especially true if it was previously open. After the composition dries, the actual installation work begins:
- A crate is stuffed on the walls and ceiling. It is usually made from wooden bars. If the balcony or loggia is insulated, the installation step of the slats is consistent with the width of the insulation.
- The heater is installed and fixed.
- Floor joists are installed.
- A heater is placed between them.
- Moisture-resistant plywood with a thickness of at least 10-12 cm is laid on top, fixed to the logs with self-tapping screws.
- The lining is mounted on the walls.
- The ceiling lining is installed.
- Floor and ceiling plinths, corners, slopes are installed.
Further on some stages and materials in more detail.
How to insulate
Before sheathing a balcony with clapboard, it is necessary to lay a heater. Any of the thermal insulation materials available on the market will do:
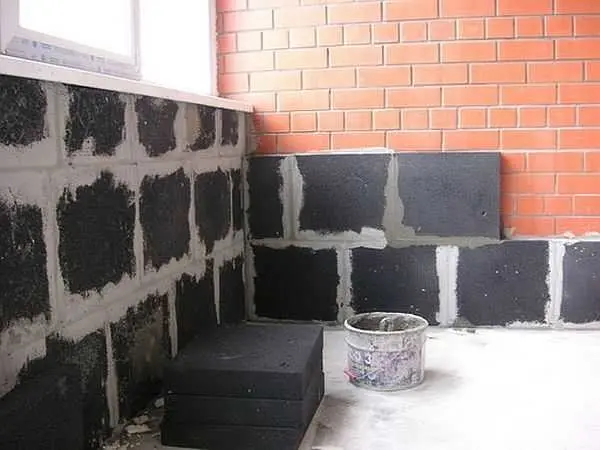
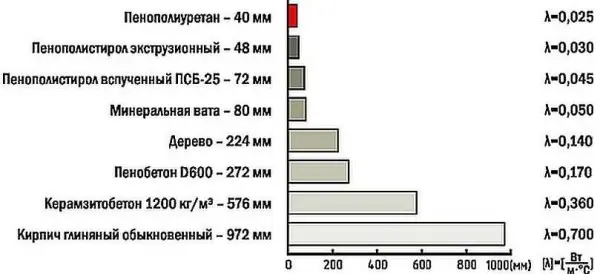
- The cheapest is foam (PSB). Produced in the form of plates. It has good thermal conductivity (see the graph). Its main drawback is that it cannot withstand loads – it is wrinkled, but under the clapboard this drawback is unimportant. The second point that many do not like is that it is unnatural and can release harmful substances. You can’t argue with unnaturalness, and the second statement is only partly true. Under normal operating conditions, the foam is chemically neutral and harmless. It emits harmful substances only when burning. Another negative quality: it has low vapor permeability (does not remove steam). But this is the other side of insulation. With an excess of humidity today cope with the help of a ventilation system.

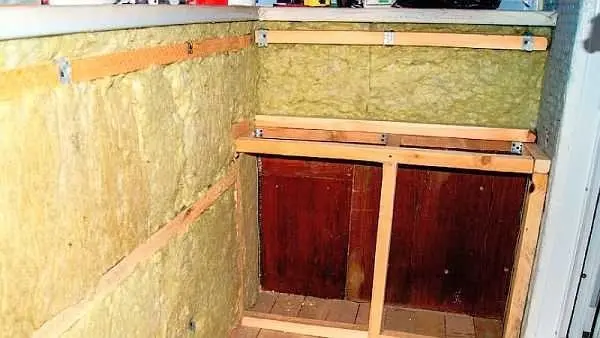
You can insulate the balcony under the lining with foam - Mineral wool. They are made from molten rocks, slag or fiberglass. So this heater is natural. But in production, phenol-formaldehyde resins are used as a binder, which is not encouraging. There are basalt quilted mats, in the production of which binders are not used – they can be used even in children’s institutions. The positive qualities of mineral wool are good thermal insulation properties, ease of use (but not with fiberglass). The disadvantage of this material is hygroscopicity, which is why it should be closed from all sides from moisture. The price range is average.

Mineral wools have good characteristics, but are afraid of moisture - Extruded (extrusive) expanded polystyrene (EPS). Has very good heat-insulating characteristics and high density, well resists mechanical loadings. Along with thermal insulation, it dampens sounds well. Of the relatively inexpensive heaters, it is the most effective. Sold in plates, has a system of locks, which eliminates the formation of cracks between which cold air penetrates. It is this material that is most often recommended. If you have the financial opportunity, put it under the clapboard trim. Of the shortcomings – it does not conduct steam and is not cheap.

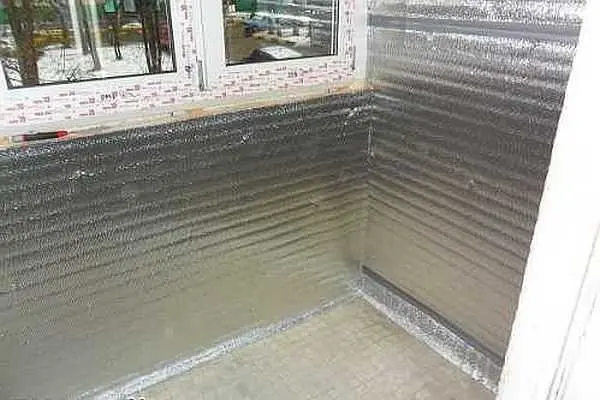
Extruded polystyrene foam is characterized by high density and low thermal conductivity - Foil polyethylene foam. This is an effective vapor barrier that prevents the penetration of moisture into the insulation. When using mineral wool, it must be rolled out from above, nailed to the crate with staples, glue the joints with foil tape. You can just use building foil, but it is more difficult to work with it, and the polyethylene layer is an additional heat insulator. This material alone can be used only in the southern regions, in the rest of the territory it is only an addition that improves thermal insulation.
Foiled polyethylene is nailed over the insulation to reduce heat loss and prevent steam from entering the insulation. - For those who want to have environmentally friendly housing, there is a natural insulation with excellent characteristics: foamed glass (foam glass). It does not burn, does not emit anything, light, durable, frost-resistant (operating temperature range from -260°C to +230°C). The thermal conductivity of foam glass is 0,04-0,08 W / (m K). Cut with a hacksaw, mounted on foam. The disadvantage is the high price. There is foam glass from Chinese manufacturers at reasonable prices, but the quality is below average, there is Belarusian foam glass, which is average both in terms of price and characteristics, the best is European, but it is expensive.

Foam glass is a natural heat-insulating material with very good characteristics. - Foam blocks are often used to insulate balconies. For normal efficiency, their thickness should be about 27 cm. No one will take such an area from a small-sized room, so a layer of one of the heat-insulating materials described above is still placed on top of the foam concrete.
Any of these heaters can be used on the ceiling, floor or walls. For the floor, there is a natural and inexpensive option – expanded clay, but it is far from being as effective as the materials presented above: the average thermal conductivity is 0,1 W / (m K) (two times higher than that of mineral wool).
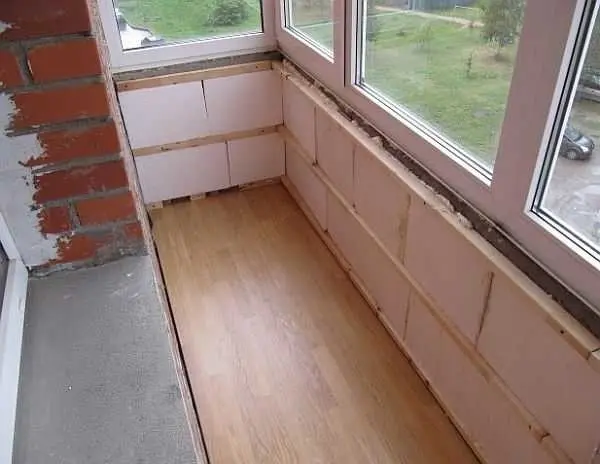
How to sheathe a balcony with clapboard
Balcony cladding is technologically not much different from finishing other rooms: first, a frame is assembled, then a cladding board is nailed to it. It is necessary to align the crate horizontally and vertically, and then correctly set the first bar on the wall or ceiling, since the installation of all the others is carried out from it. Then the second board is nailed to the first board, then the third and so on, to the corner. On the next wall, everything repeats again.
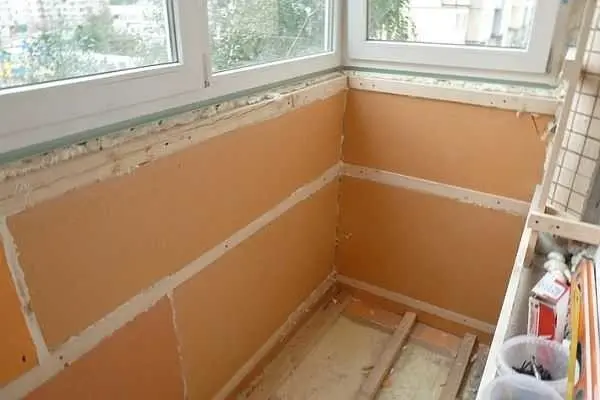
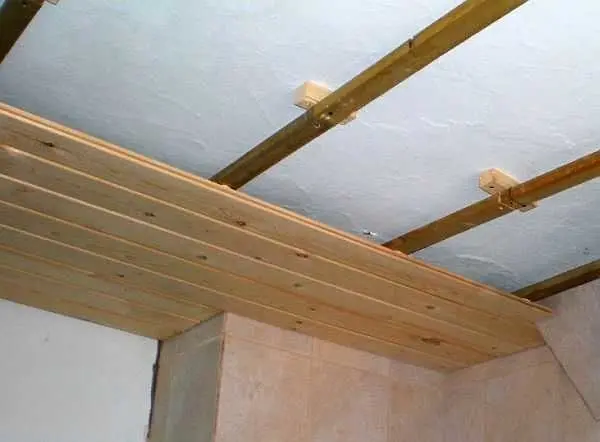
We make a crate
Sheathing clapboard begins with the creation of a frame – crates. It is most often made from a bar. The cross section is selected depending on the thickness of the insulation (if any). The bar should be of such a size that a gap of 1,5-2 cm remains above the surface of the insulation. This gap will allow maintaining the normal humidity of the insulation and wood, which will prevent the appearance of fungi and mold.
If the timber of the required size turns out to be too expensive, you can save. Under the crate take a bar of the same thickness as the insulation (or a little more). It is mounted between the guides, and on top, perpendicularly, a counter-lattice is stuffed. It is made from strips 1,5-2 cm thick. They will then give the required clearance. Only in this case it is necessary not to get confused with the direction of fastening the lining.

Cladding lining can be vertical or horizontal. The battens of the crate under it are installed perpendicularly. If the trim will be mounted vertically, then the crate under it should be located horizontally.
If there is a counter-lattice, the rules change: the primary lathing is also stuffed (vertically), and the counter-lattice – horizontally. With this system, the slats will be mounted vertically.
More often, clapboard lining on the balcony is done vertically. Accordingly, the installation of the crate can be started from the bar under the window block. It is set horizontally, checking the level in two planes. If the wall is uneven, wooden or plywood linings of the required thickness are installed in the right places. Fasten the crate with dowels.
Planks must be stuffed along the perimeter of the walls and ceiling, stepping back from the corners of 30-40 mm. Also be sure to stuff around the perimeter of window and door openings. Then intermediate bars are fixed: one plank from the other should be at a distance of 40-50 cm. It turns out a frame on the walls and ceiling, to which the lining is then attached.
The lining boards are cut a little shorter than the required length (0,5-1 cm). This is to compensate for dimensional changes due to high temperature and/or humidity.
Lining installation instructions
They are fastened with screws or nails to the laths of the crate. If you use nails, take them with a small hat – finishing, self-tapping screws – for wood (better – light, not black). There is another fastener option – staples from a construction stapler. This is the fastest way and quite reliable. Just take staples with a long sharpened leg, T-shaped ones are also suitable.
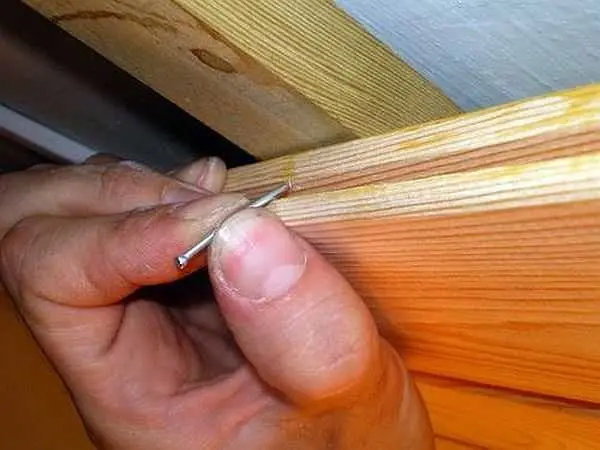
The first bar is installed in the corner that is most difficult to work with. It is put up with a spike in the corner, the correct installation is checked with a building level. They are nailed into the face (into the front surface), stepping back from the edge of 1-2 cm. To prevent the wood from splitting, a hole is first made with a thin drill. Then a screw is screwed in or a nail is driven in.
On the opposite side (the groove is located there), the lining is fixed with nails, self-tapping screws, staples. They are hammered at an angle of 45 ° into a spike. It turns out a hidden fastening – it is closed by the next board.
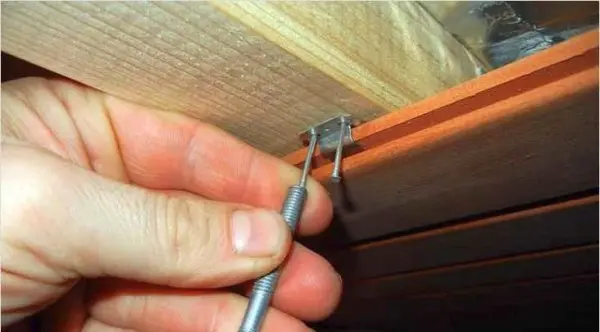
There is another option – clapboard lining using special mounting plates – kleimers. They hold well if the spike is long enough, and this can most often be observed in eurolining. Kleimers are installed in the spike (as if put on it). On the other hand, they have a mounting plate with holes for nails. One or two cloves with a small hat are hammered into this plate.
The first board is attached to each plank of the crate, all subsequent boards – through one in a checkerboard pattern (alternating). The second board is inserted into the tenon of the first. If it does not fit tightly, it is knocked out with a small piece of wood attached to the bar. and hammer. They knock with a hammer on the attached piece of wood. Such complexity is necessary so as not to damage the board. Having driven the spike into the groove, they check whether the bar has become vertical. If necessary, adjust, then nail. This is how the entire lining of the clapboard is assembled. The last bar sometimes needs to be cut in width. It is attached closer to the corner, like the first one, in the face.
The process of mounting the crate and wooden lining is shown in the video.
The entire process of cladding a balcony – from the installation of exterior finishes to the installation of slopes and platbands, see the video below. We only worked with PVC panels, but the finishing steps are similar. The only difference is that the wooden lining does not have starting bars. All tops and bottoms are closed with skirting boards, and corners with corners.
How to process lining
When cladding a balcony with clapboard, it is necessary to treat with antiseptics not only the finish, but also all the laths of the crate. The most popular protective impregnations and primers are listed below. Some of them can immediately give the wood a shade, not painting over, but emphasizing the texture.
- Senezh Aquadecor is a tinting antiseptic. If you cover the wood with this composition, it immediately protects against mold, fungi, insects, while giving one of 16 shades. No topcoat required.
- Aquatex “Anti-septic primer” – high-quality protection of lining for subsequent finishing coatings (for example, under varnish).
- TIKKURILA VALTTI-POHJUSTE (TIKKURILA VALTTI-POHJUSTE) primer antiseptic for wood, protects against biological damage, but does not protect against ultraviolet radiation. Therefore, it is recommended to color as soon as possible.
- Impregnation Manor “U-409”. It creates a thin polymer film on the wood, through which steam penetrates, but this film prevents dirt from penetrating into the wood, preserving the appearance of the finish. The composition includes additives that protect against fungi, mold and insects.
On the packaging of each product there is an instruction for use and application. It describes the rules of application and consumption to ensure protection. Only if these rules are observed, you can be sure that the lining and the frame under it will serve for a long time.
If we talk about stains, then most of the modern compositions, along with a change in the color of wood, also have protective properties. For example, stain Aquatex (similar to Senezh Aquadecor). It has a wide range of colors, contains a hard-to-wash antiseptic that protects wood from damage by fungi or insects.
Processing lining on the balcony can be done in different ways. It is most convenient to use tinting antiseptics to finish the balcony. A single treatment will immediately protect and give color. But they only give shade, leaving the pores open. Dirt can accumulate in these pores. And getting it out of there is no easy task. If you also need a protective film that will prevent the penetration of dirt, you can cover the lining (tinted or not) with varnish or dirt-repellent impregnation such as U-409 Estate. Impregnation creates a polymer film on the surface that closes the pores, but does not give shine.
Often there are problems on the sunny side: how to cover the lining on the balcony so that it does not fade. Light tinting is best, which whitens the wood a little. A light wall heats up less and is not afraid of fading. This clapboard lining looks wonderful.
If you want to have a shiny surface, then you can use any varnish for interior work. Watch the video about the types and types of varnishes. It will be easier for you to understand how to varnish the lining on the balcony.
Painting the lining on the balcony with ordinary paint is no longer relevant today. Why spend money on wood and then paint over its texture? Then you can immediately put PVC. So choose: toning, varnishing, or both.