


Contents
Thuja is a small monoecious evergreen tree (less often a shrub) of the Cypress family. This family includes 5 species, which are native to regions of North America and East Asia. In the natural habitat, the propagation of this coniferous culture occurs by seed or vegetative means. However, in nurseries and garden landscapes, thujas are propagated by other methods, one of which is using cuttings. Thuja cuttings can significantly save time and effort on seed germination, as well as finances for the purchase of a finished seedling.
For everyone who is going to cut the conifer for the first time, it is important to know all the nuances, rules and features of breeding thuja with cuttings at home.
How thuja reproduces at home
At home, thuja is often propagated in several ways: for example, you can grow a conifer from a twig or use the seed method. If you propagate thuja with seeds, you can get quite healthy specimens with a high level of endurance in a fairly short period of time without large financial costs. The seed method allows you to propagate any varieties and types of trees, however, this method has a significant disadvantage: the grown seedlings will not correspond to the parental form by 100%, and may also have deviations in their appearance and decorative qualities. Growing thuja from twigs also has a drawback: with this method of reproduction, no more than 70 – 80% of plants can survive.
Is it possible to propagate thuja cuttings
Unlike the seed propagation method, which takes about 6 years, there is another way to breed thuja – cuttings. If you propagate thuja by cuttings, you can see the result much faster – already in 2 – 3 years, when young healthy plants are obtained that are completely suitable for landscaping a garden area. Moreover, seedlings grown from cuttings are much more hardy and viable than those propagated by seeds. Such plants adapt much faster and better to the climatic conditions of the area than specimens brought from another place.
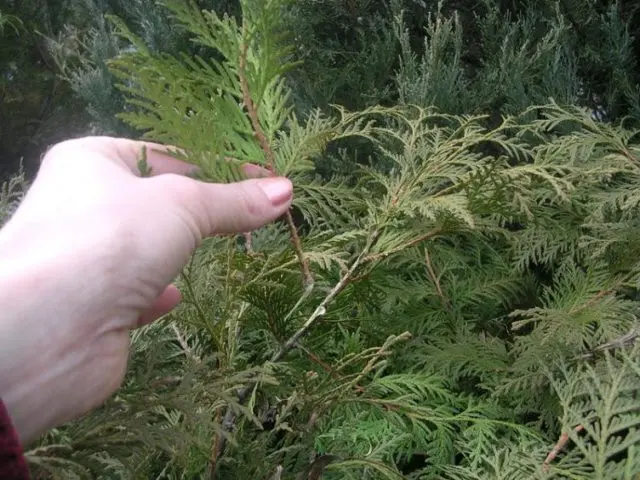
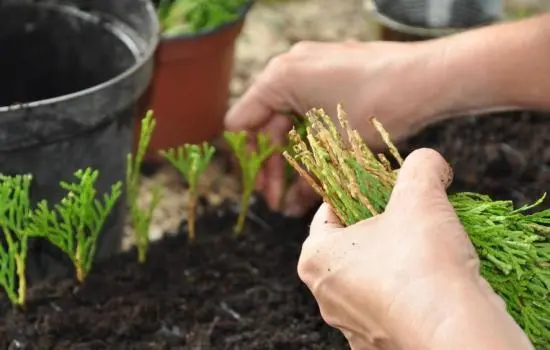
In order to propagate thuja by cuttings, it is extremely important to correctly choose the branches of a plant that has not yet become stiff, up to 3 years old. It is optimal to choose green branches up to 0,5 m in length with a small amount of wood at the tip. It is best to do this on a cloudy day (in the morning).
Harvesting cuttings of thuja
Many gardeners believe that cutting thuja and harvesting planting material is a complex process that requires a lot of effort, but this is not so. By correctly cutting the stalk from the right place at a certain time (mid-April), as a result, you can quickly propagate the conifer and get a seedling that will give roots 5-7 cm long in 4-5 weeks.
When cutting cuttings, it is important to adhere to the following rules:
- It is best to cut off the part of the branches that is in the middle of the tree. The branch must be over two years old and begin to wood. Its length, on average, should be 40 – 50 cm, and the diameter – no more than 5 – 7 mm. As a result, about 3 – 4 finished cuttings will be obtained from one branch.
- It is best to use a sharp knife or secateurs to cut off the cutting.
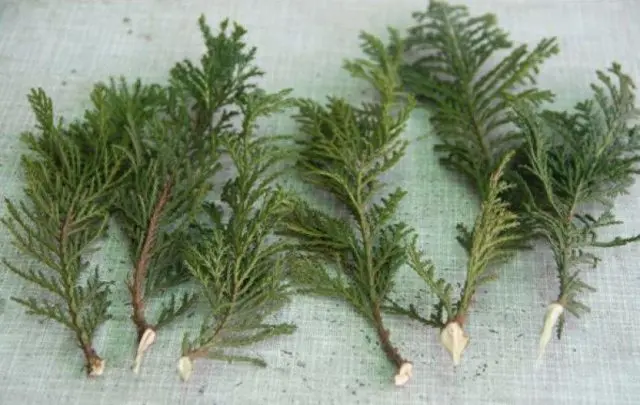
- In order to properly propagate the conifer, it is better to take a cutting with the so-called “heel”: this is a separate branch of the right size (10 – 15 cm), which was torn from the plant with a sharp movement. This “heel” is the basis for subsequent root growth.
- All leaves on the lower part of the branch should be cut to 4 – 5 cm: so that they do not take away the nutrients necessary for the proper rooting of the cutting. The rest of the leaves may remain.
Before planting plants in the ground, experts recommend treating the planting material with a drug that stimulates root formation (Epin, Ecopin, Kornevin, etc.). The stalk is dipped in the preparation and allowed to soak in the open air for 30 minutes.
How to save thuja cuttings before planting
Experts do not recommend postponing the planting of the thuja after receiving the cuttings, as they may lose some of their decorative qualities, and the roots of the plant may dry out. However, if there is no opportunity to immediately plant the ephedra, the best option would be to wrap the cuttings with a damp cloth and place in a cool place for a short time.
Terms of reproduction of thuja cuttings
You can propagate thuja by cuttings in any season, but it is worth considering that at different times of the year, thuja is cut differently. For example, when the conifer is propagated in the autumn, the plant immediately needs to provide the optimum level of heat and moisture for growth in the winter.
Experts consider spring to be one of the most optimal seasons for propagating thuja by cuttings, because:
- After the snow thaws, the thuja gradually awakens from winter, and the process of sap flow begins at the tree. At the same time, the vegetative mass of the plant has not yet been recruited and you can safely cut the conifer, which, in turn, will not notice the “loss” of several of its branches.
- In the spring, during the first 1 – 1,5 months after planting (from mid-April), thuja cuttings will take root at ideal air temperature. However, the humidity level should be maintained artificially by hand.
- It is in the spring that you can have time to transplant rooted plants into a special school, where the thuja will continue to grow over the next 2 to 3 years. Healthy, hardened and hardy young plants will be ready for winter.
In summer, thuja is most often cut by cuttings in the last decade of June, when the second stage of growth begins. However, it is worth remembering that the rooting process will not happen immediately, and the seedlings will wait for the next year. Harvesting of cuttings is carried out in April using green annual shoots. If you propagate thuja in the summer, you can achieve the development of the most powerful root system in the seedling in the winter and until the plant wakes up. It is also recommended to take the soil from the place where the thuja will be planted in the future: then the level of its adaptation and life expectancy will increase significantly.
Most of all, the propagation of thuja by cuttings in the fall has features. Many gardeners consider the autumn period to be the ideal time for cutting thuja, because then the chances of getting healthy and hardy specimens increase several times. In autumn, the process of sap flow slows down, which reduces the number of branches that die from lack of moisture. However, it is worth considering that at the time of vegetative dormancy it will take more time for rooting than during active growth. It is best to take up harvesting branches in October, on one of the cloudy days, when the leaves on the trees begin to crumble intensively. It is also important to carefully approach the process of choosing a tree and branches. In order for the seedling to form the correct crown, it is better to take shoots from the area of u3buXNUMXbthe top of the tree. On especially high thujas, it is best to choose branches that are at least XNUMX years old.
The principle of cutting branches from a tree in the autumn remains unchanged: they should be cut off from the shoots in such a way that at the ends there is a part of the lignified bark – the “heel”, which should be as long as possible. The cut is carried out in places where the bark has already begun to move away. In addition, it is better to cut off all leaves up to 30 mm from the heel.
You should pay attention to the features of caring for cuttings in the fall during rooting:
- If thuja is propagated with the help of cuttings plucked in autumn, which are placed in water, all care consists in its regular change. This will prevent heel rot. When changing the water, the cuttings must be removed and their bases wrapped with a damp cloth. Rinse the container and pour fresh water on the bottom, you can add a little solution of potassium permanganate, after which place the cuttings back into the container;
- If the thuja is cuttings using a substrate, the soil should be regularly moistened. It is best to use a spray gun for this to prevent soil subsidence. On also allow the earthen lump to dry out greatly;Attention! Do not be zealous with watering. With an excess of moisture, the “heel” or the root system of the plant may begin to rot.
- If you propagate thuja in the autumn, then caring for the cuttings in the film will be the most hassle-free. Due to the fact that the film and moss perfectly hold moisture, the plants practically do not need moisture. You can determine whether the conifer has enough moisture by looking at the package with cuttings: if there is no condensation on its inside, the humidity level inside is optimal. If condensation still appears, then the moisture level should be slightly increased.
Reproduction of thuja by cuttings in winter at home is not particularly difficult, moreover, it is during this season that there is the most time for gardening. However, it is important to take into account: it is the winter period that is characterized by high plant mortality, therefore it is necessary to cut thuja with the utmost care.
You can find out more information about the features of thuja cuttings in winter at home from the video:

How to propagate thuja at home with cuttings
Growing thuja from cuttings at home can be done in several ways, each of which has its own characteristics and nuances:
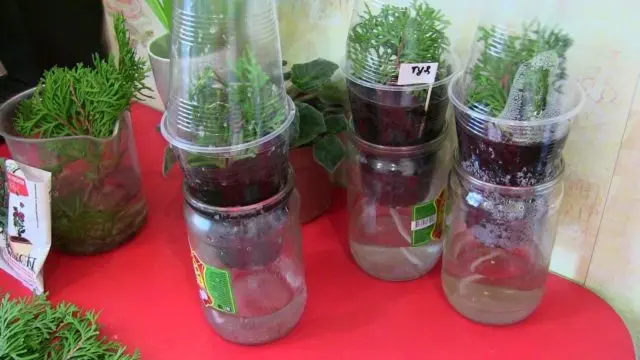
An easy and quick way to propagate thuja in water
Propagation of thuja by cuttings in a jar of water is considered one of the most unpretentious plant breeding options that do not require much effort. A sufficient amount of water is collected in a jar or a sufficiently large container and the shoots are placed in it so that the “heels” of the plant are immersed by 3–4 cm. It is very important to ensure that there are no leaves in the water, otherwise the process of decay may begin.
Depending on the size of the shoot and the jar, from 1 to 5 branches can be cut from XNUMX to XNUMX branches in one container. It is strongly not recommended to propagate more plants in one jar, because then they will not be provided with enough nutrients in the water.
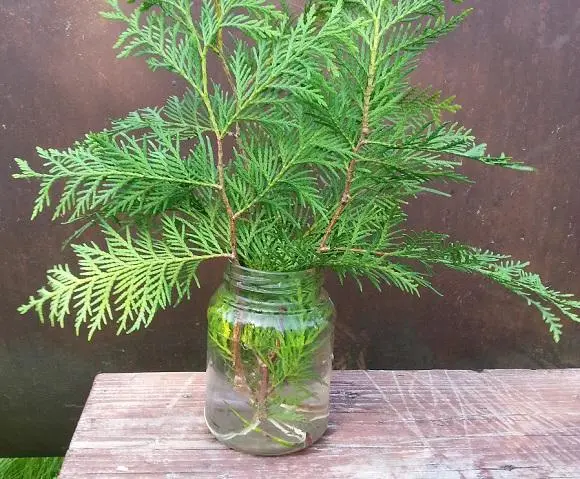
As the water becomes dirty and evaporates, it must be changed to fresh. In order to prevent the process of decay, a few small crystals of potassium permanganate should be added to the water. When propagating thuja with cuttings in a jar, it should also be remembered that the shoots tend to dry out quickly on land, which is why they need to be wrapped with a damp cloth before being placed back into the container.
The jar with cuttings should be placed in a cool place with diffused light. Depending on the rate of root growth, cuttings should be planted in containers with soil. In the absence of bright lighting, the development of the root system will occur much faster. Root growth often lasts for several months, after which the plants will be ready for planting. Reproduction of thuja from a cutting in a jar will allow you to get healthy sprouts for planting in a fairly short period without much hassle and effort.
How to propagate thuja in the ground at home
You do not need a lot of knowledge and skills in order to propagate thuja cuttings in the ground at home. The main task is the correct preparation of containers. To do this, you can use a pallet with river sand, treated with a solution of potassium permanganate, or a separate container with a volume of 0,5 liters. Cuttings in the pallet should be placed according to the 3×5 cm pattern with a rooting depth of 2–3 cm; when using a container, they are planted in 3–5 pieces. To create a substrate, sand and peat are mixed in a 1: 1 ratio.
When the thuja is cut in the substrate, constantly monitoring the level of soil moisture. Plastic wrap will help maintain optimal soil moisture, as well as daily spraying.
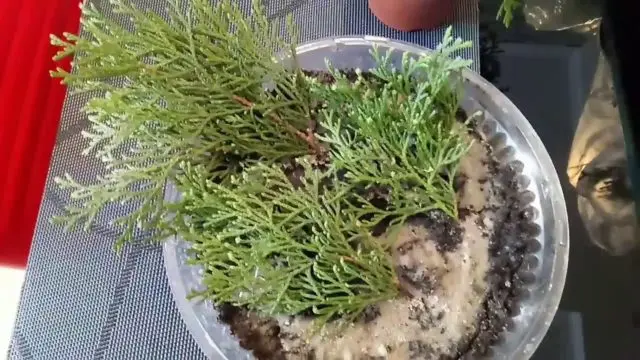
Reproduction of thuja cuttings at home with moss
Cutting thuja in tissue is one of the easiest and most effective methods to propagate a plant. At the same time, the risk of rotting of the root system of the future conifer is significantly reduced. In order to propagate the conifer, they prepare a plastic bag, a small piece of cloth, moss (sphagnum), any growth stimulant.
Moss should be soaked in cool boiled water for 2-3 hours. After that, it is placed in the middle of the fabric, and the cuttings are placed on top at a sufficient distance from each other. Next, the fabric should be bent so that the green part of the plants is hidden inside. Then the material is pulled with a rope or elastic band. A bundle with cuttings should be put in a bag and placed in a well-lit space (a window would be ideal in an apartment).
Rooting thuja cuttings at home with a wick
To cut a thuja with a wick, it will take more time and effort, however, it is this method that can ensure the maximum survival rate of the cuttings at the planting site. The main feature of this method of propagating a culture is the ability to root cuttings of trees and shrubs.
The process of rooting thuja with a wick consists of several stages:
- Prepare a plastic cup (200 g) and make a small hole in its bottom.
- Thread a string or piece of twine through the hole.
- Pour drainage to the bottom, and a nutrient substrate from above.
- Place the glass on a jar of water and dip the tip of the cord or twine into the water.
- Plant pre-harvested cuttings (no more than 5 copies per container).
- Cover the top with another plastic cup to ensure optimum moisture levels.
You can see the first roots already after 3-4 weeks, and in the fall the plants will be ready for transplanting into a school.
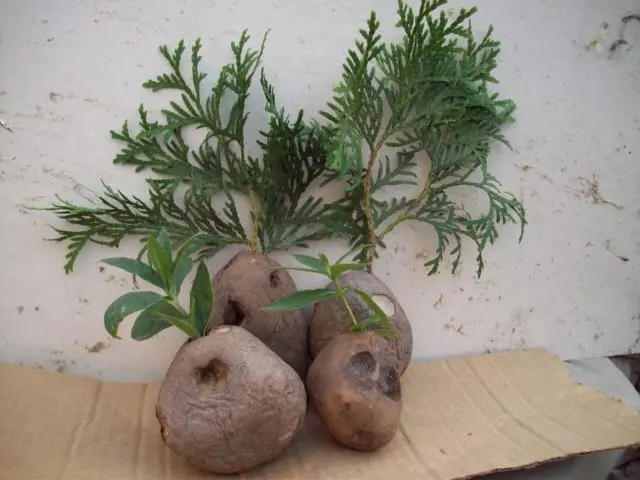
Step-by-step instructions on how to cut thuja in potatoes
It is best to propagate thuja using this method in the spring, when the active growth of conifers begins. The sequence of actions is as follows:
- The prepared stalk should be placed for one night in Kornevin’s solution.
- Take a potato and carefully remove all the “eyes” from the vegetable.
- From above, using a nail, pierce holes 3-4 cm deep.
- Place the prepared stalk in a puncture on the potato. The deeper it is placed, the better.
- Then it is important to prepare the landing site: dig small holes and add a little humus or fertile black soil to them.
- Bury the stalk placed in the potato in the ground and cover with a bottle with a screw cap on top and pour well through the cork.
Cutting a plant in this way is quite simple and effective, because the potato will hold moisture perfectly, which will allow you to quickly get healthy thuja specimens ready for planting.
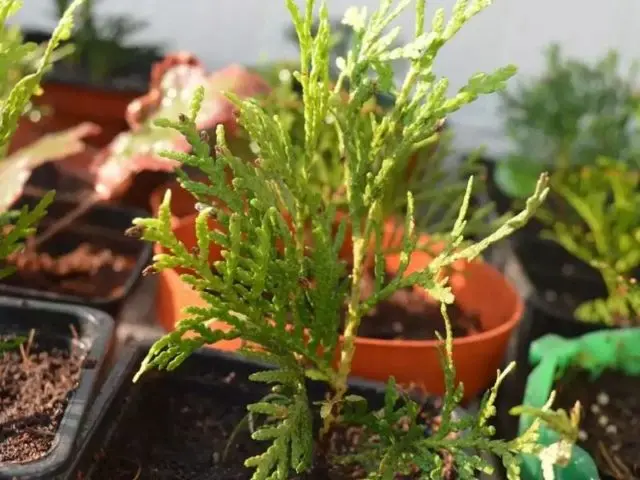
How to grow thuja from cuttings at home
In order to propagate thuja at home, it does not take much effort. But proper care of seedlings can preserve and improve the decorative qualities of the plant, as well as extend its life. There are a few simple rules for caring for cuttings, following which you can grow a healthy coniferous tree.
How many thuja cuttings take root
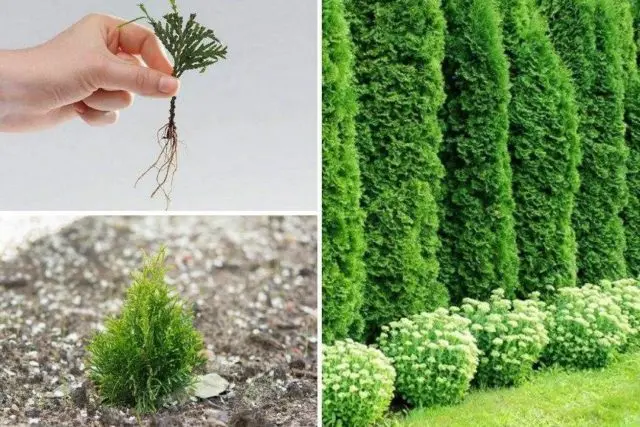
The first roots of thuja cuttings begin to appear after two months. During this period, the risk of drying out of the root system is also reduced, so you can worry less about maintaining moisture levels.
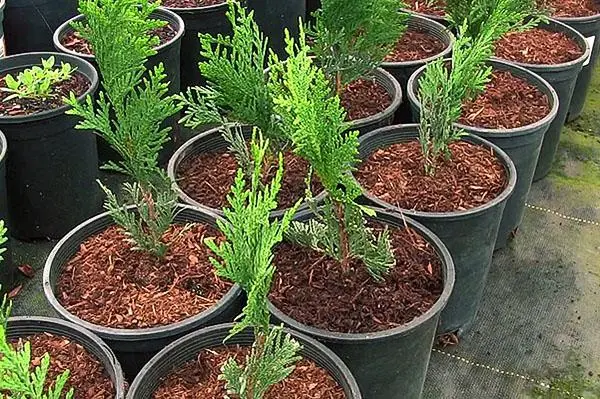
Immediately after the first roots of the thuja cuttings appear, the plants are transferred to a shkolka (special garden bed), where they will ripen for the next 2 to 3 years, until they are transplanted to a permanent place. Branches harvested in autumn should be transplanted the next year, harvested in spring – in September. For this you need:
- Select the area where the school will be formed. An ideal place would be a semi-shaded area.
- Dig up the ground and add a small amount of peat (1 bucket per 1 sq. M).
- Then you should water the containers with already rooted thuja cuttings: then the plants can be removed without damaging the root system.
- Place the seedlings in the ground at a distance of 20 – 25 cm from each other.
- Water the soil well.
After that, it is important to follow fairly simple rules: regularly water the soil and remove weeds from the site. After 2 – 3 years, young seedlings will get stronger, grow up and be ready for transplanting to a permanent place. Then thuja can be used to create alleys, hedges and other landscape compositions.
After transplanting into the ground, the thuja begins to grow actively. To obtain a lush multi-stemmed tree, it is better to start its formation during this period. To this end, next year you need to cut the central “channel” with last year’s wood. After such pruning, the thuja will stop growing for a while, and in the places of the sinuses on the lower part, new branches will begin to grow, which subsequently form a multi-stem system, and then the conifer will become much more magnificent.
Possible rooting problems
Rooting thuja at home is quite simple, but even in such a simple process, difficulties can arise. Before you start propagating ephedra, it is important to familiarize yourself with possible problems and ways to eliminate them.
The appearance of white mold on thuja cuttings
The development of white mold on thuja cuttings is often encountered even by experienced gardeners when they cut conifers. There may be several reasons for its appearance on young shoots:
- The seedling was affected by a fungal disease during the vegetative period: most often, such an infection is oidium.
- Poor-quality treatment with special fungicides or poor quality preparations.
- Tui cuttings were propagated without treatment with agents that prevent the appearance of white mold.
- In the place where the cuttings are stored, the level of air humidity is high or the temperature exceeds the permissible norm.
- The cause of mold can also be waterlogging of the soil.
Having found white mold on thuja cuttings, do not rush to throw them away. First, the seedlings must be thoroughly washed with clean water, and then in a light pink solution of potassium permanganate. After washing off the mold, the cuttings should be placed for some time in a solution of ferrous sulfate in a ratio of 500 g per 10 liters of water. Iron vitriol can also be replaced with Fundazol or Chinozol: plants must be placed in them for 2 to 3 hours at a concentration of the solution, according to the instructions for use. After processing the cuttings, they must be well dried and left for further storage.
Sand can be used to prevent the next occurrence of mold, but it is best to store plants in special plastic bags that have holes for air to enter. When placing a small number of cuttings in a plastic bag, they should first be tied into bundles and wrapped with a damp cloth or paper. Storing thuja cuttings in plastic allows you to check the safety of the plant at any time and provide additional ventilation if necessary.
What to do if the thuja cuttings dry
Drying of thuja cuttings often occurs in the spring, when the air begins to warm up actively. It is necessary to immediately move the cuttings to the most shaded place and treat with special stimulants: 2 times with the help of the HB-101 preparation or 3-4 times with the help of Epin or Zircon in combination with Cytovit, with breaks of 7-14 days. Plants should also be sprayed with Phytosporin to prevent the development of fungal infections.
Another reason for the drying of thuja cuttings may be the lack of space between the sprouts, when the seedlings do not receive the proper amount of nutrients. That is why it is extremely important to monitor the distance between plants and, if necessary, move the cuttings to a more spacious container.
Conclusion
Tui cuttings are one of the most common methods of propagating a plant at home, which also has many advantages over other methods. To cut thuja in a relatively short period, there are many ways and techniques from which it is easy to choose the most suitable method for yourself. However, before propagating plants, it is important to familiarize yourself with the features of each cutting method, possible problems and rules for further care of seedlings.