Contents
Issues of grape propagation are an important part in the cultivation of this horticultural crop. At the same time, it is possible to prepare cuttings from existing varieties that you really like in terms of taste. This article will be devoted to exactly how to prepare grape cuttings in the fall and properly prepare them in order to obtain high-quality planting material.
The choice of material for cuttings
In order to obtain high-quality planting material, cuttings must be prepared in the right way. One of the fundamental steps in this matter is the choice of material.
Material sampling should be carried out in the fall. But, if you are selling them, then harvesting can take place throughout the year. In any case, you need to know exactly how many seedlings you will need, so that later you do not have to attach unnecessary seedlings and throw them away.
There are certain requirements that are placed on the material for harvesting grape cuttings:
- grape bush bears fruit well;
- the bush must be completely healthy. It should not have traces of diseases, fungal infections, mechanical damage;
- the bush must grow in the same zone in which seedlings obtained from cuttings will be planted;
- the grape bush must have normal growth. It should not be dry or wilted.
You can choose the desired bush in the summer or early autumn. It is during the summer, observing all the grape bushes, that you can determine the strongest and most fruitful bushes.

This method is called mass selection. It allows you to methodically, from year to year, select bushes according to such important criteria as yield, health and growth intensity. The grape bushes are observed for three years. After that, those bushes that bear fruit well for three years in a row are isolated. At the same time, they need to be marked somehow (for example, using a metal label, colored tape, oil paint, or simply not removing a bunch of fruits). This is done in order not to forget and not lose sight of the selected grape bush.
Remember that the growth and taste qualities of the cutting reflect similar parameters of the mother bush.
Workpiece
After you have decided on the source material, you can proceed to the direct preparation of the cuttings.
Usually this process is carried out in autumn (in October) after leaf fall. But you can find information that grape cuttings were harvested in winter (in early December). But this is permissible only if the winter is mild and strong long frosts have not yet arrived.
If you live in an area that is characterized by early and prolonged frosts, harvesting cuttings is possible only in early autumn. In this case, the readiness of the vine is determined by the ease of separation of the leaf from it. The vine is mature enough when the leaf stalk is easily peeled off by the cork layer.
It is allowed if, until the moment of pruning the cuttings in autumn, frosts were single. In this case, the future shank will be hardened for overwintering and will accumulate a sufficient amount of nutrients (especially carbohydrates).
Slicing
After the bush has been selected and the vine has matured enough in the fall, you can start cutting the cuttings.
Rules for cutting grape chibouks:
- you can cut only fruit shoots;
- it is necessary to cut quite long cuttings – about 140 cm, although their length is also allowed from 50 cm;
- vines should be relatively straight;
- the color of the cut shoots should be uniform, without inclusions;
- the width of the selected vine should not be large enough (no more than 8 mm). If it is larger, then it is no longer a fruit vine, but a fatty shoot. Such an escape cannot give a strong and fruitful stalk and seedling;
- the stalk should also not be very thin (less than 5 mm). A smaller diameter will not allow the cutting to survive the winter normally;
- they should not have stepchildren, excess bark, antennae and leaves;
- a prerequisite is the presence of two or three live and healthy buds on the cut handle;
- growers recommend cutting chibouks from the middle of the vine;
- on the handle there should be at least five internodes (the recommended number is from six to eight pieces). But experienced gardeners believe that three or four internodes are enough;
- cut only with clean (to prevent infection) and well-sharpened garden shears or secateurs;
- cutting is carried out from the bottom up;
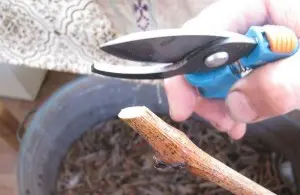
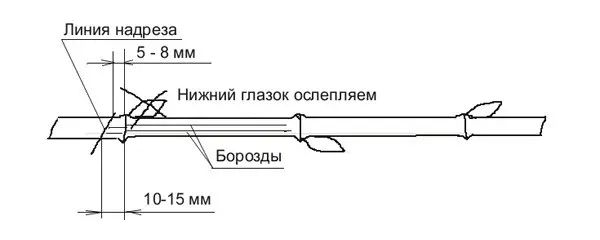
- cuts should be straight and with smooth edges. To do this, they need to be cut along the oblique.

Scheme of cutting a cutting of grapes
Compliance with the above rules will allow you to most correctly harvest the cuttings and get the desired result in the form of well-sprouted grape seedlings in the spring.
Disinfection
Cut cuttings can be easily spoiled if you have not carried out a disinfecting treatment throughout the day. If for some reason you cannot carry out this manipulation, then the sections of the vine must be buried or wrapped in a plastic bag.
Not all disinfectants are suitable for grapes, otherwise, when using them, you can get a decrease in the quality of future planting material. Such disinfectants include, for example, some pesticides.
Cut cuttings can be furmigated with insecticides, fungicides and sulfur dioxide (either fumigation or a creamy consistency mash with the addition of a mixture of various pesticides is done). Methyl bromide and phostoxin fumigant are also used.
Another method of decontamination involves placing the sections in water for two days and then leaving them for four days in a plastic bag. They are then placed in a solution of an organophosphate pesticide. After it, the chibouks are placed for another day in a plastic bag.
The simplest method of disinfection is soaking the cuttings in water for a day, followed by treatment with an intense pink solution of potassium permanganate.
A 3% solution of copper sulfate is also used (30 g of copper sulfate is diluted in 1 liter of water). After it, the chibouks are soaked with paper towels and laid out on dry paper to dry.
Preparing for storage
After you have cut the cuttings and decontaminated, they need to be grouped into piles depending on the variety.
The resulting cut material is folded with the upper ends to the upper ones and the lower ends are cut. After that, they are tied with a wire into bundles. In one bunch there can be from 20 to 25 cuttings. The bundles are labeled with labels indicating the variety and cut time, as well as the purpose (sale, planting and its place). The labels must be made of a material that will carry the storage juice (plastic, metal or foil).
Then the bundles are wrapped in plastic bags and sent to a storage location.
Video “Harvesting grape cuttings”
In this video, you can visually view all the necessary stages of harvesting grapes.
Following the above recommendations, you will be able to get good planting material, which will subsequently provide you with new healthy vines.


