


Contents
Any person who has been working with Excel spreadsheets for a long time is faced with situations where one or more columns need to be moved down. This may be due to the fact that a large amount of new data needs to be entered into the working area, or the information of individual tables (columns) needs to be compared with each other. There is no separate tool for performing this action in Excel. However, this can be done by combining the capabilities of this program with each other. We will talk about proven ways to move a table in more detail in this article.
Moving one or more columns through the “Cut” and “Copy”+”Paste” function
The proven and most popular way to move a table down or other sides is through the Cut and Paste function. However, it is important to consider that the procedure will be slightly different depending on whether one column or the entire table will be shifted.. The procedure for moving a single column:
- Initially, you need to select a whole column with information. To do this, click on the Latin letter in its title.
- In order to cut a column, you can press the key combination – CTRL + X. The second option is to call the context menu by right-clicking on the column header, select the “Cut” function.
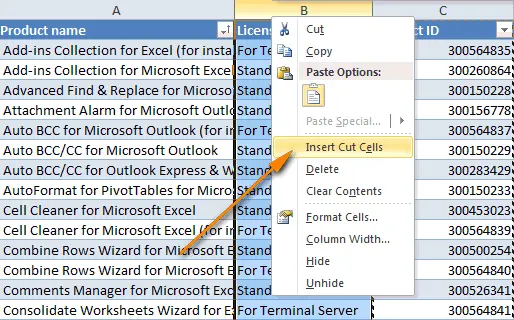
- Select the place where you want to move the column with the mouse. Right-click, select the “Paste cut cells” function.
- The initially selected element of the worksheet will be moved to the selected location.
To shift several adjacent columns at once, you can use one of 3 methods:
- Using the functions – “Copy” + “Paste” + “Delete” (extra remaining element).
- With the help of commands – “Cut” + “Paste”.
- Mouse dragging.
The process of moving one or more columns of a table through the commands “Copy”+”Paste”+”Delete”:
- First of all, you need to select one or more columns that you want to move. You can do this with the mouse or through the keys on the keyboard (SHIFT – you need to hold down this button, click on the heading of the first column, without releasing the key, click on the heading of the last column from the selected range).
Advice! To select only those cells in a column that are filled with any information, you need to use the key combination – CTRL + SPACE. Free cells will not be highlighted.

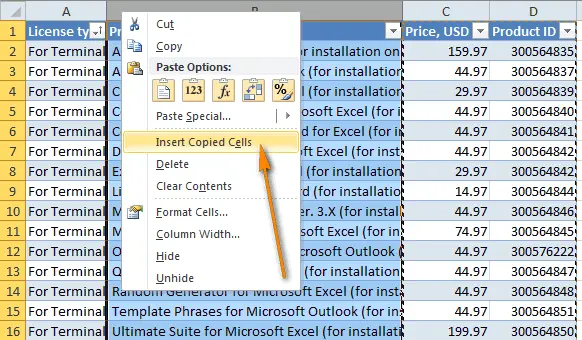
- Next, you need to mark the place in the table where you want to move the selected range with data (pressing the left mouse button). Right-click on the highlighted area, from the context menu, select the “Paste copied cells” function.
- The last step is to re-select the initial column with data, right-click to open the context menu, and click the “Delete” button.
Moving a table with the mouse
The easiest way to move individual columns or several columns at once in an Excel spreadsheet is dragging with the mouse. Procedure:
- Select one or more columns with the mouse. If you combine the LMB with the SHIFT button, you can quickly mark an entire range.
- Move the mouse cursor to the border of the column or the marked range, in which direction it will move. It is important to wait until the image of a cross appears with arrows diverging in different directions.
- Next, you need to hold down the SHIFT key, drag the range with the mouse to where you want to move it beyond the selected border.
When 1 or more columns are moved to the desired location, release the mouse button and the SHIFT key.
Using macros
Users who have a high level of work with Excel tables will simply use a special macro to move individual table elements, selected ranges to marked places. To implement this procedure, you must write a VBA macro yourself. However, this method has a significant drawback. It takes quite a long time to set up a macro so that a column or a marked range is moved to the required place in the table.
Move one or more table rows
Special attention should be paid to a fairly common procedure – shifting up and down one or more rows of a table. The process of moving one line:
- Click the left mouse button on the number of the line that you want to move (the scale with numbers is located on the left side of the table).
- After the selected field appears, lower the mouse with the left mouse button pressed down the required number of lines.
When the selected line is at the desired location, release the mouse button. Procedure for moving adjacent lines:
- Left-click on the number of the first line from the range. Hold down the SHIFT key.
- Scroll the table with the mouse wheel.
- Release the SHIFT button when the desired stitch range is highlighted.
After that, it remains to click LMB on any number of selected lines, shift the entire range down. The process of shifting down several lines located separately from each other:
- Hold down the CTRL button.
- With the left mouse button, mark all the lines that need to be moved.
Click LMB on any number of selected lines, move them down to a certain place, release the mouse button.
Conclusion
The process of moving a worksheet or a selection range is quite complicated if you do not know how to combine basic Excel functions with each other. It is much easier to move individual elements of a work item to the left or right side. However, having dealt with the procedure for moving down in more detail in theory, in practice there should be no difficulties.