


Contents
Building a dog house is easy. Most often, the owner knocks a box out of the board, cuts through a hole, and the kennel is ready. For the summer period, of course, such a house will suit a four-legged friend, but in winter it will be cold in it. Today we will look at how to make a warm booth for a dog, inside which the animal will not freeze even in severe frosts.
Calculation of the dimensions of the dog kennel
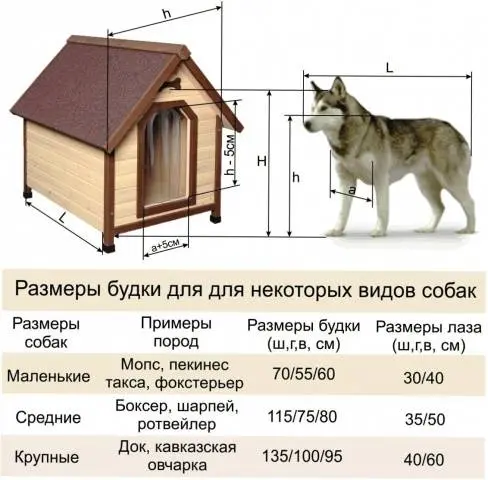
The photo shows an example of the dimensions of the booth and the manhole for different breeds of dogs. When making a dog kennel, you can use the dimensions from the table, or make your own calculations.
The height of the kennel is determined by the height of the dog at the withers, and an additional 15 cm is added. The reserve is needed for winter bedding, and suddenly the animal will grow up. The depth of the booth is equated to the length of a lying dog with its paws stretched out in front of it. The measurement is taken between the tips of the paws and tail, and 15 cm are added to the result.
The calculation of the width of the house depends on its design. If the booth consists of one compartment, then its width is calculated on the same principle as the depth. The dog should be comfortable lying even across the kennel. In the northern regions with long harsh winters, it is reasonable to build a two-compartment house. A sleeping place is equipped in the second compartment from the manhole. This is where the dog will sleep in the winter. The dimensions of the sleeping compartment are calculated from the already given examples of determining the width and depth of the booth. The tambour is made in front of the sleeping compartment. Its size is selected arbitrarily according to the complexion of the dog. The animal must be free to enter and leave the house.
For a dog, it is important to properly organize a hole in the kennel. It is cut out in a rectangular or oval shape, counting on the height of the withers of the animal, adding 10 cm. The width of the hole is made 8 cm more than the width of the dog’s chest.
We draw up a drawing of a winter booth with a vestibule
The design of the dog house is simple, and it is unlikely that you will need to draw up drawings for it. Just as an introduction to the photo of the presented scheme, you can see an example of a kennel with two compartments and a folding roof.
If you still decide to build a doghouse according to the drawing, this is considered only a plus. The diagram will help more accurately determine the dimensions and shape of the house.
A few useful tips will help you develop a drawing correctly:
- The interior space of the kennel should be enough for the dog to unfold freely and sleep comfortably. It must be remembered that a young puppy will grow up over time, and he will need more space.
- For the construction of a warm kennel, it is better to take only boards. Wood retains heat well, is easy to process, and in addition is harmless to the dog.
- In the northern regions, you still need to give preference to a booth with two compartments. During the design of the structure, double walls are provided, between which space is left for laying insulation.
- Alternatively, a warm dog house can be built inside the enclosure. Such decisions are resorted to by owners who have acquired a large dog that is not put on a chain.
- At the stage of developing a drawing for a booth, they determine the shape of the roof. For a large dog kennel, it is better to make a shed opening roof. In summer, the dog will lie on it. The gable roof increases the space of the kennel, so it is preferable to build it on a small house.
Drawing up a drawing taking into account all the nuances, it will be possible to foresee all the little things, and the insulated booth for the dog will become a comfortable home.
The process of making a wooden box
So, we figured out the preparatory questions, it’s time to start making a dog house:
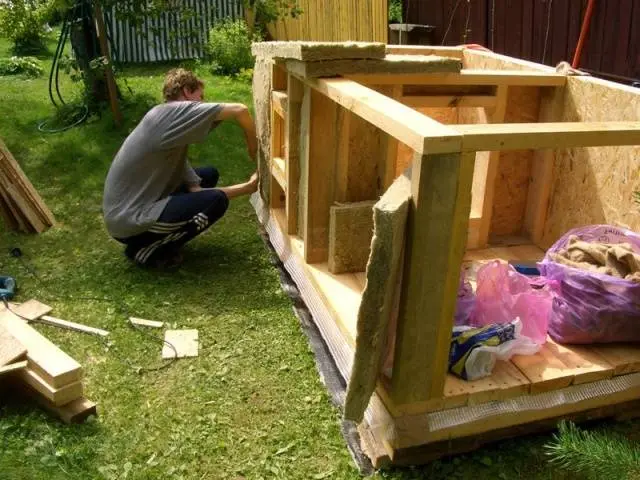
- Any do-it-yourself booth for a dog begins to be made from assembling the frame. For these purposes, you need a bar with a section of 50×50 mm. You can take blanks thicker or thinner by 10 mm. Nothing will change significantly from this. From blanks cut to size, the frame of the bottom of the doghouse is assembled. You should get a rectangular frame. For a large dog, it is better to strengthen the frame with additional jumpers so that the bottom does not sag. The finished frame is sheathed on top with a board 30 mm thick.
- The floor of the doghouse is ready, we proceed to the walls. Vertical racks are attached from a similar beam from the corners of the bottom. Two additional elements are placed on the front wall for the manhole. If the doghouse is designed for two compartments, then inside there will be a partition with one more hole. Here for him you will have to install two more racks. From above, the racks are interconnected with a beam. The resulting frame will be the base of the roof of the kennel.
- The finished frame is sheathed with a board or wooden clapboard, and the bars should remain inside the house. They will still be needed when the walls are lined with insulation. At this stage, an internal partition is nailed from the board, and immediately a hole is cut out on two walls with an electric jigsaw.
- The design of the roof of a warm house is different from the usual cold design. Even in the case of a gable option, you will have to sacrifice interior space by installing a ceiling inside the kennel. So, on the upper trim of the frame racks, only from under the bottom of the frame, a piece of plywood is attached. This will be the ceiling. On top of the plywood, a recess turned out, edged with a bar of the upper trim. Roofing material is laid here, then polystyrene foam or mineral wool, roofing material again, and another sheet of plywood is nailed to the frame from above. The result was a warm layered ceiling, located between the bars of the frame of the upper trim of the racks.
- It makes no sense to make a gable roof for an insulated dog kennel, since the interior space will still not increase due to the ceiling. To build a shed roof, rafters from the board are fixed to the upper frame, forming a slope to the back wall. From above, a board is nailed to the rafters, on which the roofing material is laid.
- The resulting gaps between the roof and the body of the house are closed with platbands. To prevent heat from escaping from the doghouse, the hole is closed with a canvas or rubber curtain. To make it heavier, you can fix the load at the bottom.
But for now, it’s too early to hook the curtain and the roof, because the process of wall insulation is still to be done. And that’s what we’re going to do right now.
Dog kennel insulation
The question of how to insulate a booth for a dog should not be a problem, since any heat-insulating material will do. Usually use mineral wool or pieces of foam.
So let’s get started:
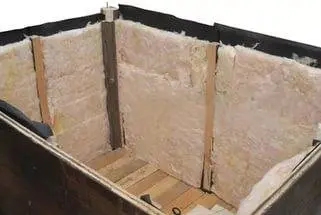
- The insulation of the dog house must be taken seriously, and first of all, raise it from the ground. The kennel is turned upside down. The bottom boards were nailed from the inside, so a frame of timber remained outside. A layer of roofing material is laid inside the frame. A heater is placed on top of it, and then roofing material again. Now this entire layer is clogged with a board. To raise the insulated bottom from the ground, legs are nailed to the bottom frame from pieces of timber with a section of 100×100 mm. They can be made about 100 mm high.
- A dog house with an insulated bottom is put on its legs, after which they proceed to the walls. In the photo you can see that the insulation is attached to the inside of the walls. After sheathing the frame with a board, bars remained inside the dog kennel, forming cells. This is where the insulation is put in in the same way as it was done on the bottom. The inner lining can be made of plywood or OSB.
Now it is already possible to close the hole with a curtain, put a roof on and paint the booth with soft oil paint or open it with varnish.
Electric heated dog kennel
Of course, insulating a dog house for the winter is good. However, this may not always be enough. To heat the dog’s house when the outside temperature drops below -30оC, electric heaters will be required.
Electric panels for heating the booth

Panel heaters are well suited as heating for a dog house. The maximum heating temperature of the device is 50оC. The dog will not get burned on the walls of the panel, so it can not be covered with a wooden grate. The thickness of the heater is about 20 mm. The panels are produced in two sizes: 590×590 mm and 520×960 mm. Heaters work silently.
Infrared film
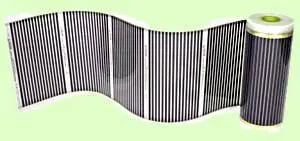
An excellent heated booth will turn out if an infrared film is laid in the walls under the inner lining. It is usually used in the arrangement of electric floor heating. With the onset of severe frosts, it is enough to supply electricity to the film heater, and it will heat the walls of the booth up to 60оC. The dog will be comfortable in any frost, and electricity consumption is minimal.
DIY heater
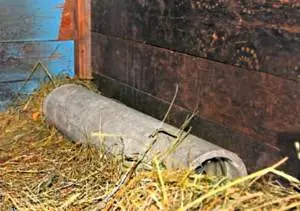
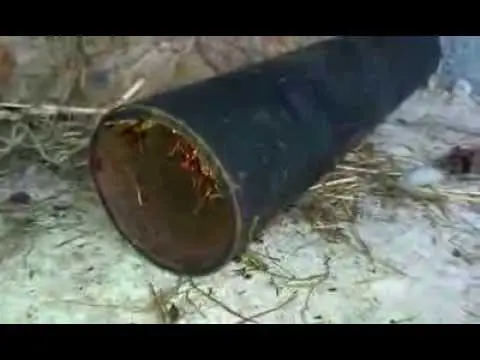
If a modern heated booth is too expensive for you, an alternative option is offered. A piece of asbestos-cement pipe is cut along the length of the dog house. A lampshade is cut out of a tin can. The size of the jar is selected so that it freely enters the inside of the pipe. A tin lampshade is attached to a cartridge with a 40 W light bulb. The finished heater is inserted inside the pipe, the wire is taken out of the booth, and connected to the network through the machine. The entire structure and cable must be protected so that the dog does not chew them.
The video talks about making a homemade heater for a dog:
Conclusion
So, the insulated doghouse is completed. Now it remains to install it in its place, equip the site and launch the dog.