


Contents
At first glance, building an outdoor shower in the country is a simple matter. I put a cabin behind the house, a tank of water and you can swim. However, everyone thinks so until it comes directly to the construction itself. Here questions immediately arise with the selection of material, the organization of drainage and water supply, the correct determination of the dimensions of the shower house. In order to quickly deal with these issues, we propose to consider step-by-step instructions on how to build a summer shower for a summer residence with your own hands and bring communications to it.
Drafting a summer shower
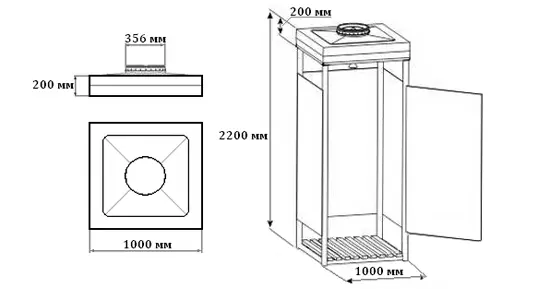
The simplest garden shower consists of one bathing booth. To build a house, you do not need to create complex drawings. Most often, they adhere to standard sizes of 1x1x2.2 m, as shown in the photo. It is impossible to build a shower stall below these parameters. After all, about 10 cm in height will take the pallet under your feet, and even the watering can will hang from the ceiling about 15 cm. Too high a booth is also not needed. There will be problems with pouring water, and it will be difficult for a short person to reach the tap installed in front of the watering can.
The width and depth of the shower is selected individually. It is undesirable to build a shower stall that is less than the recommended standards. It will be too tight inside. If the owners are rather obese, the width and depth of the booth is selected so that it is convenient for people to bathe in the shower.
If you have the desire and the means to build a shower with all the amenities, you will have to approach the drawing up of the scheme more carefully:
- For night use in the shower provide lighting. It can be any low-power flashlight, but always with a high degree of protection against moisture. During the day you can use natural light. To do this, a window is cut out on the top of the door or any wall of the shower stall. To avoid drafts, it can be glazed.
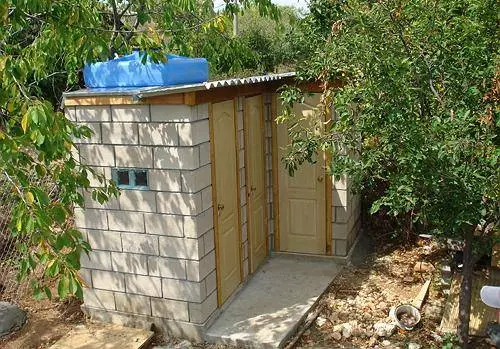
- Better buy a square tank. It can be installed on top of the cabin instead of the roof, which will save on roofing material. If the made shower will be used in the cool time of the day, the tank must be purchased with heating. The built-in heater will allow you to heat water for a country shower from electricity at any time of the day.
- You can’t do a completely clogged shower stall. From the gathered steam inside it will be difficult to breathe. Alternatively, an opening ventilation hatch is made on the side or back wall of the shower house at the top.
- You can’t do without a dressing room in the shower. It can be done inside the booth, then the size of the shower house itself will have to be increased. The place under the clothes is simply separated with a film screen. A comfortable locker room is organized in the dressing room. It is erected separately adjacent to the shower stall. To do this, you will need to install additional racks and sheathe with any sheet material. Inside you can install benches, and even a small table.
The scheme of the shower house should display all the little things, including coat hooks, shelves, mirrors, etc. If the shower is designed for a large number of people, the drawings show the passage of the sewer and the location of the drain pit.
Summer shower foundation
Garden shower cubicles are lightweight, but be aware of the weight of the water tank mounted on the roof. In order for the house to stand securely, a foundation is built under it. Let’s learn how to build the simplest foundation for a shower stall:
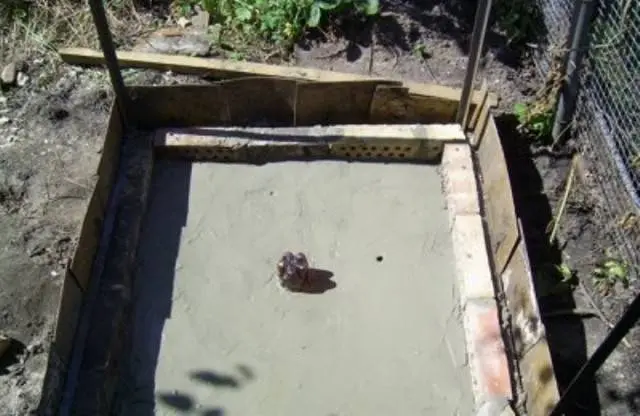
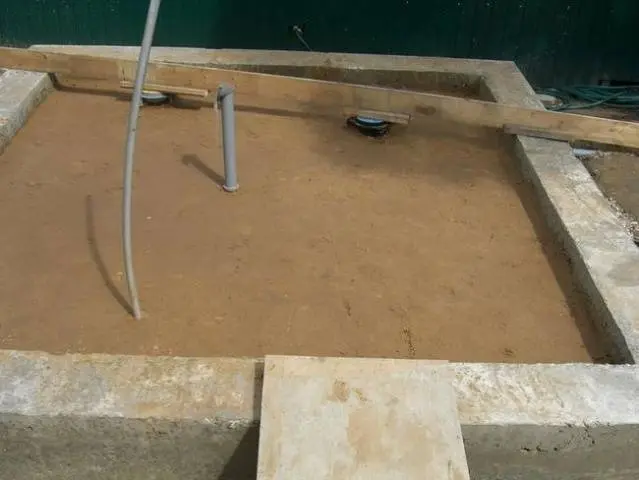
- For the construction of the base in the form of a monolithic slab, concrete is used. On the site, according to the size of the shower stall, they dig a recess of no more than 50 cm. Formwork is knocked down around the pit, the bottom is covered with a layer of sand with crushed stone 20 cm thick and a reinforcing mesh is laid. Further, everyone is poured with concrete mortar so that the future slab protrudes 10 cm above the ground. Red brick can be used as formwork. Before pouring the concrete slab, it is necessary to lay a sewer pipe for draining, otherwise it will not be possible to do this later.

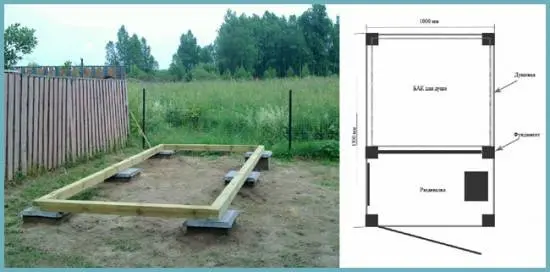
- For a wooden shower stall, it is easier to install a pile foundation. To do this, holes about 1 m deep are drilled around the perimeter of the building with a drill. Pieces of asbestos or metal pipes are inserted inside. They should protrude 20 cm above ground level. All pillars are leveled in the same plane, after which they are poured with concrete. Concrete is also poured inside the pipe, but an anchor rod is first inserted. When the concrete hardens, the frame of the lower trim of the shower stall is knocked down from a wooden beam and, having drilled holes, put it on the studs. Now it remains to tighten the frame to the foundation pillars with nuts, and you can install a shower house.

- As an option, a summer shower in the country can be installed on a columnar foundation. Its design resembles a pile analogue. The difference lies only in the manufacture of supports. Pits 20x20x50 cm in size are dug in the corners of the future shower stall. If the house has a dressing room, then additional holes are added in the center of the long walls. As a result, they should get 6 pieces. The walls of the pits are covered with roofing material, anchor studs are installed in the center, formwork is installed around each recess and poured with concrete. Next, the wooden frame of the lower trim of the booth is attached to the studs.
- A capital shower stall with brick walls is erected on a strip foundation. A trench 50 cm deep is dug along the perimeter of the future building and formwork is installed. The bottom of the trench is covered with a 10 cm layer of sand and gravel, reinforcement is laid, and concrete is poured. In height, the foundation should protrude from the ground by 10 cm.
When the foundation for the shower is completely ready, proceed to the arrangement of the sewerage system.
Organization of draining water in the shower
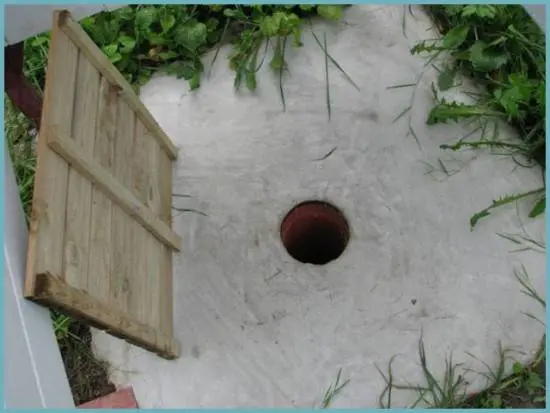
In the shower for giving, the method of organizing the flow of dirty water depends on the type of soil, the type of foundation and the number of people living. If the foundation is made in the form of a monolithic slab, then a plastic pipe with an elbow is laid before pouring it. The plate is poured so that there is a slope on all sides towards the drain hole. The sewer pipe is taken out of the cabin and connected to the general sewer system or brought to the drainage well.
Built-in shower with connection to the sewer is ideal for a large family. After bathing, there will be a large amount of dirty drains and they will not fit in a small pit near the shower.
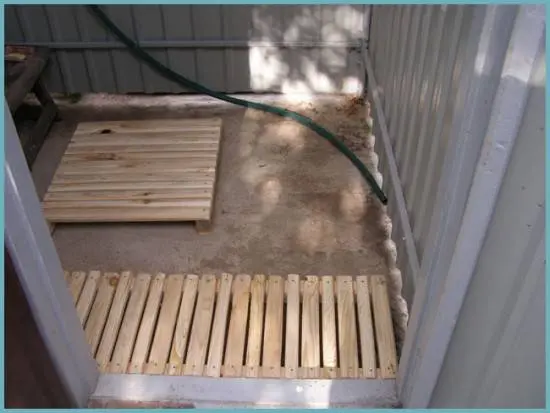
When the shower is designed for 1-2 people, the drain can be arranged directly under the booth. However, this option is suitable for summer cottages with loose soil. Let’s say a shower stall is on a pile or column foundation. You can also do it on a tape basis. Inside, soil is chosen with a depth of 50 cm. Up to half of the pit is covered with any stone or gravel. The second part to the ground level is covered with fine gravel. When the shower stall is ready, a pallet of wooden grating is placed on the rubble. Waste water will be absorbed into the soil, passing through the drainage layers.
Sometimes summer residents simply take the pipe out of the shower into the garden. Not a very good solution, but if you do this, then the place where the water drains should be warmed up by the sun. If the water does not have time to evaporate in a day, over time you will get a swamp with frogs and a cloud of mosquitoes around the shower.
Shower options
Now we will look at how to make a shower in the country from different building materials. In each case, step-by-step instructions and a detailed description of the work performed will be presented.
Economy option
A little trick will help save on building a shower house. The fact is that a blank wall of any building can serve as a booth. Even better if it is the inner corner of the L-shaped building. A small water container with a watering can is attached to the wall of the building. Various shelves, hooks and other devices are also hooked here. A semicircular partition is fixed on top of the wall and, with the help of rings, a curtain made of an opaque film or tarpaulin is hooked.
The floor must be equipped so that the water flows further from the foundation of the house. It is optimal to concrete the platform or install an acrylic tray from the shower stall.
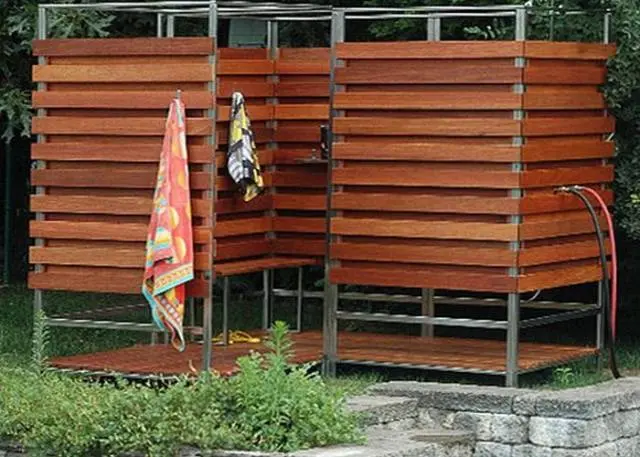
Construction of a wooden shower house
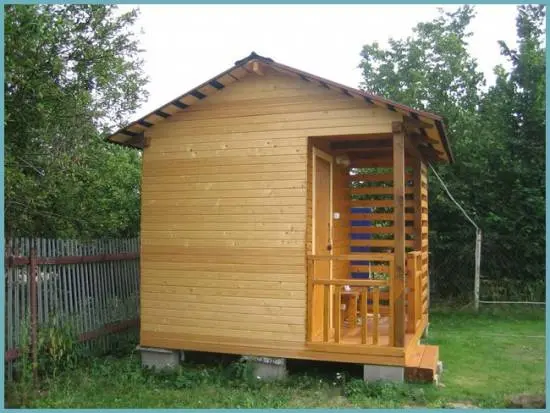
In this photo, the shower in the country house is presented in the form of a wooden house. This is the most common building. The wood is easy to process and holds heat well in cold weather.
The procedure for erecting a wooden booth consists of several steps:
- For the manufacture of the frame you will need a wooden beam. On the corner posts of the house, blanks are taken with a section of 100×100 mm. There will be a tank with 200 liters of water on top, this is the thickness of the beam taken from here. Two additional posts are placed in front between the corner posts. They can be taken with a section of 50×50 mm. This will be enough to hang the door.
- The front corner posts of the shower house are made 20 cm higher than the rear ones. Get a slope for a pitched roof. If a square tank is installed instead of a roof, then all racks are made the same height.
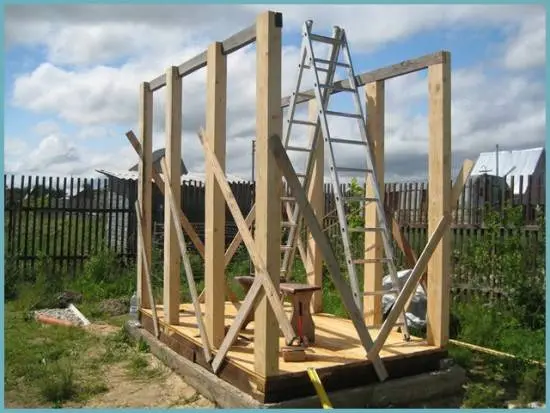
- All racks with the help of metal corners and hardware are attached to the wooden frame of the lower trim of the shower stall. Top make a similar strapping. Between themselves, for stability, the racks are reinforced with spacers. Depending on the shape and size of the tank, a frame is knocked down on the upper trim of the frame to install the container.
- The finished frame of the shower house is sheathed with a board 20 mm thick. The door is assembled from the same blanks. The boards are laid in one row, knocked down with two jumpers and one rail obliquely so that the door does not warp. The door frame is assembled from a board 40 mm thick. With self-tapping screws, it is attached to the door racks of the frame, and the door is hinged onto the box itself.
The finished shower stall is opened with colored varnish, and the door is hung from the inside with a film. Otherwise, the wood will swell from the ingress of water, and it will be difficult to close the door.
Polycarbonate shower cubicle
Now let’s look at how to make an outdoor shower with a beautiful polycarbonate paneling. For a shower house, you will need to make a similar frame, only not from wood, but from a metal profile with a section of 40×60 mm.
The principle of manufacturing the frame is the same as the analogue of a wooden shower stall. All the same racks with jumpers, only metal and they need to be welded. By the way, such a shower frame can be welded separately, and then placed on the foundation and secured with anchor bolts. Another method of manufacturing a metal frame is based on concreting racks in the foundation. Next, there is a strapping of the upper jumpers and struts.

For sheathing the shower frame, fragments are cut out from a sheet of opaque polycarbonate 10 mm thick. It is attached to the metal profile with hardware with a sealing gasket. The shower door frame is welded from a similar profile, hinged to the rack and sheathed with polycarbonate.
The video shows an example of a polycarbonate shower:

Shower house from corrugated board
Now we will find out how to make a do-it-yourself shower in the country from sheets of corrugated board. It should be noted right away that this version of the shower stall is most in demand among summer residents.
So, any of the considered frames is suitable for corrugated board: wooden or metal profile. The only difference is that the frame is reinforced with additional jumpers to give it rigidity. After all, the corrugated board is very soft and without jumpers the shower stall will “play”. Sheets are screwed to the frame of the house with galvanized self-tapping screws with a rubber washer. For aesthetics, they are selected to match the color of the corrugated board.
Brick shower house
The brick walls of the shower house are laid out on a strip foundation or concrete slab. In the process of masonry, a box for doors and windows is installed. For a country shower, it is enough to drive out the walls in half a brick. On the last row, lintels made of wooden beams are embedded in the masonry. A roof and a water tank will be attached to them.
The shower door can be bought ready-made from plastic or knocked down from boards. It is optimal to weld a frame from a profile and sheathe it with corrugated board. It is desirable to install the window frame on hinges. This will make it possible to arrange ventilation inside the shower stall.
Installation of a tank on the shower and water supply

The final construction of the soul is the installation of the tank. It can be made independently from any plastic or stainless container. To do this, a hole with a diameter of 15 mm is drilled in the bottom, and a piece of pipe about 30 cm long with a thread at both ends is fixed with nuts. In the roof of the booth, a hole for the pipe is cut in the center. The tank is installed on the roof of the shower house so that the pipe through the hole comes out under the ceiling inside the cabin. A tap and a plastic watering can are screwed onto the free threaded end. The tank is fixed to the frame of the shower cubicle frame, filled with water and covered with a lid.

If you buy a tank from a store, the kit will already have a watering can, a faucet and all fasteners. The container will only be installed on the roof of the shower house and filled with water.
If a heating element is installed inside the tank, then the water can be heated in the cold season. However, you need to remember about security measures. To avoid electric shock when bathing, the heating element should be disconnected from the mains.

The video tells how to build a summer shower:

Building a shower in the country with your own hands is not so difficult. It is only necessary to prepare a scheme, purchase material and slowly do the work.