


Contents
The simplest sandbox can be built on your own in a few hours. To do this, it is enough to grind four boards and put together a box from them. But it is unlikely that such a play place will bring comfort to the baby, especially in hot weather. Playing under the sun is exhausting and sometimes even dangerous. Wouldn’t it be better to spend a little more time creating a canopy over the playground? An improved sandbox with a roof can not only provide a comfortable gaming environment. The canopy will cover the sand from rain, falling branches and leaves from trees.
Choosing the location of the playground
The roof of the sandbox protects the playground from the sun’s rays, but you still need to try to place it correctly on your site. The photo shows how to arrange a place for the game relative to the cardinal points. Such a scheme was not chosen by chance, because the intensity of sunlight, more precisely, ultraviolet rays, will depend on this. It is optimal to install a playground on a site located in the direction from north to southeast. In the early morning, ultraviolet rays are more intense, but they themselves are not as dangerous. At this time, the sandbox can be completely under the sun. Closer to noon, the intensity of ultraviolet decreases, but the rays become more aggressive and have a bad effect on humans. At this time, a shadow should fall on the playground.
You can hide the sandbox from the scorching sun under the trees, but there are also limitations here. The problem is falling leaves, small branches and bird droppings. You can protect yourself from all this if you make a sandbox with a roof and a lid. However, they will not save you from caterpillars, spiders and other pests falling from fruit trees.
Now back to spiders. Most poisonous representatives with bright colors do not like drought. This means that it is desirable to remove the place for the game at least 4 m from the watered area. And the last thing you need to pay attention to is the abrasive properties of sand. Usually the sandbox is placed closer to the house so that the playground with the children is in the field of view of the parents. Grains of sand stick to the soles of shoes, enter the house and scratch the floor. It is undesirable to place the sandbox close to the path leading to the house. It is good if these objects are separated by 2 m of lawn. In extreme cases, cleaning mats are placed near the playing place.
Varieties of children’s sandboxes
The shape and size of children’s sandboxes are different, and it will not work to divide them into certain groups. But according to the material, three types of children’s sandboxes can be distinguished: metal, wooden and plastic. As for sheet steel sandboxes, they can be called a rarity. Modern playgrounds are equipped with sandboxes made of wood or plastic.
Plastic
You can’t make plastic sandboxes for children on your own. The finished product is bought at a retail outlet. A high-quality sandbox for children will last for many years without losing its bright color. It does not require special care, it is enough to occasionally rinse with water and a disinfectant. There are no burrs or peeling old paint on the plastic. Plastic designs are bright, attract the attention of children. Most often they are made in the form of fairy-tale heroes, animals, inhabitants of the deep sea. Take, for example, the Ladybug sandbox. The wide edges are comfortable for babies to sit on, and the lid is shaped like a torso. Cats or dogs will not be able to get to the covered sand at night. In addition, the cover protects the sand from wind blowing, falling leaves, rain and other unpleasant consequences.
The plastic sandbox with a lid is very light. It can be moved to any place, and if necessary, take it to the house. There are one-piece products in the form of a basin. This bowl can be used for playing with sand or instead of a pool. Quite interesting collapsible models. The complete set of such a sandbox includes up to eight modules. Using the required number of elements, a frame of the desired size and shape is assembled. Collapsible models come without a bottom or are equipped with a tarpaulin. More expensive products represent a whole gaming complex. In addition to the sand container itself, they are equipped with benches, a table, a roof and other elements. If you choose correctly, then the purchased plastic sandbox will decorate the landscape of your summer cottage.
Wooden
If you want to organize a playground for children with your own hands, then a wooden sandbox with a roof is the ideal solution to the problem. Wood is an environmentally friendly natural material. It lends itself well to processing. A sandbox made of wood will cost parents many times cheaper than buying a plastic counterpart.
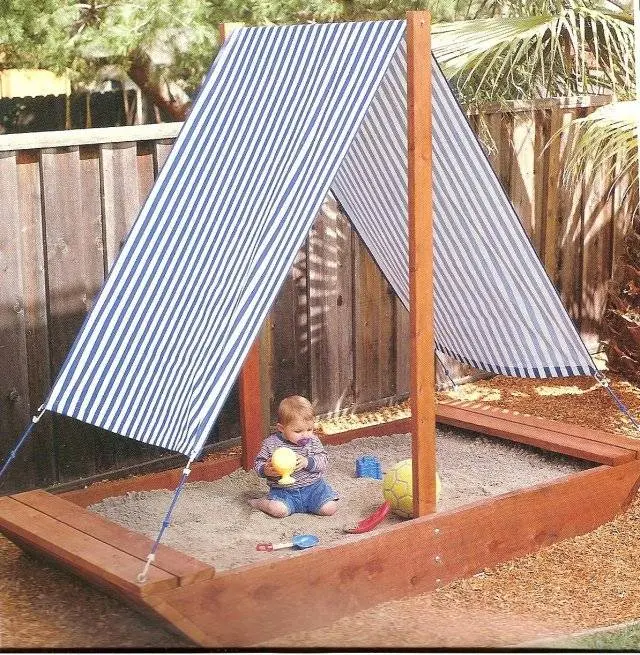
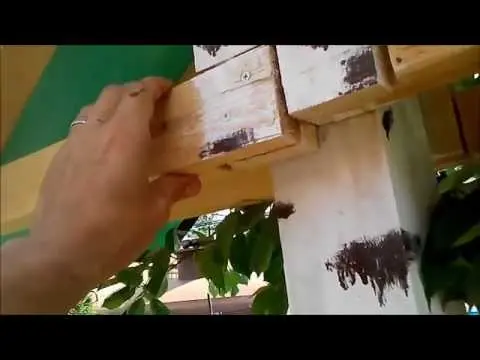
To knock down a sand box, you need only four boards, and the same number of stakes. However, you can approach the design of a wooden sandbox from the other side. Firstly, it is easy to install a roof over the sand. She will shelter the children from the rain and the scorching sun. Do not build complex structures. It is enough to install one, two or four racks to which the canopy will be fixed. The roof is made of different materials, the main thing is that it has a small weight. Not bad for these purposes are not wet tarpaulins, polycarbonate or transparent slate. In extreme cases, you can stretch the usual fabric. Such a canopy will not save you from rain, but from the sun and falling leaves it will be an excellent protection.
Secondly, most often a do-it-yourself wooden sandbox with a lid is made. It can be made in the form of a simple shield or decomposed into two benches. The second option is very popular with children. Kids, while playing in the sand, have the opportunity to relax or have fun with board games.
Choosing sand for backfilling
In most cases, parents do not think about what kind of sand is needed for a children’s sandbox, and fall asleep what they have. However, there are some pitfalls here, which we will now try to deal with.
Purified river or quarry sand is suitable for filling children’s sandboxes. In rural areas, you can often get it yourself, and for free. If there is such an opportunity, then before backfilling, the sand is sifted through a fine sieve. When large impurities of dust or clay are observed, it is desirable to wash them. The procedure for washing sand with water is not very easy, but for the sake of the children, you need to decide on this step.
There is an option to use purchased sand. It is sold in bags. Buying sand is justified for urban residents, where there is simply no other place to get it. Although this option is suitable for consideration by all parents who decide to buy a plastic sandbox. The fact is that each grain of sand, by its natural origin, has sharp edges. When children play, the sharp grains of sand scratch the plastic like sandpaper. Since the parents forked out for such an expensive gift, then you should not save on buying a filler.
Store sand goes through many stages of processing before being sold. One of them is aimed at smoothing the sharp edges of grains of sand. It is this filler that is ideal for a children’s plastic sandbox. It would be useful to ask the seller for a quality certificate, but it is better to inspect the goods. High-quality sand has excellent flowability, and does not stick to dry hands.
Drawing and manufacturing of a wooden box

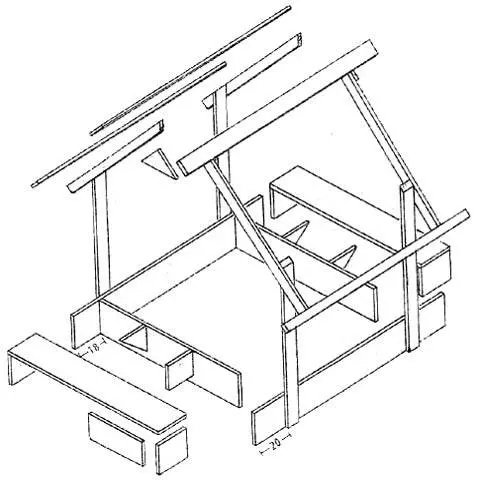
Children’s wooden sandbox usually resembles a simple box filled with sand. For its manufacture, complex drawings are not needed, but you can sketch a simple sketch. Since our design will be with a roof and a lid, all the details must be taken into account in the diagram. The photo shows a drawing of a square-shaped children’s sandbox, and we will start with its manufacture:
- The optimal size of a children’s sandbox is 1,5×1,5 m. For its manufacture, a cut board 1,8 m long is taken. 15 cm on each side will go to the mortise connection of the corners. The number of boards on one side of the sandbox depends on their width: 100 mm – 3 pieces, 150 mm – 2 blanks. The optimal board thickness is 20-30 mm.
- Stepping back 15 cm on each side, they make a drink on the boards. Next, a square box is assembled from the blanks, inserting the boards into the cut grooves. The method of such assembly is shown in the drawing.
- Four racks are made from a bar with a section of 50×50 mm. Their length corresponds to the height of the side, plus 20-30 cm will go into the ground. Racks are fixed on the outer corners of the box between the ends of the crossing boards. So that during the game the children are not squeezed out towards the side, in the center from the outside they are reinforced with similar stakes.
The diagram of the children’s sandbox also shows the simplest version of the benches. They are stuffed from the board on the ends of the boards. However, this option is appropriate for a wooden sandbox with a removable lid. When making a transforming cover into benches with a back, it is not necessary to stuff benches on the ends of the box.
Making a removable cover
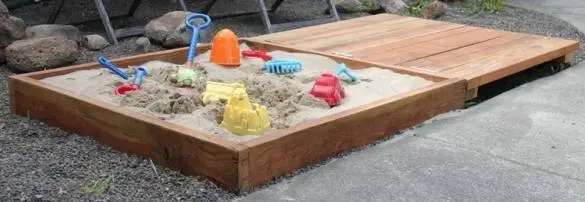
The simplest version of a removable cover is a regular shield. It can be cut from moisture resistant plywood or other similar material. Alternatively, the shield is knocked down from a board no more than 20 mm thick. From above, it is desirable to upholster the wooden cover with a film, linoleum or other non-wetting material. Be sure to provide handles on the shield.
In order not to constantly pull the shield to the side, it can be made of a folding type. The photo shows a rectangular sandbox with two types of such a cover. Moreover, the box itself can be divided by a jumper into two compartments. A hinged lid is installed over an empty compartment reserved for children’s toys. A roll-up lid is attached over the sand box. You can do the opposite as well. It all depends on the preferences of the owner.
Children respond very well to bright objects. You can attract their attention with multi-colored drawings applied by hand on the surface of the lid.
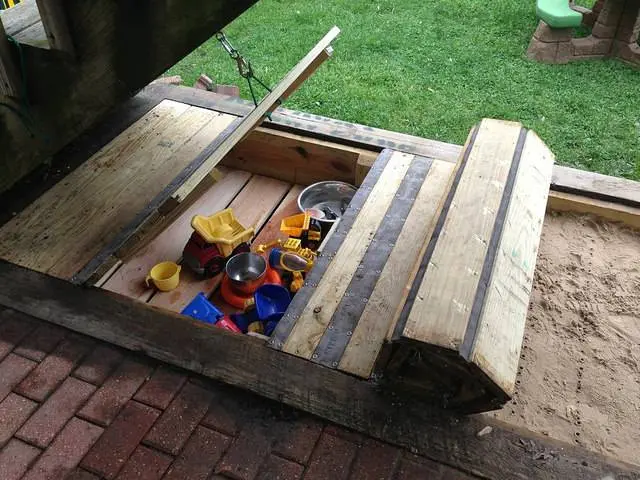
Making a transforming cover

The transforming cover for a children’s sandbox is convenient not only in terms of use by parents. Two folding halves make comfortable benches with a back. During the game, they have the opportunity to relax or just come up with new entertainment on the bench.
A folding cover for a children’s sandbox is made from boards. In length, they should protrude 1-2 cm beyond the box. Each half of the lid consists of three parts connected by hinges. The first part is thoroughly fixed to the sides. Loops connect only the middle and last part. Bars-limiters are nailed from the inside and outside. They will hold the back upright and act as handles.
Roof manufacturing
Since we initially set a goal to build a children’s sandbox with a roof, it remains to consider options for arranging the last element.
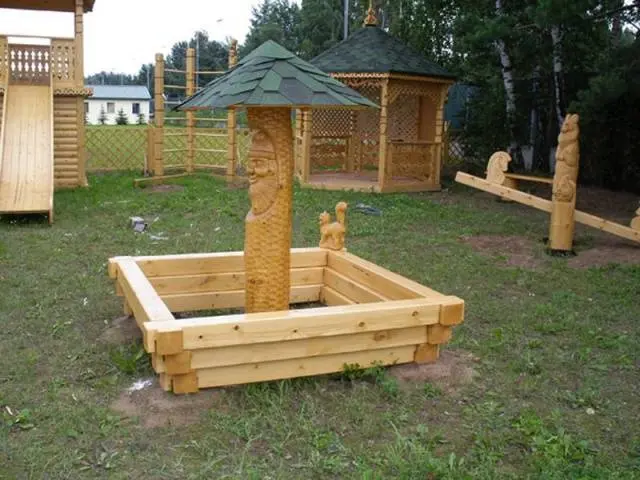
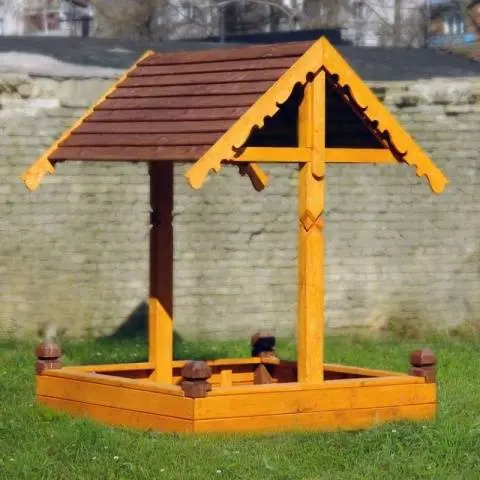
The simplest canopy over a children’s playground is a fungus. It is installed on one support, most often in the center of the sandbox. Such a roof will not protect much from the sun, but there will be more bumps on the forehead. An interesting option is the roof, reminiscent of a wigwam. For such a roof in the form of a hut, you will have to build a box in the shape of a hexagon. A rack is installed from each corner. At the top, the supports converge at one point, forming a spire. The idea of building a children’s wigwam is interesting, but in terms of protection from the sun and rain, it is ineffective, just like a fungus.
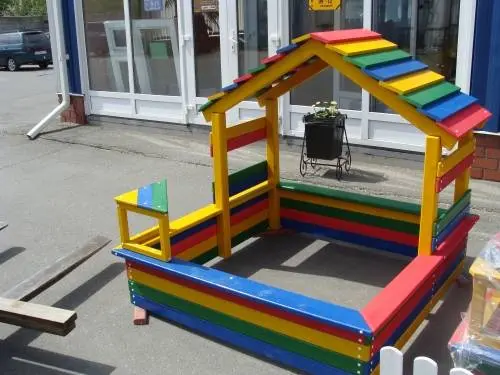
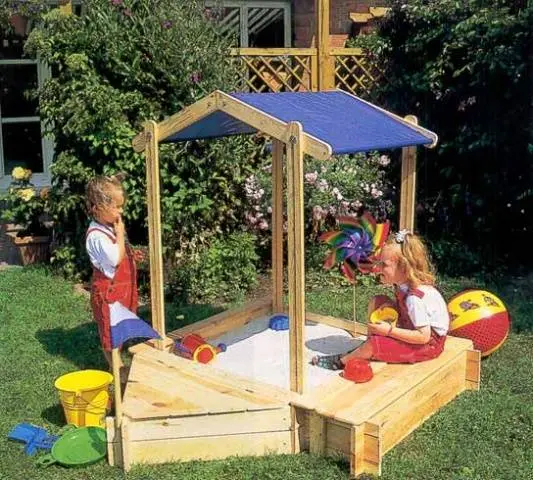
The roof of a square sandbox, mounted on two racks, looks good. The supports are fixed in the center of the opposite two sides. The result is a gable roof that covers a fairly large space.
A real roofing structure can be called the roof of a children’s sandbox, installed on four racks. Each support is attached to the corner of a wooden box. An awning is pulled from above or the frame of a full-fledged gable or four-slope roof is knocked down.
For a better idea, you can see photos of sandboxes with a roof of different configurations.


The choice of roofing material for the roof depends on the wishes of the parents. The main thing is that it should be light in weight. The fungus can be installed from a large umbrella or fixed on a frame rack, and then sheathed with a soft roof. Not bad for any roofs, polycarbonate or tarpaulin is suitable. In extreme cases, a sun canopy will turn out from ordinary fabric, only during rain such a roof will quickly leak.
The video shows a children’s sandbox with a mushroom roof:
Improvement of children’s sandboxes with a roof
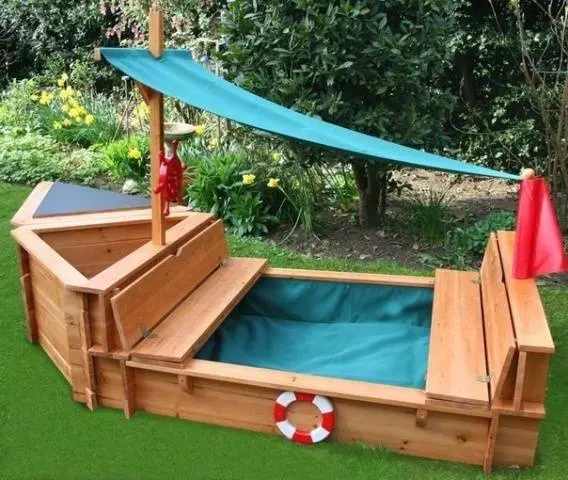
It is not difficult to build a square sandbox with a roof with your own hands. However, it is of less interest to children than an unusual play structure. Let’s say the same wooden sandbox can be made into a ship. The photo shows that the same square box with a folding lid was taken as the basis for the children’s design. The roof is made of two posts of different heights, replacing the masts. A sail is stretched from the fabric, which, although not much, closes the playing place from the sun. There are two triangular drawers in front of the box. They form the bow of the ship, plus they provide additional storage space for toys.
The following photo shows a drawing of a children’s sandbox with a gable roof. The design is quite complex and is made to grow. Inside such a house, the baby can organize a sandbox. When the child grows up, floors are laid instead of sand. A new play area with a roof will turn into a small gazebo.

Building a children’s sandbox with a roof on your own is more difficult than putting up a square box covered with sand. But when the parents plan to have a second child, the playground will be inherited and will delight the kids for many years.