


Contents
Windows are often decorated with various curtains. They are attached to a special structure, which is usually called a cornice, but there is also the name “curtain” and “curtain”. We will talk about how to hang a curtain rod for curtains, how and what to fix it on the wall, on the ceiling.
Wall mounting
Before you hang a curtain rod on the wall, you need to decide on the distances. How far from the ceiling should it be installed? Curtains look best when 1/3 of the entire distance between the window and the ceiling is from the eaves to the ceiling, and 2/3 to the window. It must be remembered that the minimum clearance from the window is 5 cm.
It is also worth deciding at what distance from the window opening the edges of the cornice (pipe or profile) should end. This applies more to the choice of cornices, but it would be useful to recall: the minimum distance is 15 cm, and the maximum is up to 40 cm (more is possible, but it may look disproportionate).
Types of brackets
To hang curtain rods, you need to consider the bracket on which it is attached. They are of several types:
- In the shape of the letter “G”. Such brackets are usually completed with metal cornices. They are the easiest to work with: the holes for the fasteners are clearly visible.
L-brackets are the easiest to install - Round collapsible. Consist of several parts. The first is a washer for installing fasteners, an overlay with a holder for a pipe or profile is attached to it. Brackets of this type are completed with light cornices – plastic.
- There are also one-piece holders with holes drilled in them for installing fasteners. These are most often found in wooden models.
The most difficult installation is with round collapsible brackets. The difficulty is that they understand and assemble. Otherwise, everything is the same, the installation procedure is the same as for other types.
Installation procedure
Having decided on where the cornice will hang, you can proceed with the installation. Attach the cornice, level with a building level. At this stage, it is desirable to have an assistant who will hold the second edge.
We hammer nails into wooden walls or screw self-tapping screws immediately. You can only remove the pipe / pipes to make it easier. You can’t just install fasteners into brick, concrete, foam concrete and other similar walls. Dowels are needed, and tags are needed to install them.
Having set the cornice for curtains according to the level, we put marks (right, left, top, bottom) in those places where the brackets will stand – 15 cm from the end of the pipe / profile and at a selected distance from the window and ceiling. We remove the cornice, remove the bracket, install it in the right place, mark the holes for the fasteners. We put all the marks – how many holes there are in the holder, we put so many.
We drill holes according to the marks. The diameter of the hole depends on the size of the dowel – use a drill of the appropriate diameter. After making a hole, insert the dowel into it. It should go in completely – as a last resort, if it is not possible to drown the dowel by a couple of millimeters, cut off the excess with a sharp knife.
Having installed all the dowels, we apply the bracket, align the holes, tighten the screws that come with the dowels. After all the holders are installed, we assemble the cornice and you can hang curtains and curtains.
How to hang a curtain rod from the ceiling
You can also hang wall models of cornices with round holders for guides on the ceiling – they are universal. The installation procedure is the same: mark, make holes, install holders, insert guides into them. Everything is exactly the same as when mounting on the wall. But there are plastic ceiling cornices, which are also called tire ones. They have a different look and device. We will talk about how to hang a curtain rod for plastic curtains in this section.
Where and how to make holes in the tire
Plastic ceiling cornices come in one, two and three rows – depending on the number of curtains that you are going to hang. They are sold without mounting holes. This is a single long plastic bar with molded paths along which runners move with hooks for hanging curtains and curtains. To install a plastic cornice on the ceiling, you need to drill holes in it.
Mounting holes are drilled in the gaps between the tracks. These gaps are a closed rectangular contour and both layers of plastic must be drilled. But they must be of two different diameters, so drills of two diameters are used:
- the diameter of the drill is larger than the diameter of the head of the self-tapping screw / dowel-nail for the front part of the eaves (so that the fasteners pass into this hole);
- the diameter of the drill is equal to the diameter of the fastener rod (the installed self-tapping screw / dowel-nail will hold the bar with a hat).
First, holes are made with a larger diameter drill in the front part. They change the drill to a smaller one, through the hole already made, another, smaller one is made in the back wall. Now it will be possible to install the tire cornice on the ceiling.
One more moment. Holes for single-row or double-row models can be made in one line – in the center (indicated by a red arrow in the picture above). For wider ones, it is better to arrange them in two rows (marked with yellow arrows). If you plan to use double curtains made of dense fabric, you can use all three lines.
The pitch of the holes is 50-70 cm. The exact distance depends on the weight of the hanging fabrics. The weight of tulle curtains can be ignored, but thick curtains can weigh a lot. The more weight, the more often you need to install fasteners.
Installation procedure
After the mounting holes have been made, we take the cornice, center it relative to the window, set it according to the level, put marks. Next, you need to mark on the ceiling with a pencil or marker where to drill holes for fasteners. If there are assistants, this is not a problem – they hold, you draw.
If there are no assistants, you can do it alone. You will need double sided tape. Cut 3-4 pieces about 5 cm long, fasten them to the back of the tire (the one that faces the ceiling). Two at the edges and one or two in the middle – this is enough for a 4-5 meter plank. Remove the protective coating, fasten the cornice according to the marked marks. On adhesive tape, it keeps quite firmly, you can work without fear. If necessary, you can correct the position by tearing off the adhesive tape (you will have to make a noticeable effort).
When the marks are made, remove the tire, drill holes, install plastic dowels. Next, put the cornice in place, aligning the holes (this is the most troublesome part), screw in the screws. If you previously attached double-sided tape, it will help hold the bar in place, if not, it is easier to install the mount at the ends, then in the middle.
Features of mounting cornices on a stretch or suspended ceiling
Neither stretch nor suspended ceiling is able to hold at least some mass. Therefore, hanging a curtain rod on a suspended / stretch ceiling “directly” will not work. There are two options:
- During the installation of the ceiling, install mortgages (usually wooden blocks), to which the holders are screwed. In this case, the load, through mortgages, is transferred to the main ceiling (ceiling). When attaching to wooden bars, fasteners are self-tapping screws. Length – less than the height of the beam.


Mortgages under a stretch ceiling - Mount the ceiling so that its edge does not reach the window by 10-15 centimeters. You will get a niche with access to the main ceiling, into which the cheapest of the cornices is installed (you can – string or tire).


second method
Both options are working. Only in the second case, a hidden cornice is obtained, which is not visible. There are only curtains and curtains. The cornice (curtain, curtain) is not visible.
When installing mortgages, you can fix the bar parallel to the wall. In this case, the installation will be similar, but a whole beam under the eaves is wasteful. You can install small segments – 30-50 centimeters long in the places where the eaves are supposed to be attached. Installation will become more difficult – you will have to take into account the position of the mortgages, but this is nothing. If the timber is expensive, saving is more important.
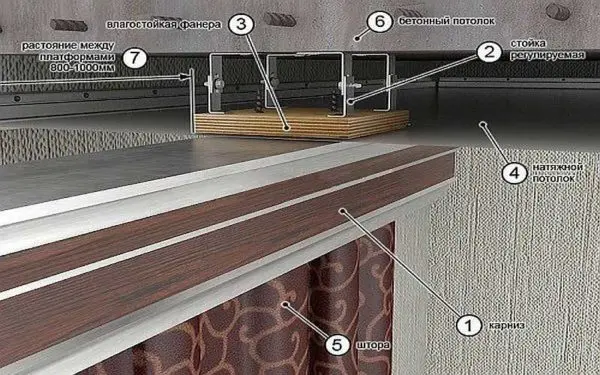
If the ceiling is lowered not by 5-7 cm, but by a greater distance, several bars should not be fixed. In this case, metal brackets are screwed to the base (base floor), and a small piece of timber or thick plywood is screwed to them. The lower edge of the bar / plywood should be set at the level of the stretch / false ceiling.
In the case of a plasterboard ceiling, you can use a profile as a mortgage, which is screwed “backward” down. In this case, it will be necessary to use metal screws. Most likely, before hanging a curtain rod, you will have to drill holes with a small drill, otherwise the self-tapping screw may not “go”. It will not be possible to develop a large effort, since the suspensions will bend.