Contents
Installing a polycarbonate greenhouse justifies itself only in case of seasonal use. Its main disadvantage is that there is a loss of 10% of heat, so it is not suitable for those owners who want to grow plants in a greenhouse all year round. But on the other hand, for seasonal use, it does not need to be equipped with heaters, because solar heat is perfectly accumulated in a greenhouse covered with sheet polycarbonate. Metal structures for the frame of such a greenhouse can be bought at the store, and assembled right on the site with your own hands. So let’s talk about how to install a polycarbonate greenhouse.
Features of installation without a foundation
If the summer resident is going to operate the greenhouse only from May to September, it is better for him to abandon the foundation. In addition to tangible cost savings, this will also save time – after all, you can mount a light polycarbonate greenhouse in just a couple of days with your own hands, unless you enlist one assistant. If necessary, it can be moved to another place, and at the end of the summer season, simply dismantled, so as not to come in the winter specifically to remove snow from its roof.

To prevent a strong gust of wind from damaging the farm, a light greenhouse is fixed in the ground with metal or wooden T-shaped fasteners. You can make the lower harness from a wooden bar for weighting, you can bury such a bar or log in the ground and attach the base of the greenhouse to it – but this will already turn out to be such a foundation that will deprive it of mobility and increase the consumption of time and money. Installation should be done in the fall after the end of all agricultural work, or in early spring, in order to calmly move around the site without fear of trampling the plants. The air temperature must be at least 10 degrees, otherwise the polycarbonate will not be plastic.
Choosing a fertile place

It is very important to choose the right place for the greenhouse. The site should be flat, not shaded, there should be no buildings or large trees at a distance of 3 meters. Trees create not only a shadow, their root system will interfere with the development of plants in a greenhouse, and close buildings contribute to the appearance of drafts.
The greenhouse must be oriented to the cardinal points. The correct orientation is east to west in length, then one wide side will always face south, and this will provide the most sunlight.
Another advantage of a mobile greenhouse is that if you have chosen a place unsuccessfully, then this is only for one year, next year you will not repeat such a mistake.
What to do with soil
When choosing a place, you need to explore the ground. To do this, it is recommended to dig a special pit with dimensions of 70 cm by 70 cm and a depth of 1 meter 20 cm. Now you need to determine the type of soil. This is easy to do if you take it in a handful and try to make a ball. It turned out to roll a ball or sausage – there is a lot of clay, it didn’t work out – sandy soil. Sand is a very good basis for greenhouse soil: it allows water to pass through, its excess will not allow the roots to rot. If the soil is clayey, it will have to be replaced.
To replace the soil under the greenhouse, you need to dig a pit with a depth of at least 70 cm and fill it with sand by 40 centimeters, and leave the top 30 cm to be filled with a fertile mixture. In addition, it would be nice to know the depth of the groundwater. If they are found higher in the pit, drainage grooves will have to be made to drain excess water.
Installation instructions

If a place for the greenhouse has already been chosen, all frame elements are made by hand or bought ready-made and brought to the site, you can proceed with the installation. You need to start by preparing the site. At the selected site with prepared soil, it is recommended to mark the site of the desired size. This is done with wooden pegs and rope. Next, the site is leveled, the turf and protruding mounds and mounds are removed. It is advisable to check the horizontality using a building spirit level. There should be no height differences of more than 5 cm. Particular attention is paid to a half-meter strip along the perimeter. The rest can be aligned later.
To determine the outer edge of the trench, measure 30 cm from the marked line, draw a line with a shovel or a pin on the ground. We tear out a trench with a width of 30 cm and a depth that depends on the length of the legs of the greenhouse. We expect the lower trim of the frame to rise 10 cm above the ground. If we are going to install the greenhouse on a beam, then the depth and width of the trench depends on the size of the beam. The bottom of the trench needs to be tamped a little and check its horizontalness so that the frame does not warp later.
Now is the time to start protecting the greenhouse from weeds and pests. To do this, you need to overlay the outer wall of the trench with some kind of solid material, for example, slate or roofing material. They say that after 3-4 years the wheatgrass will still overcome such an obstacle. So, if the greenhouse remains in the same place, the protection will have to be updated.
Video “Greenhouse Installation Instructions”
Staged assembly of the frame

Anyone who has firmly decided to assemble a greenhouse with their own hands will need a screwdriver and a wrench. If you bought a finished greenhouse, then the kit must have all the necessary fasteners and an assembly diagram. If you are able to weld all the elements of the frame with your own hands, then you have already made a drawing, calculated and bought the elements necessary for installation.
Correctly start assembling the frame from the ends. Door and window frames are attached to the end arcs, reinforcing the slats. Then fasten parts of the lower trim and attach T-shaped legs to it. The harness with supports is installed in the trench, and the harness should be 10 cm above the ground. Now you need to check the horizontal installation, correct if necessary and proceed to further assembly.
If the greenhouse is mounted on a beam, then the frame profiles must be attached to the beam with steel corners. And lay the roofing material not just on the side, but also under the beam itself. This will provide moisture insulation. In addition, all structural elements that will be placed in the ground must be treated with bitumen – this will protect them from corrosion and pests.
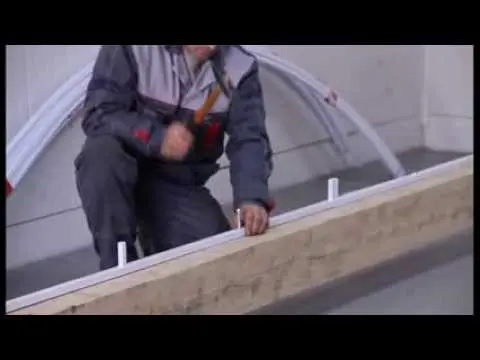
Then the rest of the frame arcs are attached to the harness, and polycarbonate is installed on top. It is necessary to carefully consider and attach it so that the light-protective film is on the outside, it will need to be removed before installation or immediately after it. Otherwise, ultraviolet will enhance the effect of the glue. The installation of polycarbonate also starts from the ends (before that, you need to remove the door and window frames). It is more convenient to attach a rectangular sheet as a whole, without cutting it out in shape, but cut it out with a hacksaw already attached, go around the outline of the frame along the outside and cut holes for doors and vents in the same way. The removed frames must be closed and fixed in place already with polycarbonate.

When installing polycarbonate on the rest of the frame, the sheets must be laid across and without overlap. Make joints with a special connecting profile. Usually it is attached to each arc in several places, but you can do it differently. Overlap the entire greenhouse with narrow long strips of aluminum and tighten them with a screw with the desired density.
It remains only to lay the ground around the perimeter above the base by 5 cm, this will also be an obstacle to the movement of insects. But for a greenhouse without a foundation, you can make an additional strapping from a bar. A timber treated with drying oil or bitumen will be an excellent barrier to pests. In addition, a greenhouse weighted with timber will definitely not suffer from gusts of wind. The greenhouse, which remains assembled for the winter, will have to be cleared of snow, otherwise the polycarbonate may crack. And it is advisable to leave the doors open and let the ground freeze.
Video “Greenhouses without foundation”
Polycarbonate is the only suitable material for building a greenhouse without a foundation. The construction is very strong and stable.