


Contents
A private house is a good opportunity to experiment. The classic option to expand the space of the main room is a veranda attached to the house. It can be of different types. Externally, the room is able to successfully emphasize the exterior of the cottage. In a convenient extension, you can comfortably spend time not only in summer. A warm veranda often acts as a corridor, hallway or lounge.
Preparatory stages
In order for the construction to be efficient and you make as few mistakes as possible, you need to prepare for the workflow. To begin with, we will draw up a project, take the necessary measurements, and make a markup. Focusing on the drawing, you can visualize what should happen, calculate how much material is needed.

Decide on the design features: open or closed, summer or insulated. The veranda can be built-in, that is, it is built with a house on the same foundation, or attached – it is built later on a separate foundation. Most often they tend to the rectangular shape of the room, they also choose round and polygonal structures.
When planning a veranda provide:
- the location of the structure – the design should organically complement the house;
- entry point – it can be from the street, any of the rooms or through;
- where the door will be installed – it is advisable to avoid drafts;
- veranda dimensions.
Pay enough attention to the drawings, with the help of which you can correctly build a beautiful structure. In addition, without a project, it is impossible to obtain permits for construction.

We are getting ready for the place. Before starting work, you need:
- Free up space above the entrance.
- Remove the porch.
- Remove vegetation and debris from the area.
- Remove the top layer of earth.
- Provide for where the material and waste will be located.
It is better to build a building so that it does not block the entrance to the house. The dimensions of the building are an individual matter. For a family of 3-6 people, a room of 3×4 m will be enough. Do not forget to take into account the architectural features of the house. If it is two- or three-story, then the extension should be of sufficient size.
Now step by step instructions for markup:
- We remove the top layer of soil.
- The resulting recess is leveled.
- We do markup.
- Keep the project at hand, taking into account the indicated dimensions, we drive in metal or wooden pegs in the corners, using a similar algorithm, we drive in intermediate pins every 100–150 cm.
We stretch the rope between the pegs. It will serve as a guideline for the construction of the foundation.
Video “How to build a veranda with your own hands”
From this video you will learn how to build a wooden veranda with your own hands.
Fundamental works
The foundation is the most important condition for the durability of a building made of any material. Brick verandas are especially in need of a reliable foundation, as they have serious weight. Verandas are built on a columnar or strip foundation. The depth of the support will be the same as at home. It is not recommended to connect the main support with the base of the extension, the weight of the structures is radically different, which will also affect the degree of shrinkage. That is why for the veranda you will need to make a separate foundation.
Tape view
A strip foundation is a rational solution if you are going to build a veranda from building blocks or bricks. The thickness of the base is selected according to the foundation of the house.
Base device in order:
- We make a trench around the perimeter of the structure.
- We level the bottom, the walls of the trench. We make formwork from boards, focusing on the height of the future concrete support.
- Gradually fill the bottom with a 10-centimeter layer of sand, perform an identical procedure with crushed stone. Each layer is rammed.
- We install a reinforced mesh of special rods. Optimum cell size: 10×10 cm. This is necessary for additional strength.
- Pour a solution of cement, sand, gravel and water.
The resulting area is leveled, left to dry. We are waiting for 23-30 days. Water the concrete on a hot summer day to keep it from cracking.
columnar type

If the veranda is made of timber or polycarbonate, a columnar base is great. It is desirable to make pits for posts with a depth of 75–115 cm. If the extension is compact, the supports can be fixed in the corners. Professionals advise to mount intermediate buildings, despite the dimensions of the country veranda. The optimal distance between the supports is 80–100 cm.
Step by step about the process:
- We make holes where the pillars will be poured. A drill is ideal for this.
- We fill the bottom of each recess with sand by 15–20 cm. Another 10 cm of rubble from above will not hurt. We ram carefully.
- Pour the solution to the ground level, wait for it to solidify.
- Finished concrete supports are coated with bitumen.
- We fill the gaps between the ground and the supports with sand.
It remains to build the above-ground part of the brick pillars. The height will be identical to the height of the base of the house.
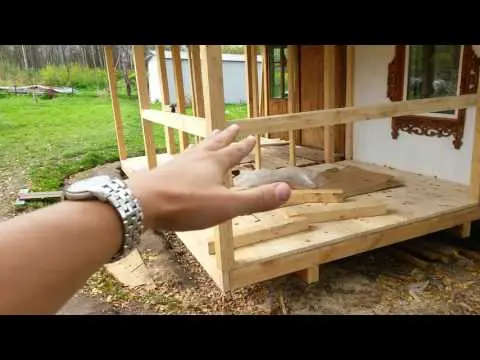
bedding

In the case when the house is located on dry ground or in a location where severe frosts rarely occur, and also if there is no basement, a covered or semi-closed veranda can be built without a foundation. According to the standard scheme, we remove the top layer of soil, remove vegetation, debris. It will turn out a pit, its bottom is rammed, we fall asleep rubble, sand. We condense all this. On the resulting base we put flooring made of slabs or wood.
It is important not to forget that the racks on which the roof rests will still need to be strengthened. You need to make compact piles or fold the posts.
The thickness of the bedding depends on two nuances:
- the thickness of the fertile layer;
- floor covering.
If we are dealing with wooden shields, the layers should be on the same level with the ground.
Rough floor
When the foundation is ready, it’s time to start the subfloor. We cover the support with waterproofing in two layers. The floor can be wood or concrete. If the structure is made of timber, it is more logical to choose the first option, if it is made of brick – the second.
Making a wooden rough coating:
- We fix the beam of the lower trim on the base. Use anchors as fasteners. To connect the bars, we pre-make recesses at the joints. We fasten them with nails.
- We install wooden logs to the bottom harness. The optimal step is about 50 cm, this will prevent the destruction of the floor. We connect according to a similar algorithm.
- The space between the logs is filled with expanded clay.
- We equip the flooring from a board or plywood.
We connect the flooring components to the joists with nails and self-tapping screws.
As for the concrete screed:
- We fill the base with a layer of sand 10 cm.
- From above we fall asleep with expanded clay.
- We lay the reinforcing mesh.
- We pour the solution.
The standard screed thickness is 30–50 mm. So that the result does not disappoint, use a level – so the screed will be as even as possible.
Building a timber structure
Wooden structures are a classic of construction. This material has been used since ancient times. Even after foam blocks, aerated concrete, etc., appeared on sale, wood remained popular. Its main advantages are ease of construction, aesthetic appearance and environmental friendliness. The main disadvantage: easy flammability, so it is better not to fry shish kebabs in such conditions.

In short, the workflow looks like this: we mount the frame racks, sew them up with shields, clapboard or other material. At the same time, do not forget to pre-treat the wood with a protective agent so that it does not quickly rot.
Step by step about the process:
- We make the bottom harness. We lay the beam on the supports.
- Corner joining is best done with a gash. To increase the reliability of fasteners, use nails or dowels.
- We mount the supports that will form the frame of the veranda to the house.
- The structure is built from timber. It is better to install supports at a distance of 500–600 mm. Their height should be equal to the height of the veranda. Supports that are closer to the wall, do higher. Due to this, a pitched roof will turn out.
- During the installation of the frame, we mount horizontal bars.
- The finish line – the execution of the upper harness. A truss system will be built on it.
Next up is the roof. We start with the installation of rafters and battens. Its features depend on what roofing material will be used.
Roof types by design:
- lean-to;
- gable.
The first option is the simplest and most effective. Rafters are attached at an angle from the wall of the house. Thanks to this, water easily flows down without harming the building. The gable roof also has features – the veranda is attached to the house with a narrow part. It becomes kind of passable. Usually such a roof is made over a terrace.
Building a brick alternative
Brick premises are the standard of reliability and durability. The material is perfect for the construction of a large-scale veranda. It will be cool in the building in the heat, and with proper insulation it is quite comfortable in winter. In addition, the brick is not afraid of fire, but the structures made of it are very massive, they must be built on a monolithic base. And this significantly “beats” the wallet.

We figured out the foundation, the draft floor is ready, we proceed to laying out the walls:
- We fasten at two opposite ends of the base with a cord tie. It should run along the edge of the foundation.
- We put the corner bricks on the landmark. Use cement mortar to fasten the elements.
- We check the evenness of the first row with the help of a level, if everything is in order, we move on. Don’t forget to leave room for windows and doors.
- When the last row is ready, we make an armored belt.
- We fix the formwork on the upper surface of the walls.
- In the corners we put anchor bolts, reinforcement, pour the solution.
- The concrete must be cured. Next, we connect the strapping from the timber with anchors.
Further installation of the roof is carried out according to a similar method, as in the case of a wooden veranda.
Versions in other materials
In addition to wood and brick, you can build a veranda from another material. A good alternative is polycarbonate. The material is quite durable and wear-resistant. The polycarbonate sheet consists of a protective layer, UV filtering, coating for selective light transmission. Thanks to this combination, the material comes in a variety of colors.
Often use expanded clay concrete blocks. The material attracts with a low price, good thermal insulation performance. Nevertheless, against the general background of wood and brick, polycarbonate and expanded clay do not seem so reliable, and they are inferior in appearance.
When the main work is behind, it would be appropriate to pay attention to the design of the room. Decorative finishing is also better to carry out according to plan. Modern or rustic design – the choice is yours. Even the usual correct arrangement of furniture will favorably transform the interior of the veranda. Plants fit harmoniously into the room.