


Contents
- Homemade for the apiary
- How to make a ramkonos
- bee remover
- pollen collector
- Queen caps
- bee scales
- Electric winder
- Jig for assembling frames
- How to make a bee analyzer
- Wire tensioner for frames
- How to make an insulator for the uterus
- Canvas for beehives
- What other do-it-yourself crafts can be made for beekeeping
- Conclusion
Do-it-yourself ramkonos is the easiest way to make from a wide variety of bee accessories. However, the beekeeper will need many other tools, equipment and supplies. Most accessories can be simply purchased, but handmade products are considered the most convenient.
Homemade for the apiary
The main inventory of the apiary is the beehive. Professional beekeepers knock them together from boards with their own hands. However, without a tool and inventory, a beekeeper will not be able to maintain the hive, take care of the bees, pump honey, and melt wax. Papiary supplies are commercially available, but they are often overpriced. Another disadvantage is the inconvenience of working with factory products. Sometimes beekeeping equipment is ill-conceived, made of poor quality materials.
The beekeeper creates the most convenient apiary devices with his own hands. They cost absolutely free, and in quality they are able to compete with factory counterparts.
How to make a ramkonos
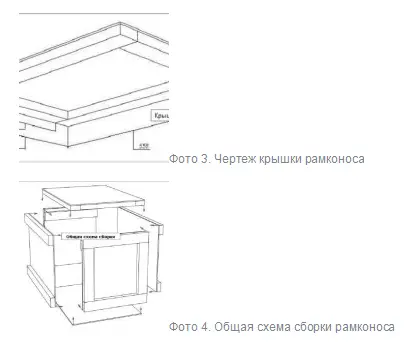
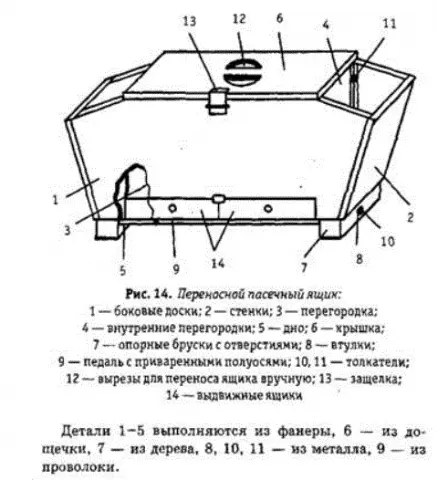
It is difficult and dangerous for the beekeeper to carry frames with honey to the honey extractor in the presence of bees. Similarly, it is inconvenient to deliver foundation to the hives. The ramkonos helps to simplify the task. The apiary device resembles an ordinary wooden box containing from 6 to 10 frames. For carrying it is equipped with a handle. You can fold the simplest apiary frame with your own hands according to the presented drawing.
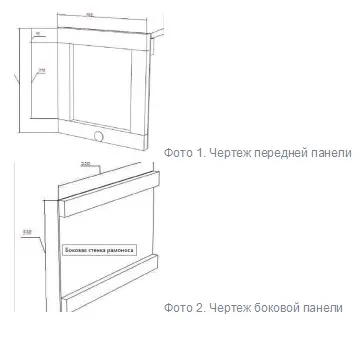
The DIY assembly process consists of the following steps:
- First, they are determined with the size of the apiary ramkonos. It must accommodate the frames used in the hives. The frame consists of two side, front and rear walls, bottom, cover. In total, you need to put together 6 elements of the box with your own hands.
- For the frame, rails with a section of 20×45 mm are used. Do-it-yourself sheathing is carried out by fiberboard. Reiki are nailed on the outside of the walls so that it is convenient to take the apiary frame with your hands by the ledges. Inside the box, 2 slats are similarly nailed to form a stand for the frame.
- The bottom is nailed last and the lid is fixed with hinges. She should lean to the side. A vent hole is drilled in the front panel, but it is optional. Many beekeepers refuse ventilation. Staples are attached to the frame of the frame, a handle is hooked from the belt.
- If necessary, beekeepers quickly adapt the beekeeper ramkonos, designed with their own hands, to catching a swarm.
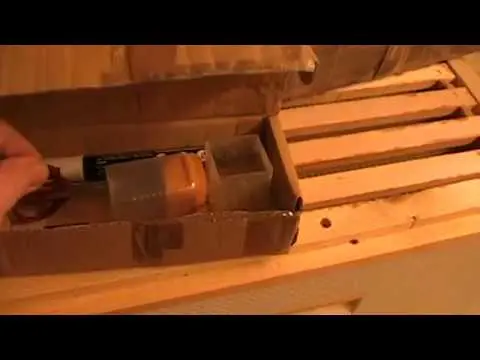
On the video example of the ramconose:
bee remover
The functionality of an apiary bee remover resembles a non-return valve. Bees from the honey housing move to the nest through special channels. They cannot return back. Having installed the bee remover in the evening, the beekeeper can safely serve the insect-free frames the next day.
Of the factory apiary devices, bee removers from Krasnov and Quebec are popular with beekeepers. The latter is made in the form of a separating diaphragm and resembles a labyrinth. The basis of the apiary bee remover is four-layer plywood. Two triangles are fixed from the bottom of the rails. Their sides at the corners do not close, but form a gap of 8-10 mm. A hole is drilled in the center of the triangle. The total area of the triangles is covered by a grid at the top.
Assembling a bee remover with your own hands is no more difficult than an apiary ramkonos. You will need drawings. The dimensions must correspond to the internal parameters of the hive so that the bee remover can be installed. Plywood thickness – from 10 to 25 mm. The diameter of the hole in the center of the triangle is up to 50 mm.
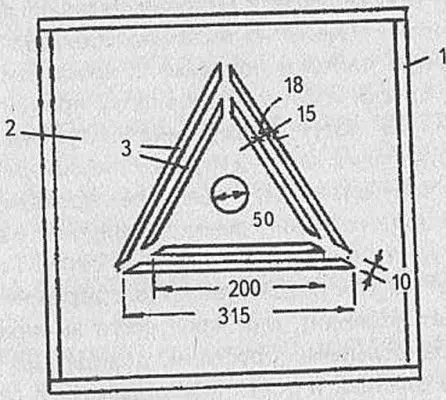
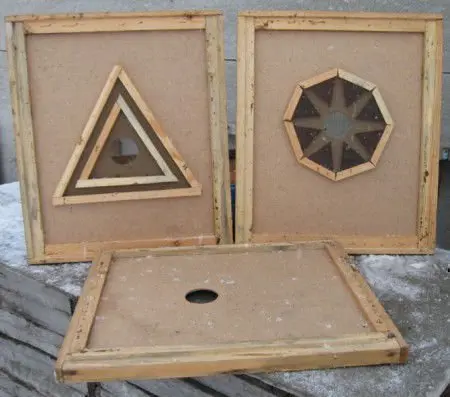
Reiki for a triangle use a width of 20 mm. The distance between the elements forming the channel is about 18 mm. Additionally, you will need bars for the frame.
DIY assembly technique is simple. Triangles are formed from the rails. Blanks are glued or shot with staples. A hole is drilled in the center of the triangle with a pen drill. The edges of the plywood blank are framed with bars with their own hands. The area of the triangle is covered with a steel fine mesh.
pollen collector
Pollen is a useful product of beekeeping. To collect it with his own hands, the beekeeper puts pollen traps on the hives. Professional beekeepers do not like shop apiary devices. They have many extra holes or their diameter is too small. Homemade beekeeping products that help the beekeeper to collect a lot of beekeeping are more popular.
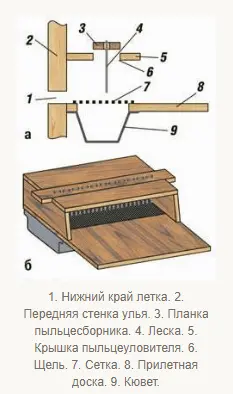
A feature of do-it-yourself apiary devices is the presence of a figured hole. A bee crawling through it is guaranteed to leave all the footprints in the collection.
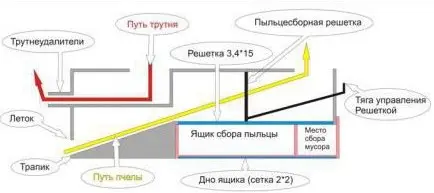
It is easy to fold the apiary device according to the drawing with your own hands. First, for the pollen collector, prepare a bar with holes with a diameter of 5 mm with your own hands. A fishing line will help to make them curly. The veins are passed into the holes, braiding them around the ring. Overcoming the barrier, the bees will cling with their paws and push the line apart. Actions will lead to tearing off the skirts.
The bee pollen collector is placed on the hive in front so that the lower cut of the notch coincides with the upper edge of the arrival plank. A plank is placed in the slot on the cover of the apiary pollen trap. The arrival board is covered with a grid with 3×3 mm cells. The torn off pieces will roll into the ditch.
The slot in the bee bin can be used to install a dividing grid to prevent queens from flying out.
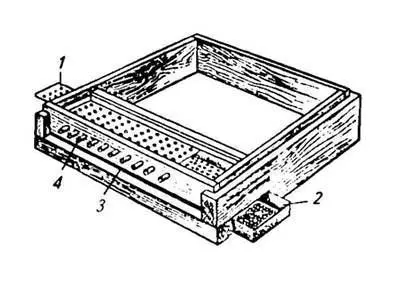
They collect and install the bottom pollen collector with their own hands in the bee pavilion, when the bees bring the maximum amount of pollen. On unproductive days, you can not use an apiary device.
The design of the bottom collection of pollocks consists of a valve. When it is raised, the bees enter the nest without passing through the grate. During the assembly of the do-it-yourself skirts, the valve is lowered.
Queen caps
For planting queens, special caps are used. The beekeepers improve the factory models with their own hands by making a hole and equipping the lid. The device is pressed into the area of the honeycomb, where there is honey, empty cells and young growth.
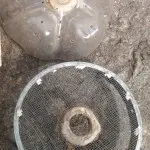
You can quickly create do-it-yourself caps for queen bees in the field from a PET bottle. First, cut off the bottom with scissors. Up to 20 holes with a diameter of 2 mm are pierced with an awl. Three days after installing the cap, the exit is covered with honeycomb, having drilled a hole for the queen. If the queen does not come out on her own, she is released by lifting one edge of the cap.
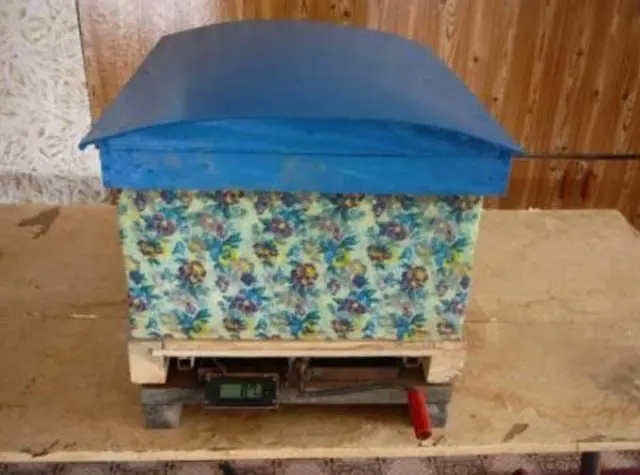
bee scales
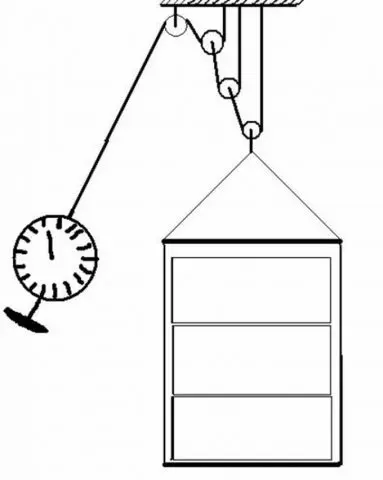
Apiary equipment for weighing is expensive, and it is impossible to do without it. To build bee scales with your own hands, the beekeeper will be burned by ingenuity. The design is made according to the principle of a suspension system. You will need to hang a set of blocks from a solid ceiling, pull a cable through them and attach the scales.
More convenient do-it-yourself scales for hives are obtained by converting a factory device with a load cell. Scales understand. The removed electronics are taken out, fixed in a convenient place.
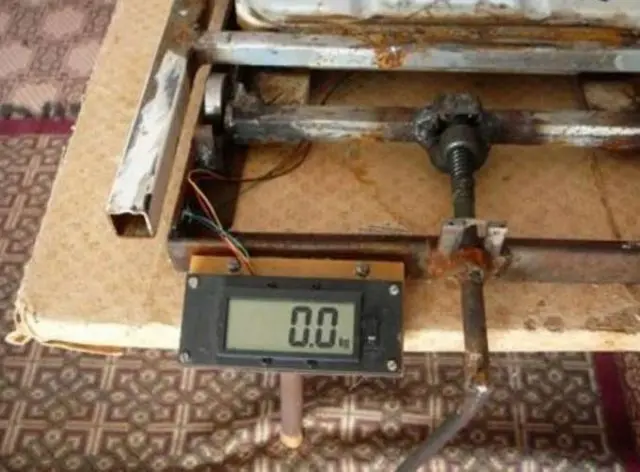
The movable weighing platform is mounted on levers connected to the frame by springs. For conversion, you need to weld a frame from a corner with your own hands, equip it with four bearings. The homemade frame is attached to the main frame with four screws.
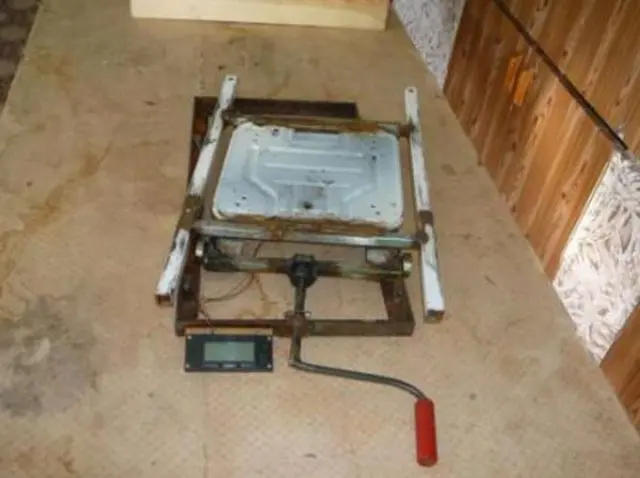
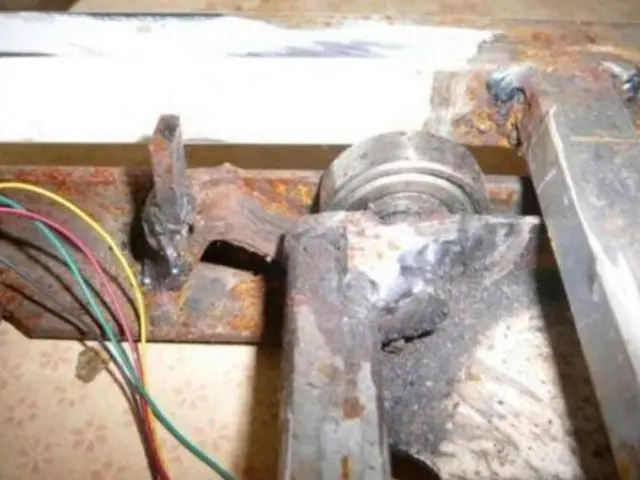
To lift the scales on the frame, weld a nut, screw the handle. For weighing, bars 55 mm thick are placed under the bottom of the hive. Scales are rolled into the gap, the power button is pressed. When zeros are displayed on the display, by turning the knobs, the movable platform is raised by 20 mm. After weighing the hives, the beekeeper turns the handle in the opposite direction.
Bearings of apiary scales are rolled synchronously. To raise or lower the platform, turn the handle about 20 times.
Electric winder
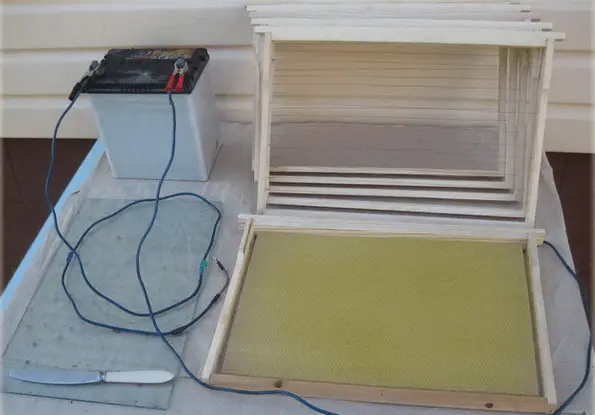
To simplify the work with honeycombs, beekeepers have created a beekeeper with their own hands. Its peculiarity is that it is powered by electricity. To assemble an electric winder with your own hands, you will need an old working battery, 2 wires with clamping terminals.
The essence of the apiary device is that the terminals are connected to the wire on the frame. When the circuit closes, it starts to heat up. Wax is placed on a hot wire, pressed with glass. Through the transparent sheet you can see how the strings are soldered into the wax.
Jig for assembling frames
It is easy to assemble a small number of frames with your own hands. For a large apiary, mass production is being established. Special templates – conductors help speed up the process. Apiaries are made of wood and metal. The easiest way is to design a jig for assembling frames for a hive with your own hands from wood.
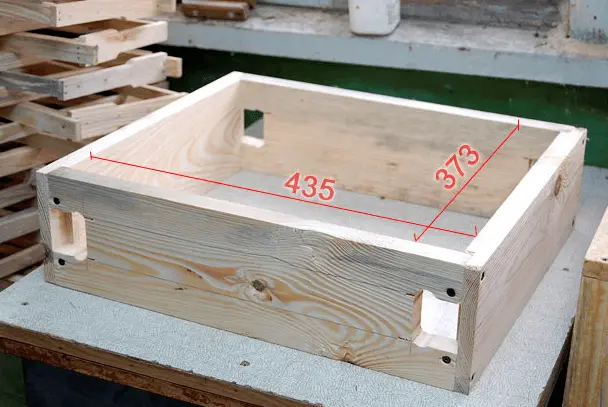
The template is assembled in the form of a box without a bottom and a lid. The internal size corresponds to the dimensions of the frame. Holes are cut out in the side walls of the template, the slats are inserted so that a gap is formed between them and the elements of the conductor, equal to the thickness of the blank for the frame.
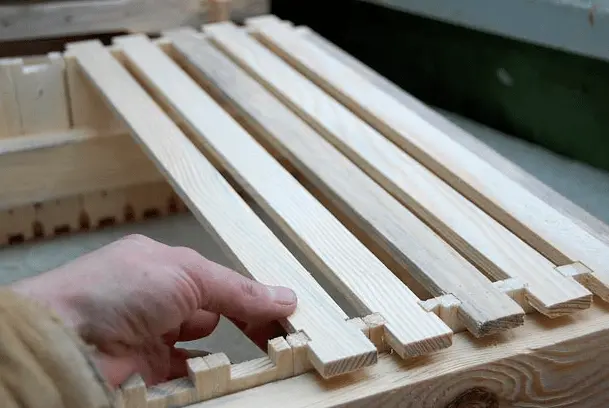
Strips with lugs are inserted into the gaps, which are the side elements of the frame. Side jumpers are inserted into the grooves of the slats first from above then from below. Elements are knocked down with nails. The finished frames are removed from the jig. Usually it turns out for a beekeeper to make up to 10 pieces at a time with his own hands.
How to make a bee analyzer
Sophisticated apiary homemade beekeepers are based on electronics. Soldering them with your own hands is within the power of an experienced radio amateur. The most common apiary electronic device is the bee analyzer. The device helps to monitor the activity of bees. The bee analyzer reacts to noise. The frequency spectrum in a normal hive is 260 to 320 Hz. In case of swarming, disease, disappearance of the queen, the activity of the bees decreases. The spectrum of noise frequencies is in the range of 210-250 Hz, which serves as a signal to the beekeeper.

A self-assembled bee analyzer reacts to the frequency of noise in the hive. LEDs serve as signal indicators. One light indicates “Yes” and the other indicates “No”.

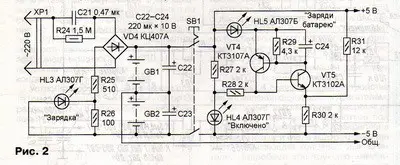
On fig. 1 is a diagram of an apiary analyzer, and in fig. 2 – power supply. The numbering of radio components in the second scheme is a continuation of the numbering of the first scheme.
Wire tensioner for frames
Do-it-yourself manual stretching of the wire on the frame does not always end successfully with the beekeeper. The string breaks or sags. A special apiary device helps to carry out a quick stretch with your own hands under the necessary effort.
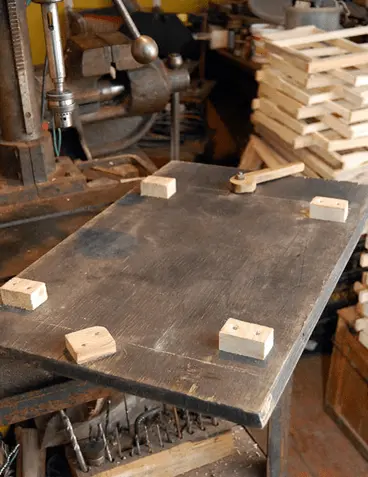
To make an apiary tensioner with your own hands, you will need an old countertop or a piece of chipboard. The size of the workpiece should be larger than the frame. On the tabletop of 5 blocks, limiters are made to stop the frame. The tensioning mechanism is a lever rotating on a hairpin with an eccentric. When turning down, the eccentric presses the side rail of the frame. After releasing, the installed string is stretched.
How to make an insulator for the uterus
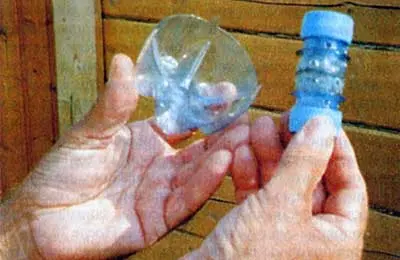
For isolation in the nest of the uterus, beekeepers use a special apiary device – an insulator. The simplest do-it-yourself cell in the field is made from two necks of plastic bottles. First, they are sawn off with a hacksaw for metal with their own hands. The blanks are connected with adhesive tape so that the threaded necks look in opposite directions.
A piece of plastic cut from the wall of the bottle is inserted into one of the corks. Ventilation holes are cut in all necks and the inserted piece. Kandy food is pushed into one cork, covered with a napkin with a small hole, and wound around the neck. The second cork is made with a hole so that the insulated queen does not suffocate. During the replanting of the uterus, it is unscrewed, and the neck is closed with honeycomb, lightly smeared with honey.
The cell is suspended inside the hive with a cork down. The bees gradually gnaw through the foundation, freeing the uterus from the insulator.
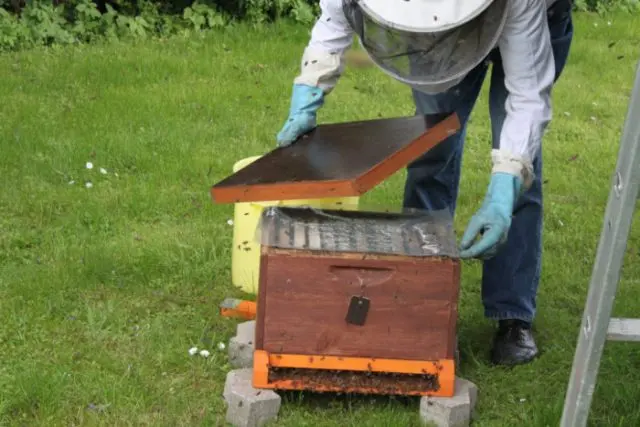
Canvas for beehives
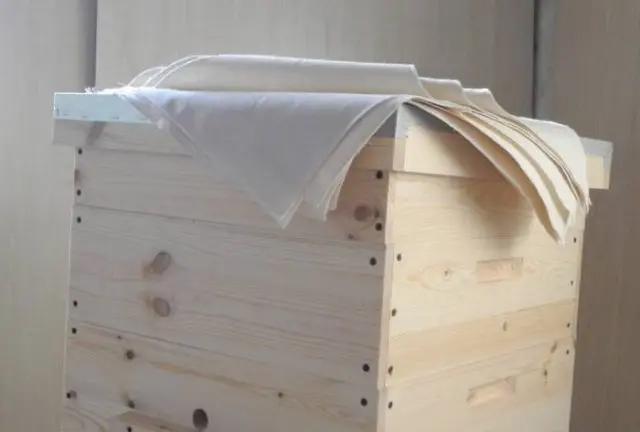
Inside the hive, beekeepers cover the frames with honeycombs with special canvases. It will not be difficult to make them with your own hands, cutting them to size from natural fabric. Linen or cotton material is optimal. The fabric retains heat well, allows air to pass through, and removes steam from the hive.
The beekeepers cut out polyethylene canvases with their own hands. Artificial material perfectly retains heat, but does not allow air to pass through. For the winter, it is better to lay canvases made of breathable material.
What other do-it-yourself crafts can be made for beekeeping
There are many other beekeeper’s apiary devices, and it will be possible to make them without much difficulty with your own hands.
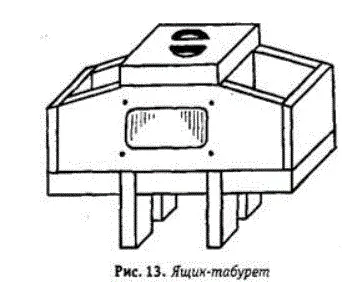
A convenient apiary attribute of a beekeeper is a box-stool. The base is knocked down from the bars. The seat is cut out with their own hands from the board, they saw through a hole for the handle. The body of the box is knocked down from plywood. It is convenient for a beekeeper to sit on a stool while servicing frames, hives. All tools are always at hand in the box.
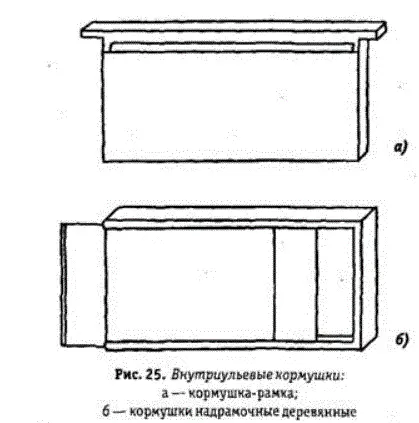
Intra-hive feeders are assembled by beekeepers with their own hands from frames. First, honeycombs and wire are removed. The frame is sheathed with plywood, the joints are sealed with wax.
In the form of boxes, beekeepers make over-frame ceiling feeders. They are made with their own hands wooden or plastic.
Conclusion
Do-it-yourself ramkonos and other apiary accessories are easy to make in 1-2 hours. Schemes and tips can always be found on thematic forums where beekeepers share their achievements.