


Contents
Assembling a homemade electric snow blower at home is not so difficult. You must be able to use a welding machine and have access to a lathe. In extreme cases, you can turn parts on order by visiting a metalworking workshop. An electric motor for a snow blower is suitable for any asynchronous, rated for 220 volts with a power of approximately 2 kW.
The nuances of designing a homemade electric snow blower
During the assembly of an electric snow blower with your own hands, many questions will definitely arise regarding the technical side of the machine. Any craftsman tries to find out what spare parts are best to complete his invention. Most questions arise on the electrical part of snowplows:
- The snow blower does not have to be equipped with a separate electric motor, the body of which has a flange mount or mounting feet. Homemade equipment can be equipped with any motor that comes with a powerful power tool. A grinder, trimmer, electric drill or puncher will do.
- If you need to make a snow blower to the country, where it is supposed to occasionally clear a small area of freshly fallen snow, then the motor power will be enough from 1,6 to 2 kW. Such a machine will throw snow mass at a distance of up to 4 m.
- When using a motor with high speeds, you need to come up with a reduction gear. It can be made from a set of pulleys or sprockets of different diameters. For example, a grinder motor with a power of 1,6 kW develops up to 6 thousand rpm. They need to be lowered to 3, and preferably 2 thousand rpm. For a homemade snow blower, an electric motor with a power of 2,2 kW is best suited, in which the shaft speed has an indicator of 2–2,5 thousand rpm. Often, the calculation of motor power is determined by the formula: 1 kW per 150 mm of a working mechanism, for example, an auger.
- Compared to a gasoline engine, an electric motor poses a greater danger to the operator. This is due to electric shock. Snow must not get into the motor, so it must be raised on the snow blower frame higher from the ground. Additionally, you must try to make a sealed casing.
- The electric snow blower will be connected to the outlet through a long carrying. It is desirable to find a cable armored with reliable insulation that can withstand low temperatures down to -60оC.
Compliance with safety rules is necessary for the operator himself, so the electrical part of the snow blower must be taken seriously. When all these nuances are carefully thought out, you can begin to create the machine itself.
Making an auger for an electric snow blower
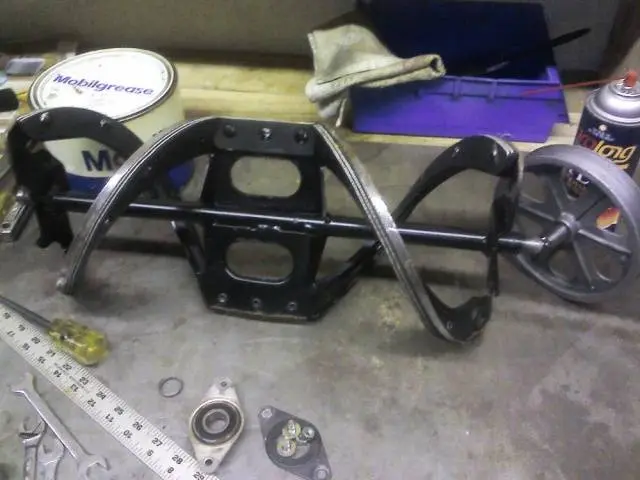
Almost every snow blower is equipped with an auger mechanism. It doesn’t matter if it’s electric or petrol. The auger is a rotating drum with knives twisted in a spiral. And they are made up of two parts. The coils of the spiral are directed towards the center, where the steel blades are located. As the auger rotates, the blades scoop snow away from the sides of the snow blower body and direct it towards the center. The blades pick up the loose mass and push it out through the nozzle, on which there is a sleeve with a guide cap.
To make a snow blower auger, you need to find a shaft. For this, a pipe with a thickness of 20 mm is suitable. The width of the snowplow depends on its length, but it is unnecessary to be zealous. Usually 500-800 mm is enough. Two rectangular plates of thick steel are welded in the center of the pipe, located opposite each other. These will be the blades.
Auger knives are cut from sheet metal or side shelves of car tires. Another suitable conveyor belt. For a drum with a width of 500 mm, you will need 4 discs with a diameter of 280 mm. A hole is drilled in the center of each workpiece. Its diameter must correspond to the thickness of the shaft. The resulting rings are sawn from the side, after which the edges are stretched in opposite directions.
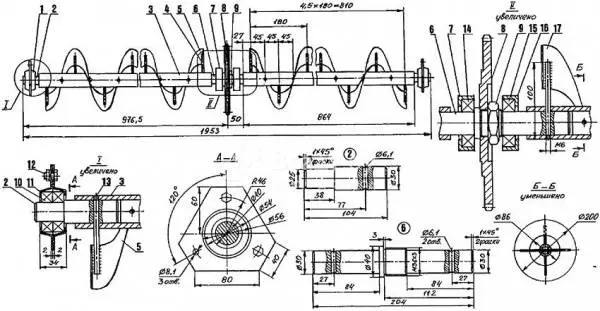
The finished turns of the spiral are fixed to the shaft towards the blades, as shown in the drawings. One edge of the knife is fixed on the blade itself, and the other is fixed to the stand, which is also welded to the shaft.
Pins are welded to the ends of the shaft, and bearings No. 305 are mounted on them. They must be of a closed type, otherwise jamming will occur from snow and sand.
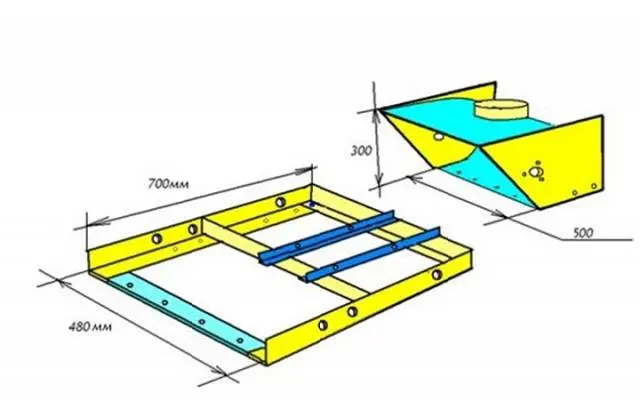
Do-it-yourself bucket on a snow blower is bent from sheet steel 2 mm thick. Its width is equal to the length of the screw, plus leave free space for the drive. The inner semicircle of the body is made 20 mm larger than the diameter of the spiral knives. In our example, the size of the semicircle of the bucket is 300 mm. The side walls are cut out of steel or thick plywood. Hubs are fixed in the center, and an auger with bearings is installed. Before that, a belt pulley or a chain drive sprocket must be mounted on one of the pins.
During operation, all auger snow blowers throw snow far to the side. To do this, a hole is cut out at the top of the bucket opposite the blades – a nozzle. Here a sleeve is fixed from a piece of pipe and a swivel visor.
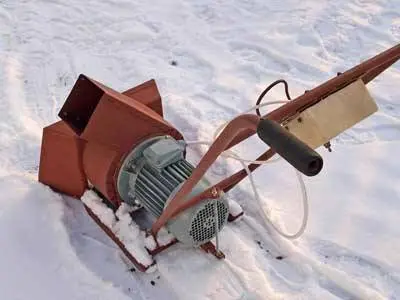
Assembling an auger snow blower with an electric motor
So, the auger working part of the snow blower itself is ready, now you need to equip it with an electric motor. First you need to weld the frame of the snow blower. To do this, you need metal corners. In the process of work, you can use the drawing. A frame size of 480×700 mm for a screw nozzle 500 mm wide will be enough. It is important to provide two jumpers for mounting the electric motor.
Ski runners are fixed to the frame from below. They can be cut out of wood or bent the edges of metal corners. The control handle is better to make adjustable. An electric motor and a screw nozzle are bolted to the jumper. Now it remains to make a drive on the snow blower. It can be chain with sprockets or belt with pulleys.

It is better to connect a short cable to the electric motor. At the free end, a connector is provided for connecting to a carrying case. Before starting the motor, the auger must be scrolled by hand. It should rotate freely without catching the bucket body with knives. If everything is in order, you can try the snow blower in operation.
Trimmer electric snow blower

A good snow blower with your own hands can be assembled from a trimmer. However, not every electric scythe is suitable for homemade. Models with a curved shaft transmit torque from the motor to the knife through a flexible cable. Such trimmers are usually equipped with low power electric motors. They are not suitable for snow blowers. A good machine will turn out from an electric scythe with a flat bar, where the torque is transmitted through a gearbox by a rigid shaft.
Having prepared the welding machine, metal blanks and the trimmer itself, they begin to create a snow blower:
- First you need to assemble the body itself. It is made in a round shape. You can bend a steel sheet, but it is better to find a metal barrel. It must be cut off with a grinder, stepping back from the bottom 150 mm. The impeller will rotate inside this housing. To install the mechanism in the center of the bottom of the barrel, a hole is drilled along the thickness of the gearbox shaft. A square window is cut on the side through which snow will be ejected. The trimmer gearbox itself will also be fixed to the bottom of the barrel, so additional holes are drilled for it.
- The barrel is rotated so that the window for ejecting snow is at the top. In front, the open part of the body is 1/3 welded with a steel sheet.
- The rotor of a snow blower is an impeller of five blades, but usually four or three are enough. For the manufacture of the structure you need a disk. Steel plates 250×100 mm in size, cut in the form of blades, are welded onto it.
- Now you need to weld the blade to the bottom of the body in front. It will cut the snow layer as the snow blower moves forward. For the blade, a piece of steel sheet measuring 400×300 mm is suitable. On the sides, you can bend the guide rails with a height of 20 mm.
- A square pipe about 100 mm high is welded to the window cut out on the side of the case. A visor is put on it, which will direct the ejected snow to the side.
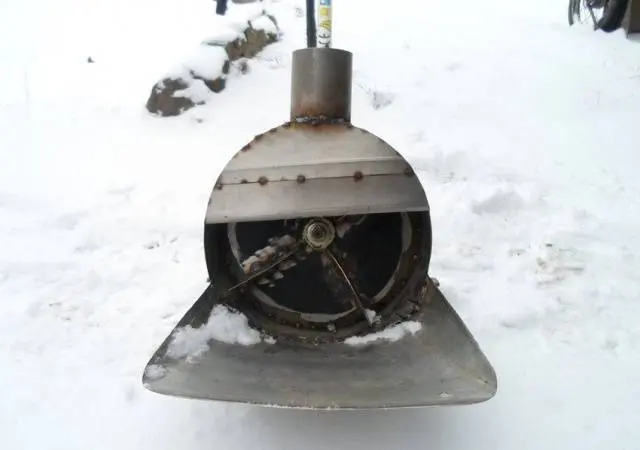
After the trimmer gearbox is bolted to the bottom of the barrel, the rotor is connected to the electric scythe instead of the knife. The entire structure is mounted on a frame. For movement, a pair of wheels or skis are provided. The finished snow blower is first checked by turning the impeller by hand. If the blades do not cling anywhere, you can try the design at work.
The video shows an example of converting a trimmer into a snow blower:
An electric snow blower assembled according to any scheme will cope with loose fresh snow. The equipment will work quietly without disturbing the neighbors. An electric snow blower will do without refueling and oil. However, this design has a significant drawback. The low power of the electric motor does not allow you to create a self-propelled machine. The snow blower will constantly have to be pushed by hand and it is better to do this in the snow if the frame is placed on wooden skis.