


Contents
Making the water supply of a private house or cottage permanent and uninterrupted is not an easy task. The most difficult thing is to ensure the supply of water in winter. So that the pipes do not freeze, they can be laid below the freezing depth, but weak spots still remain. The first is abnormally cold winters, which periodically break all records. The second is the entry points to the house. They often freeze anyway. The way out is to install a heating cable for the water supply. In this case, sewerage is desirable, but it can be buried shallowly. And in the areas of entry into the house, you can lay a more powerful heater and better insulate.
Types of heating cables for plumbing
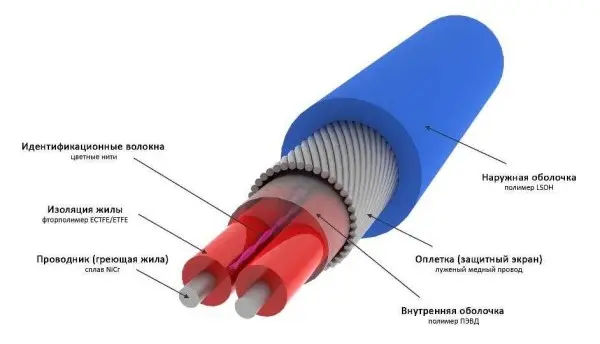
There are two types of heating cables – resistive and self-regulating. In resistive, the property of metals is used to heat up when an electric current passes. In heating cables of this type, the metal conductor is heated. Their characteristic feature is that they always emit the same amount of heat. It does not matter if it is +3°C or -20°C outside, they will heat up in the same way – at full capacity, therefore, they will consume the same amount of electricity. To reduce costs in a relatively warm time, temperature sensors and a thermostat are installed in the system (the same as used for electric underfloor heating).
When laying resistive heating wires, they should not intersect or be located one next to the other (close to each other). In this case, they overheat and quickly fail. Pay close attention to this point during the installation process.
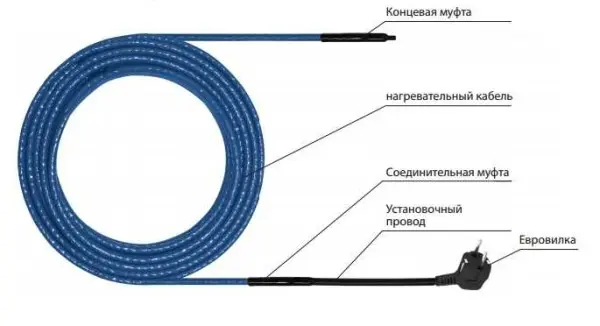
It should also be said that a resistive heating cable for water supply (and not only) can be single-core and two-core. Two-core ones are more commonly used, although they are more expensive. The difference in connection: for single-core, both ends must be connected to the mains, which is not always convenient. Two-wire ones have a plug at one end, and a fixed ordinary electric cord with a plug on the other end, which is connected to a 220 V network. What else do you need to know? Resistive conductors cannot be cut – they will not work. If you bought a bay with a length longer than necessary, lay it entirely.
Self-regulating cables are a metal-polymer matrix. In this system, the wires only conduct current, and the polymer is heated, which is located between the two conductors. This polymer has an interesting property – the higher its temperature, the less heat it releases, and vice versa, when it cools down, it begins to release more heat. These changes occur regardless of the state of adjacent sections of the cable. So it turns out that he himself regulates his temperature, that’s why he was called that – self-regulating.
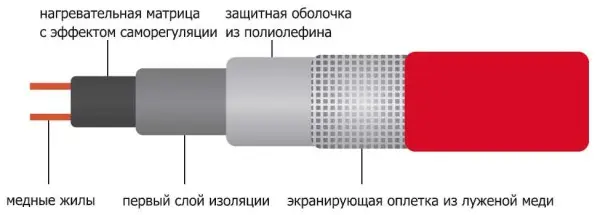
Self-regulating (self-heating) cables have solid advantages:
- they can intersect and will not burn out;
- they can be cut (there is a marking with cut lines), but then you need to make an end sleeve.
They have one minus – a high price, but the service life (subject to the operating rules) is about 10 years. So these expenses are reasonable.
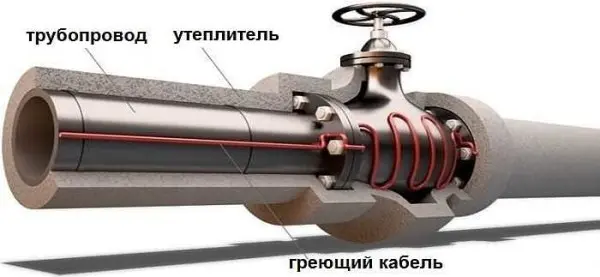
Using a heating cable for any type of water supply, it is desirable to insulate the pipeline. Otherwise, too much power will be required for heating, which means high costs, and it’s not a fact that the heating will cope with especially severe frosts.
Mounting methods
The heating cable for the water supply is laid outside or inside the pipe. For each method, there are special types of wires – some only for outdoor installation, others – for indoor. The installation method must be prescribed in the technical specifications.
inside the pipe
To install a heating element inside a water pipe, it must meet several requirements:
- the shell should not emit harmful substances;
- the degree of electrical protection must be at least IP68;
- sealed end sleeve.
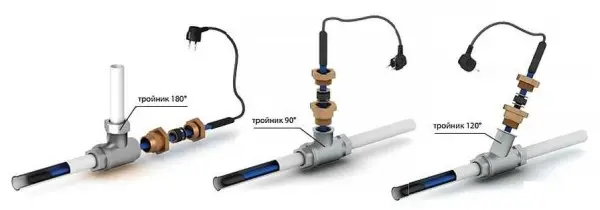
In order to be able to fill the wire inside, a tee is placed at the end of the pipeline, into one of the outlets of which a wire is inserted through the gland (included in the kit).
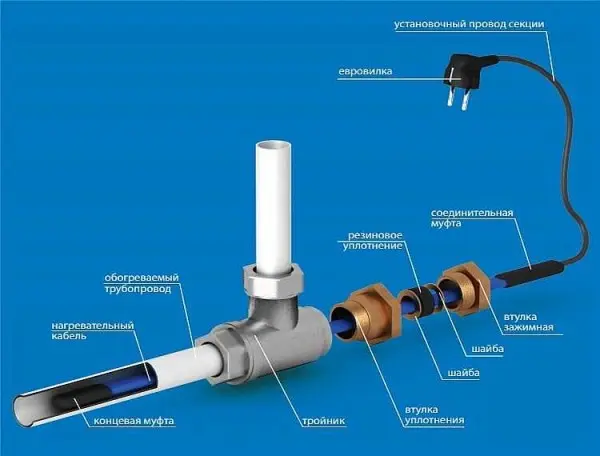
Please note that the coupling – the transition point between the heating cable and the electrical one – must be located outside the pipe and gland. It is not intended for wet environments.
A tee for mounting a heating cable inside a pipe can have different bend angles – 180°, 90°, 120°. With this method of installation, the wire is not fixed in any way. It’s just put inside.
outdoor installation
It is necessary to fix the heating cable for the water supply on the outer surface of the pipe so that it fits snugly over the entire area. Before installation on metal pipes, they are cleaned of dust, dirt, rust, welding marks, etc. There must not be any elements left on the surface that could damage the conductor. A rein is laid on clean metal, fixed every 30 cm (more often, less often not) using metallized adhesive tape or plastic clamps.
If one or two threads stretch along, then they are mounted from below – in the coldest zone, stacked parallel, at some distance from each other. When laying three or more wires, they are arranged so that most of them are at the bottom, but the distance between the heating cables is maintained (this is especially important for resistive modifications).
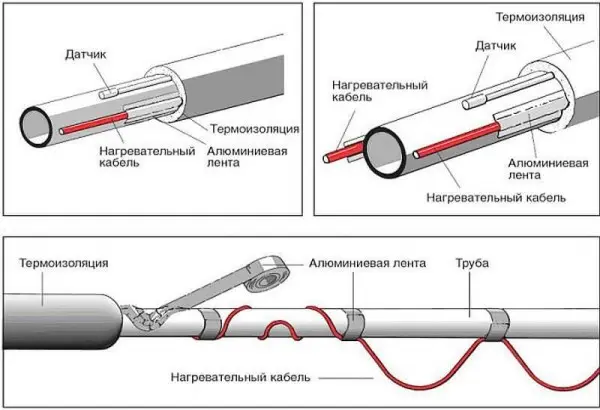
There is a second mounting method – a spiral. It is necessary to lay the wire carefully – they do not like sharp or repeated bends. There are two ways. The first is to unwind the coupling gradually winding the released cable onto the pipe. The second is to fix it with sags (lower picture in the photo), which are then wound and secured with metallized adhesive tape.
If a plastic water pipe is heated, then metallized adhesive tape is first glued under the wire. It improves thermal conductivity, increasing heating efficiency. Another nuance of installing a heating cable on a water supply system: tees, valves and other similar devices require more heat. When laying, make several loops on each fitting. Just keep an eye on the minimum bend radius.
How to insulate
It is undesirable to use mineral wool of any origin to insulate a heated pipeline. She is afraid of getting wet – when wet, she loses her heat-insulating properties. Freezing when wet, after the temperature rises, it simply crumbles into dust. It is very difficult to ensure the absence of moisture around the pipeline, so it is better not to take this insulation.
Insulations that compress under the influence of gravity are not very good. Shrinking, they also lose their thermal insulation properties. If your pipeline is laid in a specially built sewer, nothing can put pressure on it, you can also use foam rubber. But if you just bury the pipe, you need rigid thermal insulation. There is another option – on top of a crushable insulation (for example, polyethylene foam with closed cells), put on a rigid pipe, for example, a plastic sewer pipe.
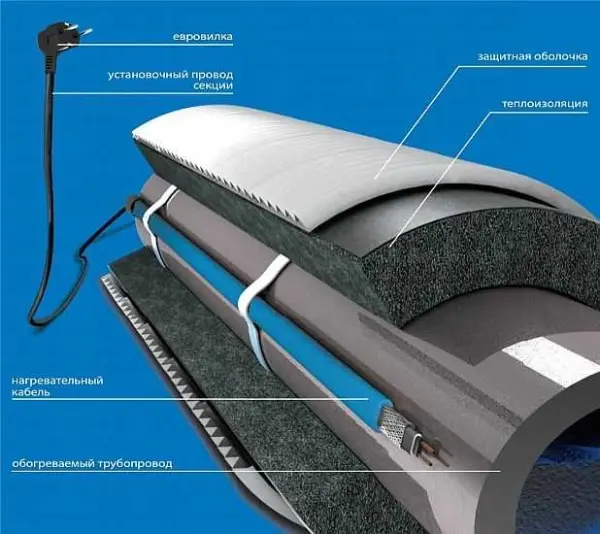
Another material is expanded polystyrene, molded in the form of fragments of pipes of different diameters. This type of insulation is often called a shell. It has good thermal insulation characteristics, is not afraid of water, and can withstand some loads (depending on density).
What power is required for a heating cable for plumbing
The required power depends on the region in which you live, on how the pipeline is laid, on the diameter of the pipes, whether it is insulated or not, and even on how you lay the heating – inside the pipe or on top of it. In principle, each manufacturer has tables that determine the cable consumption per meter of pipe. These tables are compiled for each power, so there is no point in posting any of them here.
From experience, we can say that with average pipeline insulation (polystyrene shell 30 mm thick) in Central Russia, 10 W / m is enough power to heat one meter of pipe from the inside, and at least 17 W / m must be taken from the outside. The further north you live, the more power (or thicker insulation) you need.
With thermostat or without?
If you want to pay a minuscule amount for heating the water supply, it is better to install a thermostat. Even if you are going to mount a self-regulating heating cable. Basically, the characteristics are as follows: it turns on at +3°C, turns off at +13°C.
If your water is supplied from a well, it will never have a temperature of + 13 ° C in it. It turns out that the heating will work all the time, even in spring and summer. In the summer, of course, the cable can be turned off, but in the spring and autumn you can’t do this because of the possibility of a sudden freeze. With wells, it is somewhat simpler, but not much – in summer the water there can have a temperature slightly above the shutdown threshold. But this is in the summer, and in the hottest period. And in general, why do you need to heat, say, water that goes into the drain tank? Yes, and the one that goes to the kitchen or shower, you will still heat boilers or instantaneous water heaters.
In any case, it turns out – a thermostat is needed. On it, set the shutdown temperature in the region of + 5 ° C. The cost of heating the pipeline falls at times. At the same time, the service life of heating cables is significantly increased – they have a certain resource of working hours. The less they work, the longer they will serve you.
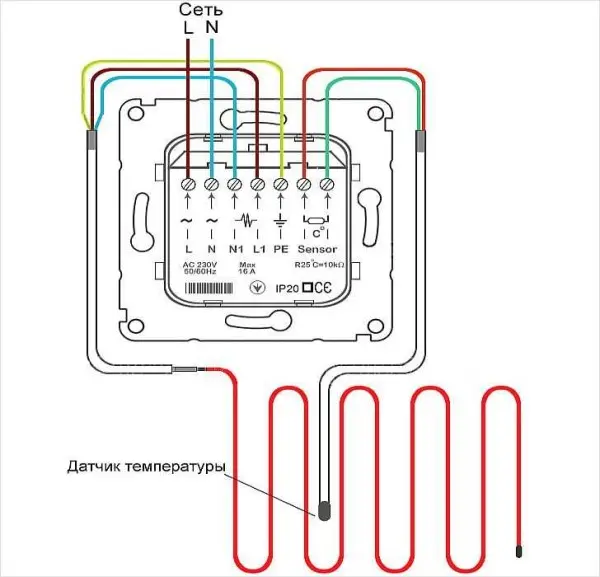
When installing a water supply heating system with a thermostat, it will be necessary to install a temperature sensor. There is a complication here. It must be placed on the pipe so that it is not affected by the temperature from the heaters. That is, it is not necessary to insulate it from the pipe, but it is necessary from the cables.
It is advisable to install the thermostat itself indoors. It is connected to the house electrical panel through a circuit breaker and, preferably, an RCD. The power consumption of the heating cable is small, therefore the nominal value of the machine can be taken on the order of 6A, the nominal value of the RCD is chosen to be the nearest larger one, otherwise the leakage is preferably 30 mA.
Connect the heating cable for the water supply to the appropriate connectors on the thermostat housing. If there are several branches, they are parallelized. A temperature sensor is connected to adjacent contacts. Each thermostat has a marking on which it is clear what and where to connect. If there is no marking, it is better to buy another one: the performance of this instance is very doubtful.