


Contents
Many people think that macros in Excel are very difficult, but they are not. In this article, you will find some interesting and simple examples of how you can automate your daily tasks in Excel. A macro is a Visual Basic program designed to automate tasks in Microsoft Office. I use Excel 2010 for my examples, but you can use Excel 2007 just as well.
Create a macro using the “Record macro” command
- To get started, open the tab View (View) on the Ribbon. In drop down list Macros (Macros) click Record Macro (Macro Recording). A dialog box will open. Record Macro (Macro recording).
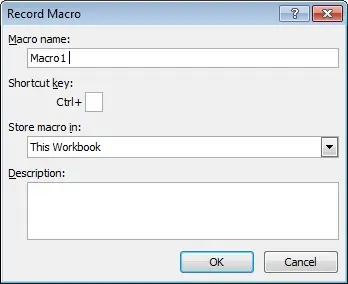

- Specify a name for the macro (no spaces or special characters are allowed), a shortcut key, and where you would like to save your macro. Optionally, you can add a description.
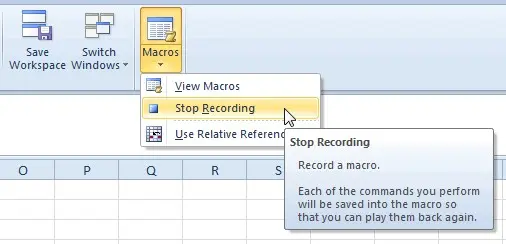
- From now on, the macro records the actions. For example, you can enter the word “Hello» to cell A1.
- Now click the icon again Macros (Macros) and from the drop-down menu select Stop Recording (Stop recording).
The recorded macro can be accessed using the command View Macros (Macros), which is on the tab View (View) in the drop down menu Macros (Macros). A dialog box will open Macro (Macro), in which you can select the one you want. Double click on the macro name to execute the program.
In addition, you can associate a macro with a button. For this:
- On the Advanced tab Fillet (File) click Options (Settings) > Quick Access Toolbar (Quick Access Toolbar).
- In the Choose commands from (Select commands from) select All Commands (All commands).
- Find a team Option Button (Button), we need the one that belongs to the section Form Control (Form controls). Select it and click Add (Add). Then click OKto close Excel Options.
- Select the command you just added to the Quick Access Toolbar and draw a button outline on the Excel worksheet.
- Assign a macro to an object.
Note: If you have tab enabled Developer (Developer), then you can access the controls of the form from it. To do this, go to the tab Developer (Developer), click on the icon Insertion (Insert) and select the desired item from the drop-down menu.
Don’t know how to display a tab Developer (developer)? Excel 2007: click on the button Office > Excel Options (Excel Options) > Popular (Basic) and check the box next to the option Show Developer tab in the Ribbon (Show the “Developer” tab on the ribbon). Excel 2010: click on the tab Fillet (File) > Options (Settings) > Customize Ribbon (Customize the Ribbon) and in the right list, turn on the tab Developer (Developer).
Cycle FOR
In the following example you will see how to use a loop FOR. Cycle FOR allows us to repeat the loop with different values. Let’s see how you can fill in numbers from 1 to 5 cells A1: A5.
To do this, on the tab Developer (Developer) click Visual Basic. Double click on an item from the list Microsoft Excel Objects, in which the macro should be saved. Enter this code:
Sub Macro1 () For n = 1 To 5 Cells(n, 1) = n Next n End Sub
Save the file. To run a macro, go to View > Macros > View Macros (View > Macros > Macros), select the name of the desired macro from the list and click Run (Execute).
The following code displays the phrase “Hello World” in the Windows message box.
Sub MacroName() MsgBox ("Hello World!") End Sub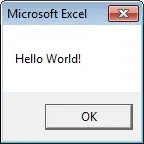
In the following example, we create a message with a choice Yes (Yes) or No (Нет). Если выбрать вариант Yes (Yes), then the cell value will be deleted.
Sub MacroName() Dim Answer As String Answer = MsgBox("Are you sure you want to delete the cell values ?", vbQuestion + vbYesNo, "Delete cell") If Answer = vbYes Then ActiveCell.ClearContents End If End SubLet’s check this code. Select a cell and run the macro. You will be shown this message:
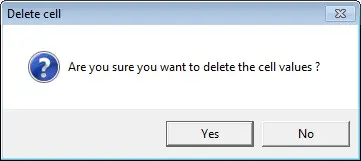
If you press Yes (Yes), the value in the selected cell will be deleted. What if No (No) – the value will be saved.
IF construction
In Microsoft Excel, you can also use the construct IF. In this code, we will color the cells depending on their value. If the cell value is greater than 20, then the font will turn red, otherwise it will turn blue.
Sub MacroName() Dim CellValue As Integer CellValue = ActiveCell.Value If CellValue > 20 Then With Selection.Font .Color = -16776961 End With Else With Selection.Font .ThemeColor = xlThemeColorLight2 .TintAndShade = 0 End With End If End Sub
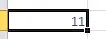
To test this code, select a cell with the value more 20:

When you run the macro, the font color will change to red:

When the second condition is met, the font will turn blue:
CASE construction
You can also use the construct Caseto associate the execution of an action with the appearance of a certain value in a cell. The following example displays a message whose content depends on the person’s specified age.
Sub MacroName() Dim CellValue As Integer CellValue = ActiveCell.Value Select Case CellValue Case 60 To 200 MsgBox "The person is old" Case 30 To 59 MsgBox "The person is adult" Case 18 To 29 MsgBox "The person is young" Case 0 To 17 MsgBox "The person is a child" Case Else MsgBox "Unknown age" End Select End Sub
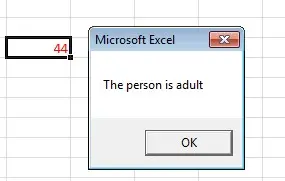
To test this example, you must select a cell with a value and run the macro. If the value of the selected cell, for example, is 44, then the following message will be displayed:
Conclusion
Macros is a great way to automate tasks in Excel. This article shows just a few examples of what you can do with macros.