


Contents
For leveling walls, floors, for filing the ceiling, sheet material is often used, including chipboard (chipboard). But ordinary sheet material leaves differences at the joints and is not a monolith. The differences can, of course, be removed, the joints can be repaired, but the coating cannot be made monolithic. Tongue-and-groove chipboard solves both problems: the material in the same batch has the same thickness, the tongue and groove are formed on the same equipment. As a result, the coating is monolithic, and the junction is almost imperceptible.
What is grooved chipboard
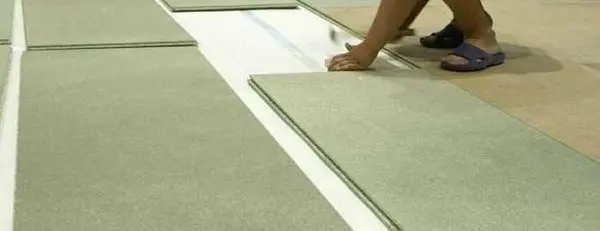
In moisture-resistant chipboard boards of the first grade (without defects and “features”), a spike and a groove are formed (on both sides – a spike, on two – a groove). These boards are called tongue-and-groove chipboard. During installation, the spike (“male”) enters the groove (“mother”). With good quality material, the connection is imperceptible.
The tongue-and-groove chipboard can be mounted on logs, crates or on a flat surface without significant protrusions. The junction is coated with PVA glue, one plate is inserted into another, then it is additionally fixed with self-tapping screws around the perimeter and in the middle. Due to the presence of locks, the installation of the material on the floor, walls or ceiling becomes much easier and faster. The glued connection creates a monolithic coating.
Tongue-and-groove chipboard is also called QuickDeck (Quick Dec) – by the name of the manufacturer who first entered our market. Can be mounted on the ceiling, walls, on the floor. They are convenient to use for leveling uneven surfaces or for sheathing frames.
Advantages and disadvantages
There are several advantages of grooved chipboard:
- moisture resistance;
- safety – paraffin resins are used as a binder, and they are harmless, at the same time they give increased resistance to moisture;
- easy and fast installation;
- no height differences at the joints (in fact, plates from different batches may have deviations);
- the resulting surface is monolithic, that is, the load is redistributed, which increases the reliability and rigidity of the structure;
- the floor made of grooved chipboard does not creak.
Manufacturers state that the surface does not require processing before using the top coat. If linoleum or laminate is used, it is so. But under the wallpaper and, especially for painting, putty is necessary: the seams under these types of finishes are still visible.
The disadvantages include the high price, and not always the ideal geometry. It is rare when there is an exact match of the seams. In any case, all the reviews say that for painting or wallpaper, the walls / floor were puttied.
Types
This is not about sizes, but about varieties of grooved boards. This material is produced in three types:
- Just grooved chipboard. Moisture-resistant chipboard with molded grooves and spikes. It is usually called QUICK DECK or QUICK DECK Professional.

Slabs QUICK DECK Professional - Tongue-and-groove chipboard with a dense polyethylene film glued on the front surface. It’s called QUICK DECK Master. This option is good for the floor if high demands are placed on the cleanliness of the base for laying the final floor covering. Before laying the finish coating, the film is removed along with the debris, leaving an absolutely clean surface.

This is the version with protective film. - Laminated tongue-and-groove chipboard (laminated chipboard). A laminate film is applied to the front surface of a conventional grooved board. It’s called QUICK DECK Plus. Lamination corresponds to class 34, i.e. resistant to abrasion. A great option if you have previously planned to lay a laminate.

With laminate (other shades are available)
There is a solution for every occasion. The last two options are more convenient in some cases, although they are more expensive. But they save time. For example, immediately after mounting each row of plates on the floor, they can be covered with a film, fixing it to the walls with adhesive tape. But this option does not guarantee that dust and debris will not fall under the film. She can also move. The film pasted on the surface is more reliable in this sense.
As for the laminated grooved chipboard, this option is more expensive than the chipboard + laminate set. But, if we add the cost of an additional substrate, the time for installation, then this difference seems not so big. On the other hand, the choice of colors is far from being as wide as that of a conventional laminate. In general, the choice will have to be made based on your own preferences.
dimensions
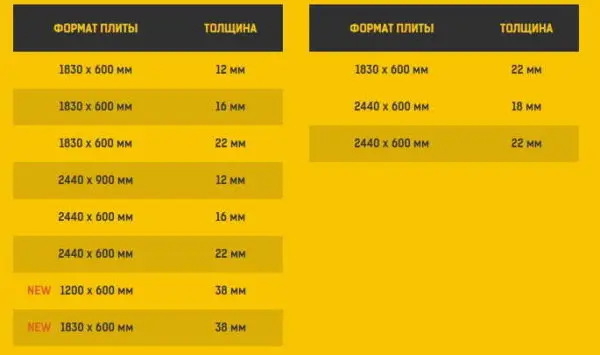
Tongue-and-groove chipboard is produced in the form of long and narrow sheets – this facilitates installation. The width of the material is mainly 600 mm, there are also 900 mm, albeit in a smaller variety.
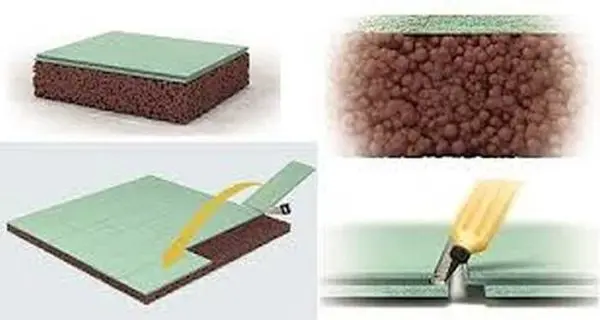
Plate thickness: 12, 16, 22, 38 mm. Twelve millimeters are usually used for sewing the ceiling and for walls. Sometimes, when laying on a solid base or with often located logs, it can be laid on the floor. On logs, it is often recommended to put 16 mm or 22 mm. In this case, the distance between the supports can be up to 60 cm.
Floor installation
You can make the floor on the logs or on the subfloor. Another option is expanded clay. The backfill can also be another heat-insulating material that can withstand the required loads.
I’m lying
To install the floor along the logs, it is required to lay a layer of waterproofing under them. Any waterproofing material can be used – even plastic film, but better – something more durable and modern. Lay the strips overlapping one another by at least 10-15 cm. It is advisable to glue the joints with mastic or double-sided tape. Another point: the waterproofing is brought to the walls and fixed. It should not be lower than the subfloor.
Logs are made of timber with a thickness of at least 50 mm. The installation step depends on the thickness of the tongue-and-groove chipboard used. For plates with a thickness of 16 mm, the recommended pitch is 305 mm, for 22 mm – 610 mm. So exactly – so that the junction of two plates falls on the beam.
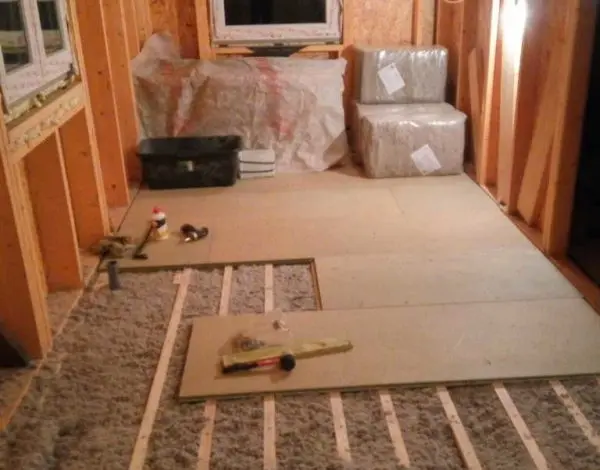
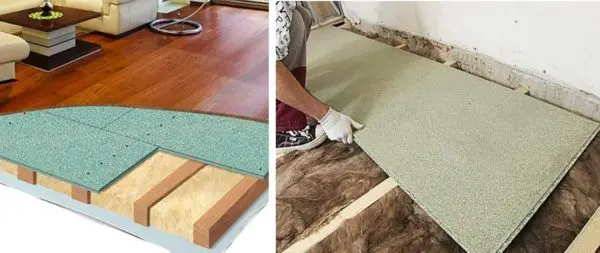
If it is required to simultaneously improve heat and sound insulation, the space between the lags is filled with materials with suitable characteristics. Further, it is already possible to lay the tongue-and-groove chipboard. Lay them with the long side perpendicular to the lags (across the lag).
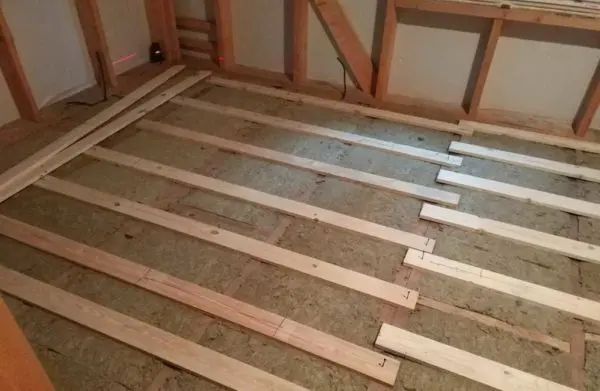
There is another option that allows you to save on the beam for the lag: make the installation step of the lag larger, follow them with a black floor, and already lay tongue-and-groove chipboards on top. But the surface of the subfloor should not have significant protrusions. Otherwise, the plates will not lie down and will swing.
If the logs are already installed with a larger step than recommended, the manufacturer recommends laying the crate with the required step, using a board no narrower than 25 mm (see video below).
On expanded clay
You can also lay grooved chipboard on expanded clay. This method is not as warm as the previous one. Modern thermal insulation materials better protect against the penetration of cold. But a floating floor on expanded clay is cheaper at times. Only you must be sure that your floor will be dry. Otherwise, despite the water resistance, the material may swell and lose its properties.
Work begins in the same way as when arranging the floor along the logs: we spread and fix the waterproofing on the walls. Next, expanded clay is poured with a fraction of not more than 5 mm, leveled to a level. Another layer of waterproofing is placed on expanded clay. When laying, one strip is led onto another by at least 20 cm and glued well. Chipboard with a selected groove and tongue can already be laid on this substrate.
On concrete
If it is necessary to insulate or level the concrete floor, this can be done using grooved chipboard. According to the manufacturer’s recommendations, it is necessary to lay the plates on a flat base. To do this, too large protrusions must be cut off, significant depressions should be covered over. If the irregularities are too global, it is better to fill with a self-leveling concrete or polymer composition. After it dries, the tongue-and-groove chipboard will lie down without problems.
If there are irregularities, but they are not global – up to 5 mm per meter – you can lay a substrate under the laminate under the grooved plates, of those that are thicker. You can use other similar foam material. If you want to improve the thermal insulation characteristics at the same time, it can be a foil material (foil towards the room) or polystyrene – high-density polyurethane foam (at least 350 g / m³). You can already lay slabs on top.
Rules for laying and fixing
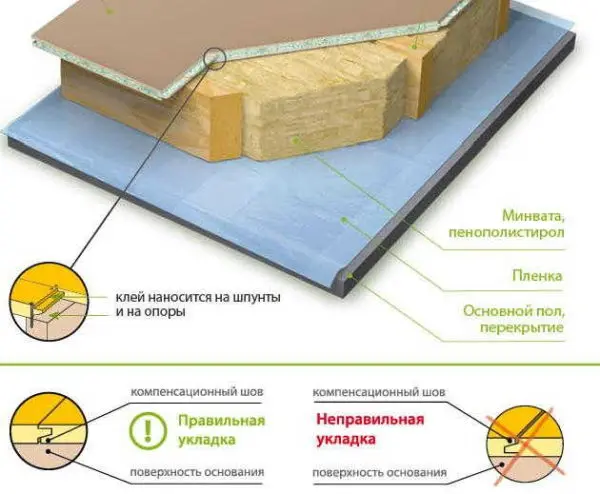
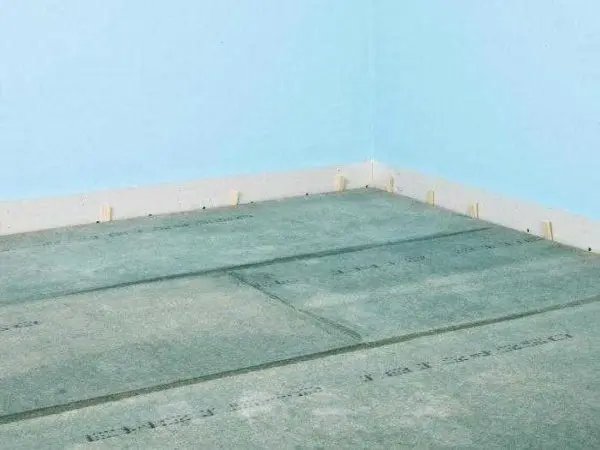
The slabs on the logs are laid across: with the long side perpendicular to the logs. Start laying from the wall farthest from the entrance. From the walls it is necessary to leave a gap of 8-10 mm. It is needed so that impact noise is not transmitted through building materials. To withstand this gap, gaskets of the required size are installed between the wall and the slab, the slab rests against them. After the installation is completed, the gaskets are removed.

Location rules
Plates are laid with a spike towards themselves. First lay out a row along the wall, then move on to the second. At the beginning of the second row, you can use the scrap from the last slab from the first row. If there is no pruning or it is too small, the second row starts with a half – this is how the seams coincide. The next row starts with a whole slab or with a cut of a different size – vertical seams must be spaced at least 30 cm apart.
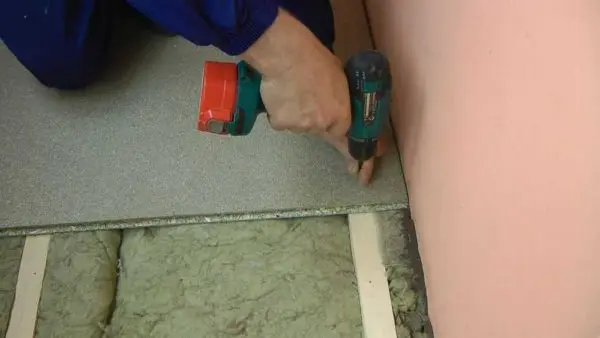
Before joining the plates, the groove (it’s more convenient) is coated with PVA glue. To smear each time with a brush is inconvenient and long. It is easier if the glue is poured into a bottle with a long spout dispenser. A groove of another plate is inserted into the spike greased with glue. To achieve a minimum gap, you can use a rubber mallet and a scrap with a spike from some kind of board. This piece is inserted into the installed slab, knocked on it with a mallet, adjusting the slabs closely. Having achieved the desired position, they take self-tapping screws, a screwdriver and fix the installed sheet. Self-tapping screws are screwed along the perimeter in increments of 15-20 cm, inside along the lags the installation step of self-tapping screws is 25-30 cm. So, gradually, the flooring from grooved chipboard is mounted.
Some little things
Self-tapping screws are better to take black “on wood” with a large flat hat. In order for the surface to be even, holes of a slightly larger diameter are drilled under the caps before installation than the caps (countersink). After tightening the screws, the recesses are covered with wood putty. After drying, using fine-grained sandpaper, level the surface completely.

To ensure complete tightness, the seams can be rubbed with a compound that is used to seal the seams of ceramic tiles.
Wall mounting features
When mounted on a wall, a vertical crate of a board 20 cm thick is stuffed onto it, leveling out all the irregularities. To do this, linings are added in the “failures”, the protrusions are squeezed. It is advisable to choose the installation step of the lathing slats so that they have joints. If this fails, a lining is installed at the junction of the two plates (a piece of board, plywood, chipboard – depending on the desired thickness) – so that the connection does not hang out.
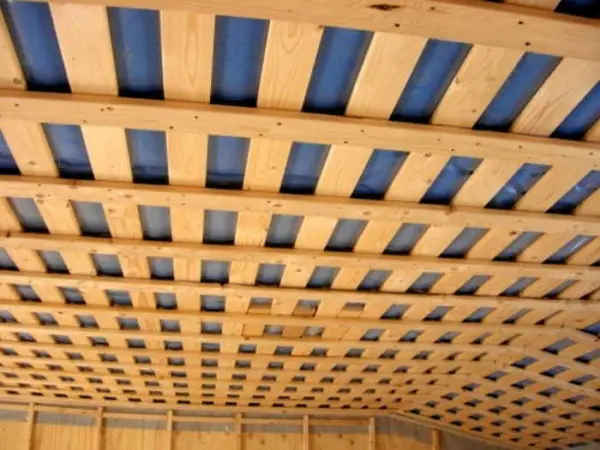
The installation of the plates goes across the crate – the long side is laid on the floor, with the spike up. This makes it easier to achieve minimal gaps at horizontal joints. You will have to deal with vertical ones in the way described above – by cutting chipboard with a groove and a rubber mallet. The installation step of the screws is the same: 15-20 cm along the perimeter of the plate and 20-25 cm along the intermediate strips.
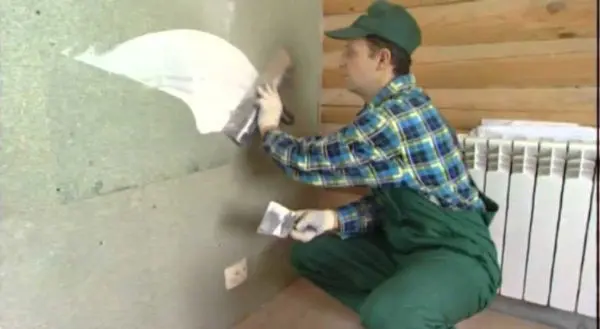
Finishing work on the mounted grooved chipboard
Manufacturers claim that the Quick Deck surface does not need puttying. You can immediately glue wallpaper, paint, lay tiles, apply decorative plaster on it. As for the plaster and tiles, it is. Only pre-treatment with impregnation is needed – for better adhesion. For tiles, you need to use a good glue.

Under thin or smooth wallpaper and, especially for painting, it is necessary to seal the seams. They are still visible. Under some types of wallpaper, the seams may not stand out, but you will definitely have to putty for painting.
Reviews
Although a lot of time has passed since the appearance of this material on the market, there are very few reviews about grooved chipboard. If we proceed from the fact that people who are satisfied with everything are not too eager to write something, but simply live quietly for themselves, then this is probably not bad. This means that the material justifies most of the expectations, and the promises of the sellers do not diverge too much from the real state of affairs.
After rereading about five forums where the topic was discussed how good or bad grooved chipboard is, we can draw the following conclusions:
- Laying is really simple and fast, only the plates must be laid with the correct side up: the one with which the spike is slightly beveled, which makes it shorter.
- Some, when laying QwickDeck on logs, the joints were not glued, the plates were not fixed in any way. With this method of installation, it is advised to leave a gap between the plates of 1-2 mm. For those who laid tightly, the seams rose in the spring. I had to sort through the new one, in some places leveling the too swollen edges with a grinder.

A tongue-and-groove chipboard with a thickness of up to 22 mm requires a support step of less than 60 cm. If the logs are installed with such a step or more, a crate is needed - Material from different manufacturers is very different. There may be a mismatch in size (the plates are several centimeters shorter / already declared), the density may also be different.
- The geometry is far from perfect. There may be differences of a millimeter or more. If you need the perfect one, use thin linings during installation, but it’s easier to walk with a grinder.
- When laid on logs without a subfloor, the slab floor turns out to be a little “boomy”: if someone takes a step at one end of the room, you will feel it at the other – through vibration.
- It is cut with a grinder or a hand saw without problems. You can directly on the floor by placing a bar down.


For filing the ceiling, the rules are similar. - When unloading, you need to be careful: the edges are easily chipped. Sheets weigh a lot, especially thick ones for the floor. Therefore, only two people can move.
- Before starting the installation, it is necessary to withstand the material for some time in the room – so that the humidity levels out. Then, during operation, the plates will not warp.
To summarize, the feedback from those who fully complied with the recommendations is positive. The boominess of the floor and non-ideal geometry are a reality. As well as the different quality of grooved chipboards at one point of sale.