Contents
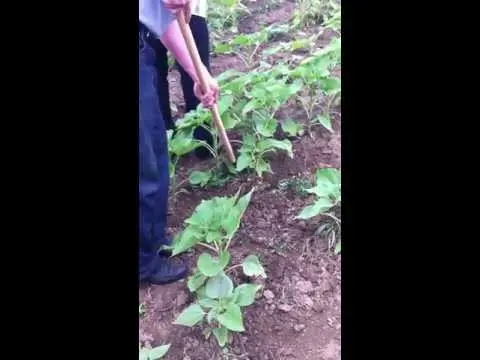
Every summer resident is familiar with such garden tools as a hoe hoe. With the help of a simple device, you can successfully destroy weeds, loosen the ground, or perfectly aerate the soil in your summer cottage with your own hands.
Description of construction
Choppers are an indispensable tool for creating irrigation grooves before watering with your own hands, and not by automatic watering. An indispensable tool for hilling plants, since with the help of a long handle you can make loosening in the most remote areas. A summer resident’s set always consists of several types of garden tools, for example, a chopper and its hybrid (hoe, cultivator) both factory-made and self-assembled.

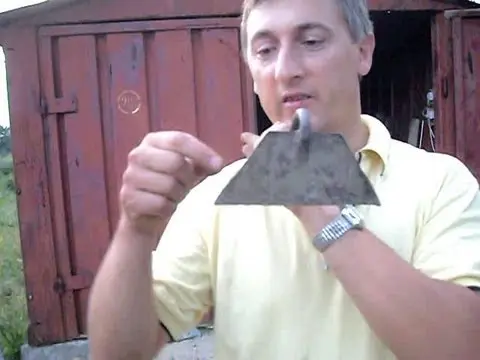
Garden choppers are made in different variations, which allows you to easily do a wide variety of work on a successful site. Depending on the required work, choose a chopper with different blade widths, with pointed or rounded corners, trapezoid or triangle shapes.
The material from which the chopper is often made is carbon steel. Such material is easy to sharpen with your own hands, but it is most susceptible to corrosion. In order for such a tool to serve you as long as possible, after each work in the garden, carefully clean the remnants of soil and grass from the blade, and then lubricate with oil. Choppers made of stainless steel are more popular with gardeners, as stainless steel is more durable and requires simple maintenance. The only downside is the price.
A hoe is the same chopper, only its blade is made in the form of a hemisphere with a pointed end. This type is more suitable for hilling, creating holes for planting, as well as beds for potatoes, vegetables, legumes on stony soils. The difference between the chopper-ripper hybrid and the classic species is the presence of uncurved ends, with which you can easily weed the weeds of creeping plants.
Technical features

If we talk about the technical characteristics of a country tool, then, in fact, a chopper is a small metal shield, which is attached to a long wooden handle at an angle of 90 degrees. The shield is made in the following forms:
- rectangular;
- triangular;
- trapezoidal.
When buying, choose the type that is most suitable for the upcoming work. Pay attention to the material of manufacture of the metal sheet, as it is he who determines the quality of the purchased tool. Often, the farm needs choppers and shovels of various lengths and shapes for hilling, forming beds and removing weeds.
How to make yourself
Today, you can easily buy the necessary garden tools in any specialized store. But if you are a “homey” summer resident and like to do everything with your own hands, then why not make a chopper yourself.
So, let’s look at how to assemble a garden tool from improvised means with your own hands. As a handle, you can use any long stick from the available tools, and for the blade, you can sharpen any hardened metal from what you have in the barn and is no longer quite working.
Video “Choppers with a handle at work”
Practical advice
Consider the option of using an old saw blade to create a shield for a chopper, since it is his experienced gardeners who most often recommend it for use. The material for the saw is of increased strength, but at the same time it is quite flexible, with increased resistance to wear. One such chopper, assembled with your own hands, will be enough for you for the season of active work.

Stage 1. Material preparation. We break off a piece of metal of the desired length from the old saw. The most convenient length is 25 cm, however, you can make a piece wider or a little smaller, thereby adjusting the tool for you. Next, using a grinder and the thinnest grinding disc, the blade is sawn at an angle of 45 degrees with respect to the saw teeth so that this part is shorter. Such a simple technique will reduce the weight of the tool without reducing its working area.
Stage 2. Mounting holes. At a distance of 2 cm on the side of the saw teeth, drill 3-4 holes, leaving uniform distances of 3-4 cm between them. We drill the same holes in a metal corner. As a result, the holes on both parts should match.
Stage 3. Mounting the holder. At this stage, you will need two parts with holes and a metal pipe 25cm and 30mm in diameter. We hammer one part 4-5 cm inward and make two holes to tighten the corner. After that, it remains to connect all the details, and in the end you will get a hybrid of a chopper with teeth fixed on a corner that is connected to a metal pipe.
Stage 4. Wooden handle. The holder can be made of any material, like a shovel, with which it will be convenient for you to work: pine, maple, larch. The diameter of the handle is at least 3,5 cm. We grind one edge of the holder and hammer it into the pipe. To prevent the wooden holder from falling out, it can be fixed with a bolt, having previously drilled a hole, or hammered in a nail.
Stage 5. Sharpening of the working tool. As soon as the garden tool is almost ready, you will have to cut off the teeth with a grinder. If you make a tool for loosening the soil with your own hands, then the teeth can be left on the contrary. The grinding disc will help you sharpen the chopper, and then in the process we sharpen it with a regular file.

The second commonly used version of “home” production is a hoe from a shovel. In this case, you will need a bayonet steel shovel, which is no longer suitable for its intended purpose. We cut off the lower part of the shovel with a grinder and get a triangle. Using a file, we remove the burrs on the cutting side, then it is necessary to make two holes for fastening the metal holder with rivets. Now it remains only to insert and fix the wooden handle in the holder, and the garden hoe is ready for work.
The third option for making garden tools with your own hands is a chopper from a piece of metal. If you do not have an unnecessary shovel or an old saw, but there is an unnecessary piece of metal, then making and sharpening a chopper is as easy as shelling pears. As a metal, it is best to take a steel sheet 2 mm thick, and then several stages of work:
- cut out a rectangle 7 by 25cm by a straight cut. Process the edges of the canvas in order to avoid injury;
- we knock down the usual corner 25 by 25 cm and weld it to the metal sheet;
- with the help of metal clamps we fasten the stalk to the corner;
- sharpen the chopper blade with a grinder, and grind the handle and varnish it;
- this is how you can quickly and economically make with your own hands a tool from improvised means for working on a garden plot.
Video “Correct sharpening and bending of the chopper”
This video can be used as a practical guide to care for this type of garden hand tool.