


Contents
Works related to electricity require attention, compliance with the rules and accuracy. And do-it-yourself wiring in a wooden house requires even more attention: the material is very fire hazardous. Therefore, when planning and installing, pay attention to the requirements and recommendations of regulatory documents. If you do not have enough experience, it is highly desirable to invite a competent electrician for advice before connecting, and even better before starting installation. He will be able to point out to you flaws and miscalculations.
Wiring diagram in the house
According to current regulations, when connecting electricity without a transformer, the power consumption for a private house should not exceed 15 kW. It is found by adding up the power of all electrical appliances that can be turned on at the same time. If the figure found is less than 15 kW, the introductory machine is set to 50 A. If the power is greater, a transformer is also needed. Its parameters will be indicated to you in the project, since in this case, you cannot do without it.
Where to put the introductory shield, hull requirements
Recently, representatives of energy supply organizations have demanded the installation of meters (and introductory machines, respectively) on the street. This is done in order to be able to control consumption even if the owners are not at home. But this requirement is not supported by anything, and, if you wish, you can install everything inside the house. But more often, in order not to quarrel with the controllers, the requirements are met, and an automatic machine and a counter are installed on the street.
For outdoor installation, the circuit breaker (AZ) and the meter must be in a sealed case, protected from dust, dirt and moisture. The protection class for installation must be at least IP-55. For the convenience of monitoring readings, there should be a window in the door of the box for the electric meter. For installation inside a wooden house, the requirements are somewhat lower: IP-44, but the housing must be metal.
Organization of entry into the house
After the introductory machine, an electric meter is installed, then another RCD is installed – for an emergency shutdown of the power supply in the presence of a short circuit, and then the cable is connected to the electrical panel inside the house. The nominal value of the machine inside the house should be one step lower than that installed outside. In this case, if there are problems, the machine in the house will work first and you will not have to climb the wall every time to the introductory machine installed there.
Single-pole automata are installed in the shield, to which wires are connected that diverge throughout the premises. They are mounted on DIN rails, their number is recruited depending on how many separate “branches” of power supply are required. To find out how many machines should be in your shield, count the number of required groups, two or three free machines are added “for development”. This will be the “branches”. According to the quantity received, select the electrical panel in size.
Divide consumers into groups
When planning a wiring diagram in a wooden house, all connection points are divided into separate groups (they are often called consumption groups). For example, all sockets on the ground floor are powered by one machine, a separate device is placed on lighting fixtures in the house, and another one is used for street lighting. If some powerful electrical equipment is used – a boiler, an electric boiler, an electric stove, etc. – for them it is desirable to conduct separate branches of power supply and install personal machines. Separate protection devices are also installed for the power supply of outbuildings (if you do not want to pull separate inputs to them and install a separate meter, but only on condition that the power of all electrical appliances does not exceed 15 kW).
From a safety point of view, it is better to make as many separate branches of the power supply as possible. This will increase the number of machines and increase the cost of the project, but will reduce the number of potentially dangerous connection points. It is in the places where the conductors are removed that problems most often arise: the contacts oxidize, heat up, then start to spark. Therefore, it is better to make the number of connections as small as possible.
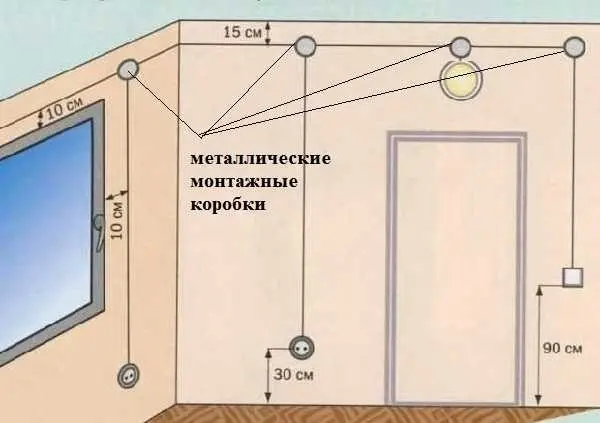
And, at the last stage, it is advisable to draw a diagram of the distribution of electricity in the premises on the plan of the house. At the same time, consumer groups are easier to draw in different colors. So you can more fully imagine what the wiring diagram in a wooden house will look like, it will be easier to do it yourself. For example, everything may look like the photo below.
Types of electrical wiring in a wooden house
After installing the shield and installing all the necessary machines, you can start wiring electrical cables in the house. There are three ways to lay an electrical cable in a wooden house:
- Open or outdoor wiring – on special insulators. This method was very popular at the beginning of the last century, and today it is back in fashion in retro-style rooms.

Exposed wiring on insulators is becoming popular again in retro-style interiors - Wiring in cable channels or special wires. In fact, this is also open wiring – it is available at any time, only the wires are laid from special trays. One of the varieties of this type of wiring is in baseboards.
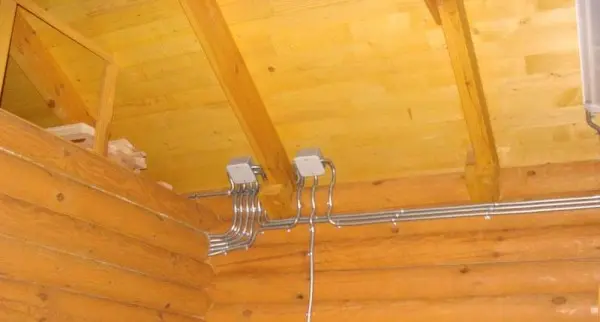

Wiring in cable channels - Closed (hidden) wiring. In a wooden house, it is possible if wall or ceiling cladding is provided. In this case, the cables are laid in a corrugated metal sleeve (not plastic) or in metal pipes and in this form are bred around the house. Moreover, the bending angles should be 90°, 120° or 135°: this ensures the possibility of tightening – replacing damaged sections of the cable without destroying the finish. Then all the wiring is hidden behind the finishing materials.

Concealed wiring should be laid in pipes or metal corrugation
Features of closed wiring in a wooden house
As you understand, closed wiring can be done at the construction or overhaul stage. Moreover, when laying it, there are features: all connection nodes must be mounted in special metal boxes, to which there must be free access. They cannot be hidden under the finish, because their covers are selected to match and / or try to place them in places that do not attract attention.
If hidden wiring in a wooden house is carried out not with a cable, but with insulated wires, the wall thickness of metal pipes is regulated:
- for copper wire up to 2,5 mm2 wall thickness can be any;
- with a cross section up to 4 mm2 the thickness of the metal wall must be at least 2,8 mm;
- if the cores have a cross section of 4,5 to 10 mm2 the pipe must have a wall of at least 3,2 mm;
- with a cross section from 10,2 to 16 mm2 the wall should not be thinner than 3,5 mm.
When laying electrical cables, there are no requirements for the wall thickness of a metal pipe, therefore it is permissible to lay cables (they have double and triple insulation) in a metal corrugation or, as they say, in a metal hose. It’s much more convenient and faster.

But in any case, since the wires will be hidden, access to them is extremely limited. Making changes to an existing network is troublesome and expensive. Therefore, before proceeding with the installation of closed electrical wiring in a wooden house, carefully check the circuit and do everything very carefully and scrupulously.
Rules for installing electrical wiring cable channels
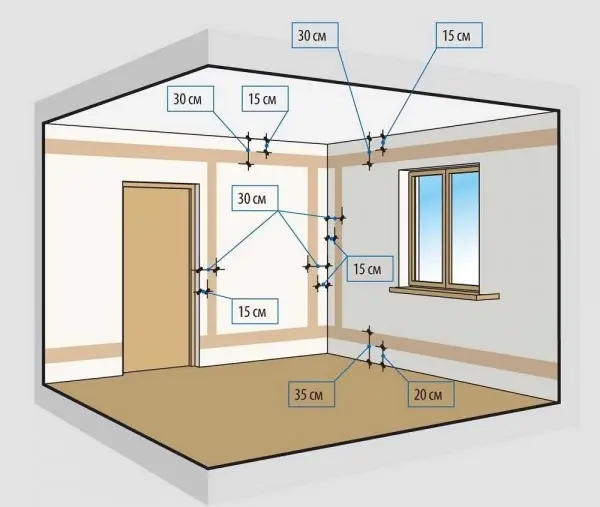
When installing open wiring or laying it in cable channels, there are also rules. They relate to how far from the floor, ceiling, corners and other structures they can be placed. All these norms for greater clarity are displayed in the photo.

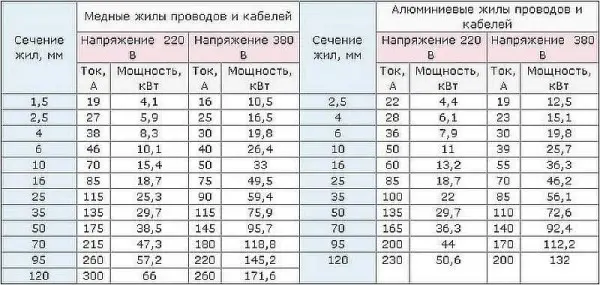
Selection of the cable section and its connection
The cross section of the cable conductors is selected depending on the planned load (in kW) and the material of the conductor. It is not necessary to do all the wiring with a cable with the same core. You can save money without sacrificing safety. To do this, a section is selected for each section, depending on the power of the devices that will be connected here. Their power consumption is summed up, about 20% of the reserve is added, and the section is selected in the table according to this value.

To connect the power supply in a wooden house, fire safety requirements are added. The main thing is that the wire sheath must be non-combustible. In such wires, the name contains the letters “ng”. To ensure the required degree of protection, double (VVG) or triple (NYM) cable insulation is also required.
In order for the wiring in a wooden house to be done correctly with your own hands, it is best to use cables with multi-colored cores. Then you definitely will not confuse zero with phase or ground. Usually the colors are distributed in this way:
- “earth” – yellow-green;
- “zero” – blue;
- “phase” – brown.


One of the triple insulated (NYM) electrical cable options
If you buy a European-made cable, there are different colors:
- “earth” – yellow-green;
- “zero” – white;
- phase is red.
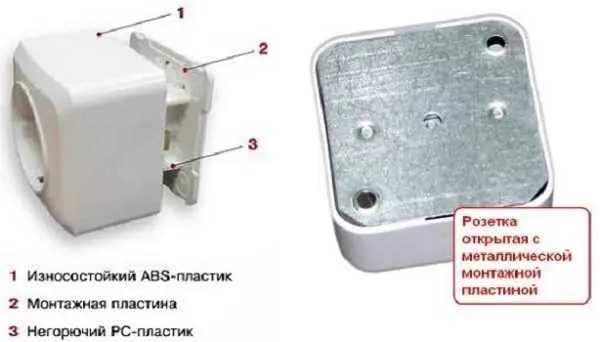
Choice of sockets and switches
To ensure fire safety in a wooden house, sockets and switches with a metal mounting plate should be installed. First, it is mounted on the wall, then the outer panel is installed. The use of plastic plates is allowed, but the plastic must be non-flammable and have the appropriate fire inspection certificate.
Moreover, for the safe connection of most modern equipment, three-wire sockets with a ground wire are required. Grounding is also required when lighting is connected, but this is often not done indoors. But for outdoor lighting, grounding is necessary: here the operating conditions are much more complicated.
Do-it-yourself wiring in a wooden house: installation rules
In a wooden house, you must always remember that the material is combustible and in this case it is better to play it safe. Do-it-yourself wiring in a wooden house is done in compliance with the basic rules:
- First, the whole scheme is assembled, the performance of each branch is checked (by a tester). We check each of the power lines for the absence of a short circuit, “to ground”. Only then the wires are connected to the machine. We recommend that you immediately sign what is connected. Then it’s easier to troubleshoot. Having connected one line, turn on the power supply, connect the load. If there are no hits, great – you can continue. Turn off the machines (which goes to the already checked line and the introductory one), work with the next line. After all the lines are checked and connected (signed), the introductory machine turns on. Then, gradually, one by one, the lines turn on.
- Installation of electrical wiring in a wooden house is carried out only with whole pieces of cable without connections and twists.
- Wiring is done in stages. Having laid a piece of cable, be sure to check the integrity of the insulation of the laid piece of cable. To do this, the cores and insulation are “ringed” relative to the ground and cores.
- When cutting the cable, a margin of length is left – at least 15-20 cm. If, with an incorrect connection, it will be possible to redo it without pulling the cables.
- Be sure to follow the colors of the wires.
Subject to these rules, electrical wiring in a wooden house, made independently, will be safe and reliable.