


Contents
Modern requirements for the repair of premises have become much more stringent. Now an inapplicable attribute of an apartment or house are smooth walls. But the walls, even in new buildings, even approximately cannot be called that, and even more so in old houses. Therefore, with any, practically, repair, the alignment of the walls is an inevitable stage. How best to do this, about the methods and technologies, the possibilities of doing it all with your own hands and let’s talk further.
How to level a wall
Although technologies in construction are developing rapidly, the alignment of walls is still done in two ways: with plaster and plasterboard sheathing. Another thing is that there are different compositions of plaster – based on gypsum and cement, and there are two ways to mount the plasterboard: on the frame and on the glue. But that’s all.
For some time, gypsum boards began to be replaced with GVL gypsum fiber boards). They consisted of a mixture of gypsum and vegetable fibers, but they turned out to be poorly shock-resistant and break even with minor impacts. Because GVL leveling walls with their use is now a rarity (sometimes put on the floor).
In Soviet times, the walls were leveled with plywood. But this is definitely the last century. Far from the best replacement for gypsum boards, which in 100% of cases cracks at the joints, and even swells from moisture. So it turns out that instead of drywall, there is nothing to use. So the choice is really not very wide.
Actually there is another way – putty. But it is used only on relatively flat walls with a difference of no more than 5 mm. Therefore, usually already leveled walls are puttied, bringing the plane to the ideal.
If we talk about how easier it is to level the walls with your own hands, then many agree that it is easier to work with drywall. But it is not difficult to cope with plaster on lighthouses. The main thing is to know the technology and not deviate from it.
Plaster wall alignment
The plaster is available in two binders: cement-based and gypsum-based. Gypsum plasters dry faster, but the maximum layer with which they can be applied less is about 50 mm. Cement-based plasters can be applied in layers up to 10 cm, but they take longer to dry.
In addition to the layer thickness, when choosing the type of plaster mixture, it is necessary to take into account which of the finishes will be later, as well as the conditions of the rooms in which you are going to level the walls. Gypsum is hygroscopic, therefore it is not used in wet rooms: it is necessary to plaster the bathroom and kitchen with a cement-based composition. For gypsum, rooms and an entrance hall remain. That’s how they basically do it.
In our description, we will use gypsum plaster – Rotband – a popular brand that has good reviews from both amateurs and professionals.
Surface preparation
Removing everything that does not hold well on the wall: beat off, pick out, clean with a spatula. If there are cracks, we embroider them. Then we evaluate the degree of curvature. If there are very large protrusions that stand out too much, it is advisable to remove them (with a hammer and chisel or perforator).
Often, when starting to level the walls in an old house, they decide whether to knock down the old plaster if it does not fall. In principle, the master should evaluate, but you can try it yourself. Tap the wall. If there are places that differ in sound – they sound muffled – then the layer here has moved away from the main wall. If you “hang” another layer of plaster on it, there is a high probability that it will all collapse together. It will be much worse. So it is better to beat previously plastered walls down to the base material.
If individual too large potholes appeared during preparation, it is better to repair them separately. Putties have a minimum and maximum layer limit. Too much layer may fall off. Therefore, it is better to patch holes or holes in advance.
When leveling a concrete wall or a surface painted with a film-forming composition, another problem arises: it is too even, which can cause poor adhesion to the plaster. The case can be helped by treating the primer of the Betonokontakt type, which leaves a rough film on the surface, improving adhesion.
Another way out is to make notches. Once they were made with an ax, now they use a puncher, a grinder more often. With their help, a notch is applied. According to the norm of notches per square meter, there should be about 100 pieces.
Primer
Depending on the type of plaster chosen (gypsum or cement), a primer is selected. Its main task is to improve the adhesion of the wall and plaster. Carefully read the instructions for using the primer. Some require that the base be moistened before application, some require dust removal, etc.
There are two favorites in this group: Cerezit 117 and Betonokontakt. There are others, but these are used more often: good reviews. The composition may be ready for use or require dilution (concentrate). It can be applied with a roller or brush, spray gun, even with a garden sprayer to speed up the process.
Up to this point, there were no difficulties for self-alignment of the walls. Everything is elementary. Further – a little more difficult, but also – not to build rockets.
Installation of beacons
If you want to achieve a flat surface, you can only level the wall along the lighthouses. These are supporting elements that are set in the same plane. A layer of plaster is then leveled over them. As beacons, you can use special galvanized “T”-shaped beacons or even wooden planks.
It is more convenient to use metal beacons – to set them faster. But the minimum layer of plaster in this case is about 8-10 mm (6 mm beacon + solution on which it is placed). The downside is their cost: although not very big money, but still additional costs. Another point: galvanized plaster does not “contact” well, therefore, after the initial drying, the beacons are removed from the wall, the holes are closed.
Using wooden planks is a cheaper option, but finding enough perfectly even bars in cheap material is problematic (you won’t use high-end timber). Even if this succeeds, there remains the possibility that the tree will lead from moisture. As a result, the wall will no longer be flat.
Some make beacons out of mortar. Pre-apply strips of plaster, leveling them. After they harden, they are used as beacons. The cheapest way, but the most labor-intensive, and requiring much more time.
The alignment of the walls depends on how correctly the beacons are set. Exactly put – got an excellent result. If you made a mistake, you will suffer, correcting the irregularities that you made with your own hands.
Read more about how to put beacons to level the walls under the screed here.
Throw mortar
The selected plaster is diluted as indicated on the package. Then they throw it on the wall. Use a wide spatula or paint bucket. They start from the bottom, cover a piece of wall with mortar from one lighthouse to another.
Then they take the rule, set it at the bottom. Leaning on the beacons, they pull up, slightly swaying from side to side. Several such passes are made until the solution is leveled. The composition adhering to the rule is removed with a spatula, again throwing it onto the wall.
Again – a portion of the solution on the wall, aligned with the rule. So to the very top. Having tightened one strip, proceed to another. So gradually align the entire wall.
The first stage of plastering is completed. But this is only the first. The surface is imperfect: if you look closely, there are small irregularities. They are leveled with a more liquid solution, achieving a more even surface.
Leveling for putty
When the first layer has dried up a little, but has not yet hardened (no later than 2-4 hours after application), leveling for puttying begins. The existing shortcomings are overwritten with the same solution, which was diluted a little thinner than required by the instructions. Since it is more fluid, it is applied with a wide spatula, after stretching it along the wall with the rule, not relying on the same beacons.
So again they pass the entire wall, leveling it to a perfectly flat plane. This is necessary in order to reduce the consumption of expensive putty mixture.
Removing beacons and pruning
When the solution has dried to a state of thick plasticine (press hard with your fingers, it bends), you can remove the beacons. They are hooked at the bottom with a screwdriver and pulled out.
They are removed very easily. Actually, because of the fact that they are taken out, that they form a heterogeneity in the plaster, which means that they reduce its strength.
Now we take the rule, clean it from the adhering solution and, stretching it in different directions, finally level the surface. This should be done at the initial stage of thickening, when gypsum plaster is similar to plasticine: it is easy to cut it off with a rule.
When the surface was leveled, divorced by Rotband. They are sealed immediately, without waiting for something: until the plaster has completely hardened, new layers stick to it well.
The solution is applied and removed with a spatula. At the same time, make sure that the surface remains even. On this, the alignment of the wall for putty can be considered finished.
When leveling walls with plaster in apartments, the angle at which the heating pipe passes becomes a problem. You can’t crawl there with a rule, but you can’t do it with a spatula. If you are familiar with such trouble, watch the following video.
Dry plaster: we level the walls with drywall
Not everyone has the patience to level the plaster, and in several layers, and then wait until it dries. It is faster to work with sheet material – plasterboard sheets (GKL). This technology is also called dry plaster, because there are a minimum of “wet” processes in it, and the result is no worse: if all the nuances are observed, the wall turns out to be perfectly even.
But this technology has its downsides. The first is that you can hang something heavy either on the mortgage bars laid ahead of time, or use special fasteners that will be held by the main wall, and not the finish. So take that into account. The second drawback: such plaster eats up space a lot. This is with the classical technology – the installation of GKL on the frame. According to the simplified frameless, much less space “leaves”.
Drywall on frame
You can level any wall in this way. First, the frame is assembled. It is exposed in one plane and serves as the basis for fixing drywall. Assembled according to certain rules:
- A guide profile is set and fixed according to the level on the floor and ceiling.
- On the fixed profiles, the installation sites of the vertical profiles are marked every 60 cm. Vertical lines are drawn through them.
- Mounting curtains are installed on these lines.


This is how hangers that are mounted on the wall look like - Carriers are inserted into the profile guides along the marked lines (a curtain between the plates).


The principle of mounting the frame for leveling the wall with drywall - The profiles are aligned in one plane, fixed in the desired position with the help of curtains.
- Drywall is attached to the exposed profiles.


The assembled frame begins to be sheathed with plasterboard - The joints are glued with mesh.
- The joints are coated with putty, leveling in the same plane with drywall.
- All screw holes are sealed.
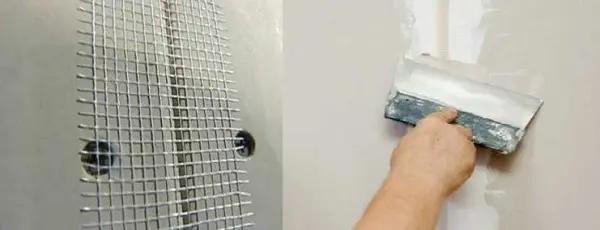

Joints glued and puttied
This completes the alignment of the walls and it is ready either for wallpapering or for plastering. As you can see, everything is much faster.
Plasterboard on clay
It’s even easier here. Since the sheet of drywall is initially flat (if it has not been stored standing up and it has not bent), it can be used without any foundation.
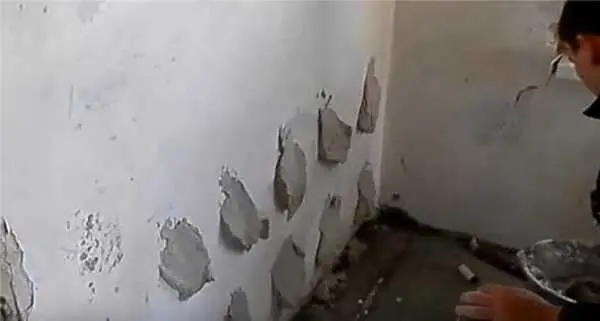
Diluted glue is applied to the walls (on brick, concrete) or gypsum plaster (on relatively even ones). It is thrown with small “blunders”. The volume is chosen depending on how concave or convex the walls are in a given place.
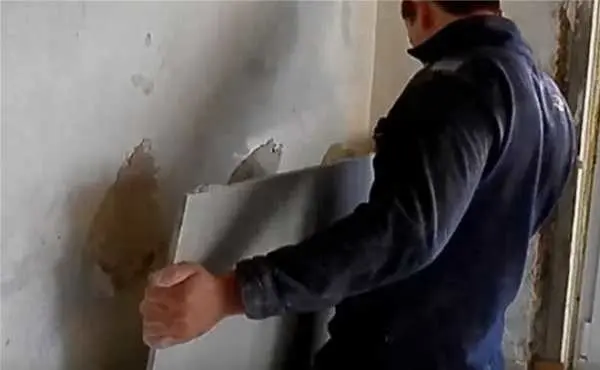
Then they take a sheet of drywall, lean against the wall, use a level to level it in a plane, sinking it if necessary, by pressing or with a fist (do not break through).
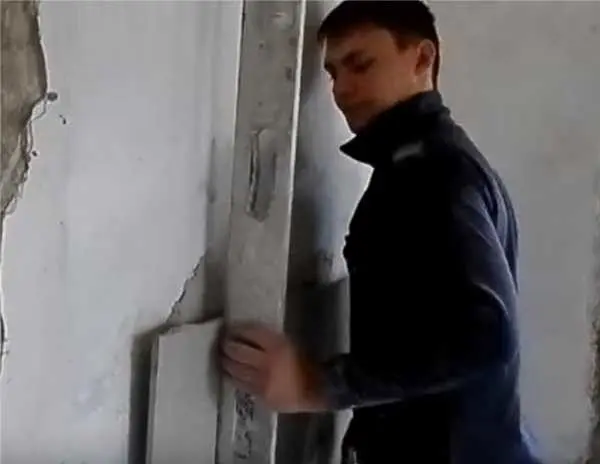
After you put the sheet evenly, coat the edges with putty, apply glue to the next piece. This is how you build the wall. To make this plaster hold better, after the glue or putty has dried (24 hours or more), screw the drywall to the main wall (with self-tapping screws or dowels, depending on the type).
Everything is as simple as shelling pears, except that it is very easy to screw up. Everything is done with a minimum of stops, and getting drops with this method is really a couple of trifles. However, if you need to quickly level the wall, you can try to do so.