


Contents
- How to make a large paper snowflake
- Volumetric paper snowflake with Christmas trees
- Volumetric paper origami snowflake
- Shiny 3D paper snowflake
- How to make a voluminous paper snowflake with rhinestones
- Original New Year’s volumetric snowflake made of paper
- Beautiful do-it-yourself 3D paper snowflake
- How to make a three-dimensional snowflake from 6 sheets of A-4 paper
- Volumetric and beautiful snowflake made of paper using origami technique
- Making a multifaceted volumetric paper snowflake
- Simple volumetric snowflakes from strips of paper
- Unusual voluminous snowflake-ballerina made of paper
- Volumetric paper accordion snowflakes
- Step-by-step MK of a multi-colored volumetric paper snowflake
- Volumetric paper kirigami snowflake
- Conclusion
Do-it-yourself voluminous paper snowflakes are a great option for decorating rooms before the New Year holidays. To make such a decorative element, you will need a minimum set of materials and tools, as well as strict adherence to the manufacturing instructions.
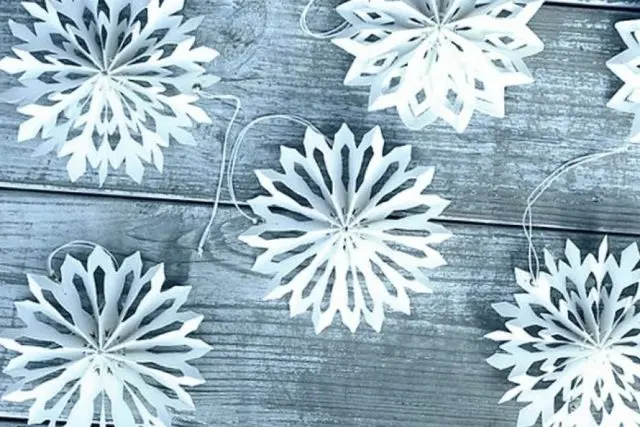
How to make a large paper snowflake
You will need 3 landscape sheets and scissors. First you need to make some two-dimensional flat snowflakes, and then connect them in the center, giving volume.
Instructions:
- Cut out a square from the album sheet.
- Fold it in half.
- Repeat the previous step twice.
- It turns out a dense triangular base.
- A pattern is applied to it using a template or pattern.

The applied pattern is cut out using stationery scissors. Then the folded base is unfolded, a flat figure is obtained. You need to cut out 3-4 of these templates, glue them in the center or staple them together.
Volumetric paper snowflake with Christmas trees
This is a more complex and original version. Making such a decoration with your own hands is very simple.
You need:
- green A4 sheets – 6 pieces;
- pencil;
- glue;
- scissors;
- rhinestone, with a diameter of 1 cm.
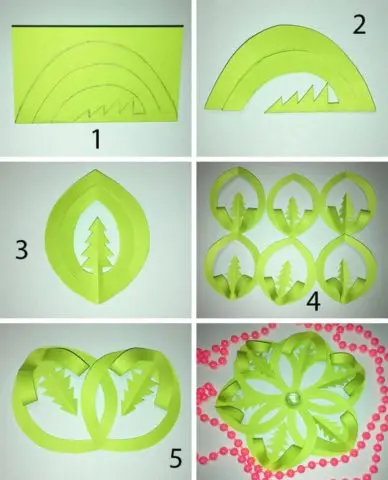
Steps:
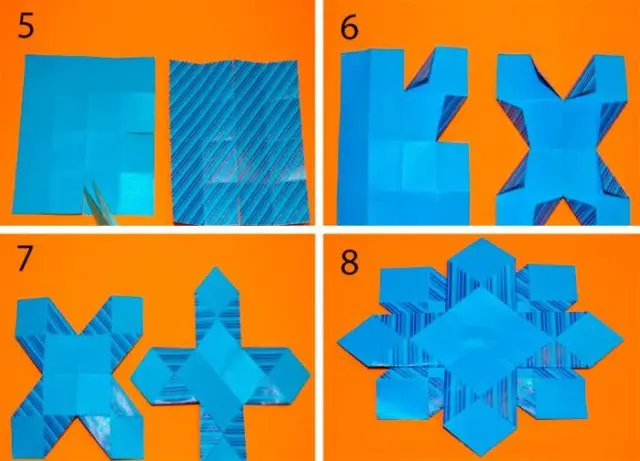
- Fold the sheet in half.
- Apply with a pencil 3 arched lines and a herringbone pattern.
- Cut out the template.
- Expand the workpiece (you need 6 of these).
- Bend and glue the central arc line at the base of the Christmas tree.
- Connect the blanks in the center and fix them with glue.
- Place a shiny rhinestone in the middle.
A handmade snowflake will help create a comfortable atmosphere on the eve of the New Year holidays. Moreover, the manufacture of a decorative element does not cause any difficulties.
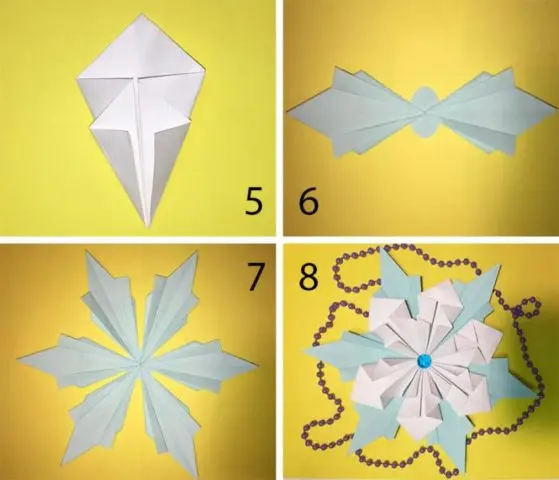
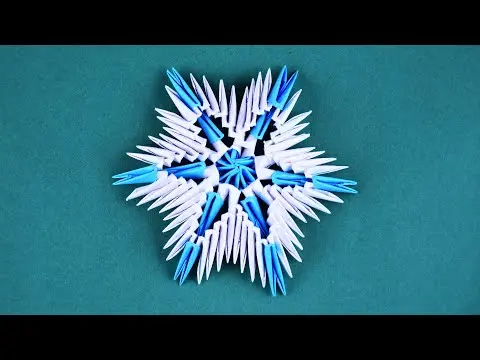
Volumetric paper origami snowflake
This technique is considered difficult. However, using a visual diagram, the manufacturing process will be simplified.
Necessary materials:
- square sheets of paper (6 blue and 6 white);
- glue;
- cardboard circle (2-3 cm in diameter);
- shiny rhinestone.
Instructions:
- Fold the white square diagonally on both sides, unfold.
- Fold the corners to the center and flip.
- Bend the sides to the center.
- Unscrew the side pieces from the back.
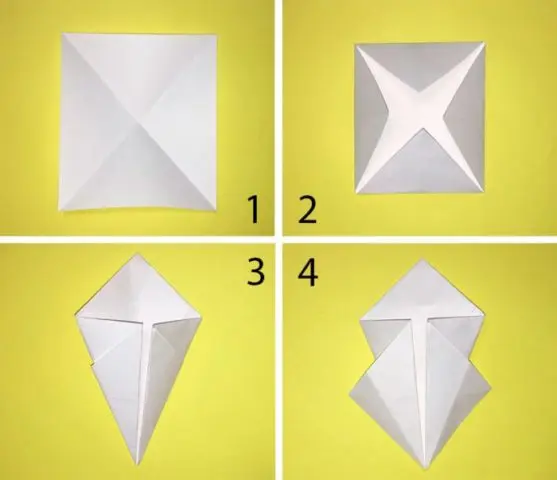

- Fold the blue square twice diagonally.
- Unfold the sheet, fold the corners to the center to make a rhombus.
- Glue the diamond-shaped elements to the paper circle.
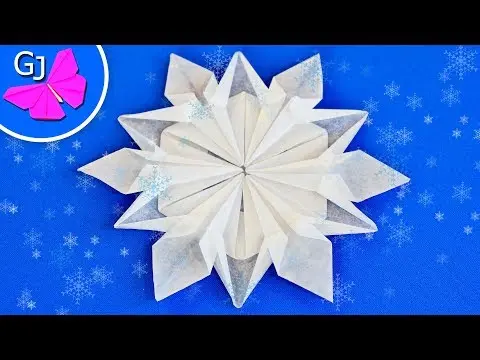
- From above, fix the white details and complement the figure with a rhinestone.
You can make decoration using the origami technique in other ways. To do this, it is recommended to use a visual instruction:
Shiny 3D paper snowflake
To make such a decoration, you need a shiny cardboard. It can be purchased at office supply stores. You will also need scissors, glue, a pencil and a sharp knife.
Instructions:
- Cut out 3 strips of each color from cardboard (length – 14 cm, width – 2,5 cm).
- Draw 4 lines on the back of each strip.
- On the applied segments, make cuts with a sharp clerical knife.
- Glue the edges of the strip, wrapping them inward.
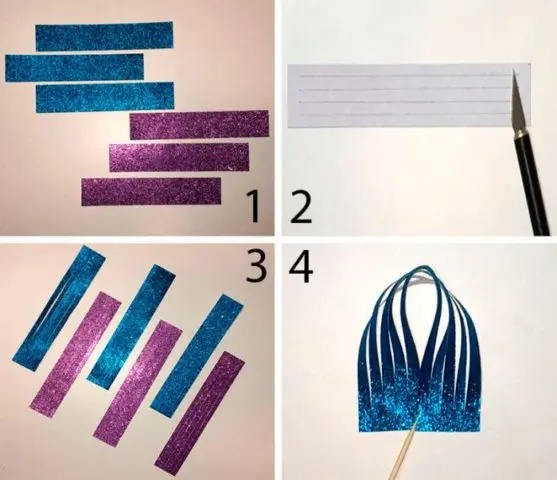
- The shiny surface of the cardboard should be on the outside.
- Make such blanks from all strips.
- Connect each element to form a snowflake.
- In the center where the individual blanks are fastened, glue a shiny circle.
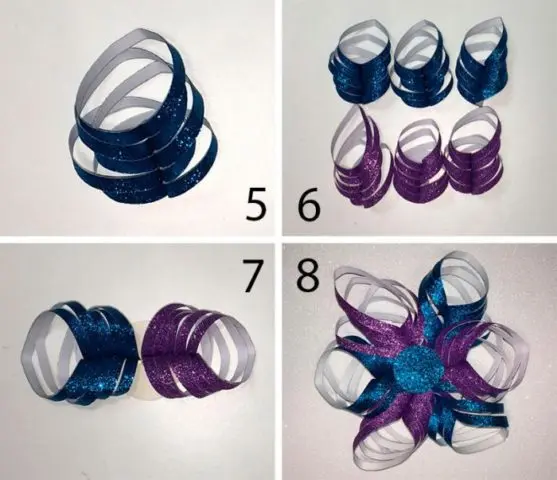
Do-it-yourself shiny voluminous snowflake can be made from cardboard of any color. If desired, the craft is supplemented with decorative components: artificial snow, New Year’s rain and serpentine.
How to make a voluminous paper snowflake with rhinestones
Even children can make such crafts. This will require blue and white paper, as well as glue, scissors and rhinestones for dyeing.
Instructions:
- Form a cone from each cut square.
- One corner must go out.
- Glue the cones at the base to make a three-dimensional snowflake.
- Decorate with sparkly rhinestones.
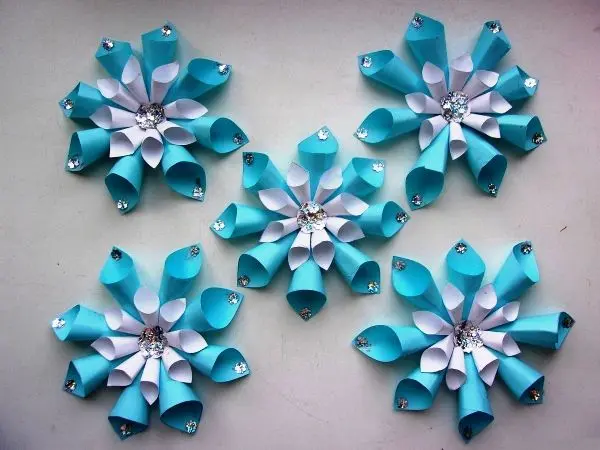
Children can be involved in the process of making snowflakes
The craft is used as a decorative element of the interior. It can also be used to decorate a Christmas tree.
Original New Year’s volumetric snowflake made of paper
To make such an ornament with your own hands, you need to use a colored sheet with a pattern printed on it. In this master class, blue cardboard is used for the snowflake.
Instructions:
- Fold the sheet in half.
- Expand and repeat the action on the other side.
- Bend the edges of the sheet to the center.
- It should get markings from the bends.
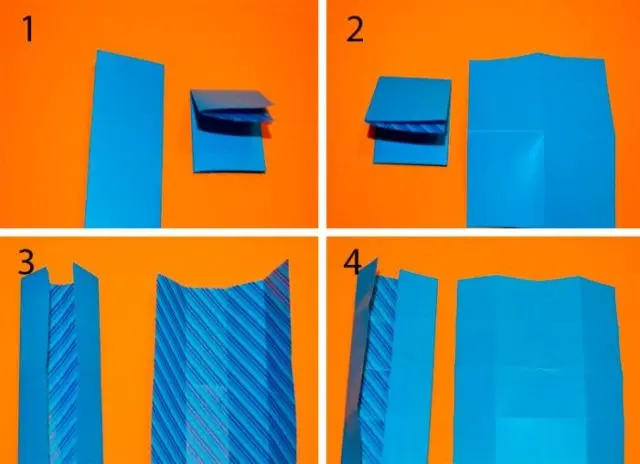

- Make cuts on the central folds (for the length of one square).
- Wrap the corners around the cuts with the narrow side up, fix with glue.
- Make another one of the same kind.
- Connect them together so that the rays are staggered.
The result is an original geometric snowflake. This craft can be made very quickly, as it consists of only two elements.
Beautiful do-it-yourself 3D paper snowflake
To make a unique Christmas decoration, two sheets of paper are enough. You can verify this with the help of this master class.
You need:
- double-sided colored paper (blue);
- scissors;
- glue.
Instructions:
- Fold the square diagonally three times.
- Draw three cutting lines on the surface of the triangle.
- Cut the contour with scissors, not reaching the edge at the fold.
- Make triangular slits at the bottom fold.
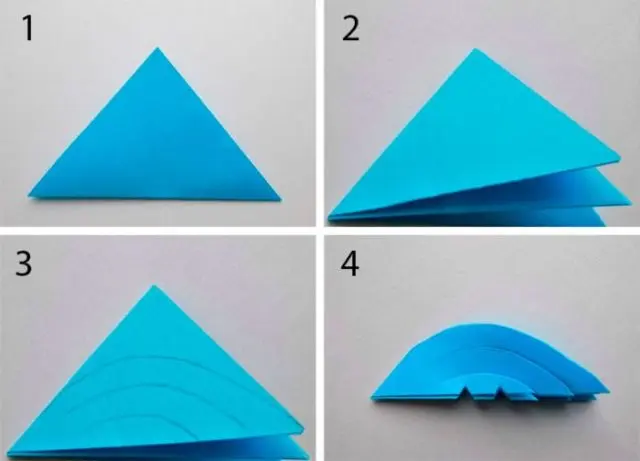

- Expand the workpiece.
- Bend the middle strips to the center and glue.
- In a similar way, make the second blank.
- Glue in the center so that the rays are staggered.
To hide the center of the figure, it is recommended to glue a rhinestone or bead. If necessary, a hole can be made in this place to hang the decoration.
How to make a three-dimensional snowflake from 6 sheets of A-4 paper
Such a decoration at first glance seems difficult to manufacture. In fact, making a snowflake of 6 elements with your own hands is simple.
This will require:
- 6 sheets A-4;
- scissors;
- glue.
Previously, the landscape sheet is folded diagonally to make a square. Cut off the excess with scissors.
Stages of manufacture:
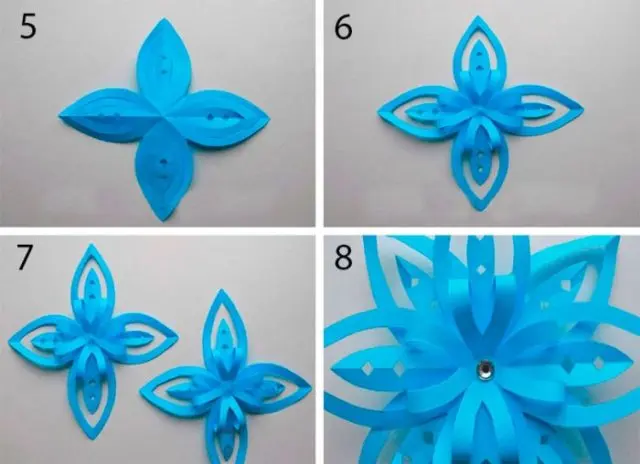
- Take a square piece of paper.
- Bend it diagonally.
- Fold in half.
- Draw several lines on the resulting triangle.
- Make cuts along the contours and unfold the workpiece.
- Glue the edges of the shortest strip.
- Do the same procedure with the 3rd and 5th strip.
- It turns out the original spiral figure.
- Such a blank is made from each album sheet.
- All 6 figures are interconnected, forming a paper snowflake.

With the help of this master class, you can make a three-dimensional decoration with your own hands from paper of your favorite color. The decorative element is large, so it can be used in rooms of any size.
Volumetric and beautiful snowflake made of paper using origami technique
For such crafts, you will need not only the ability to work with small details, but also patience. The result is a unique Christmas decoration made of paper with your own hands.
Module manufacturing:
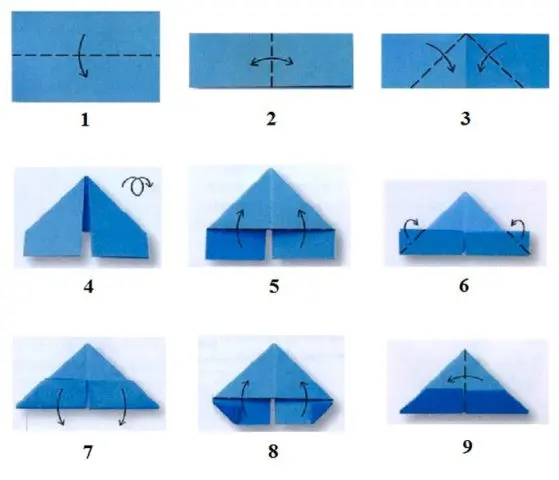
- Fold the paper rectangle in half horizontally.
- Then bend it vertically.
- Fold the top corners of the rectangle down.
- It turns out a triangle with two wings.
- Turn over the workpiece.
- Bend the wings and wrap the corners behind the base of the triangle.
- Turn them back.
- Re-fold the corners in front of the base.
- Fold the triangular piece in half.
This procedure must be repeated for the manufacture of each module. After that, you can form a three-dimensional snowflake.
Detailed instructions for assembling modular origami:
Making a multifaceted volumetric paper snowflake
To make a Christmas decoration with your own hands, you can use different improvised materials. In this master class, the main elements are made from paper envelope bags.
Stages of manufacture:
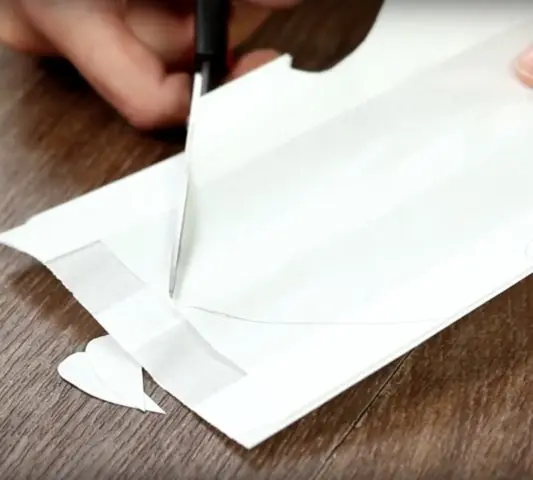
- Apply a template to each package.


- Carefully cut out the shape along the contour.

- Apply double sided tape to the surface.
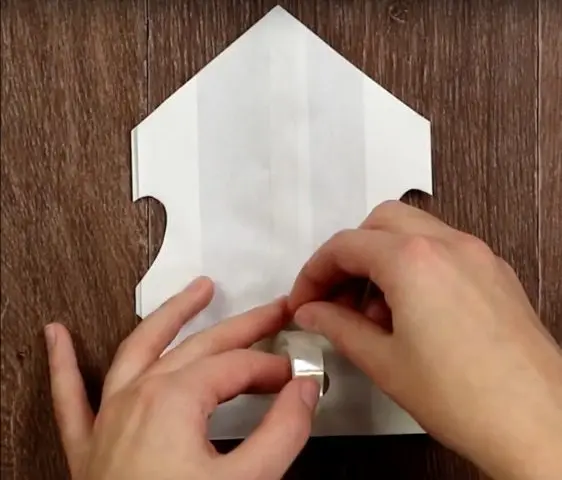

- Glue the next cut out shape.
- Glue a cardboard strip instead of tape on the surface of the last envelope.
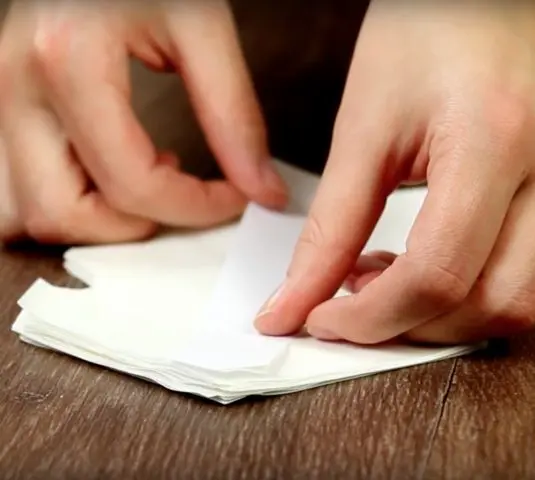
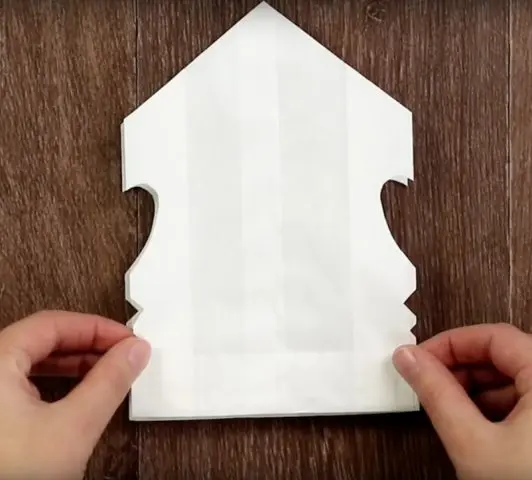
- Spread the snowflake and fasten the edges with a stapler.
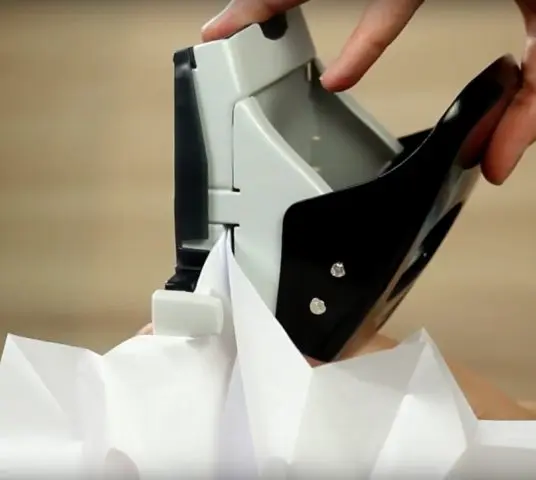

The finished decoration must be hung. To do this, make a hole in the cardboard element glued between the envelopes.
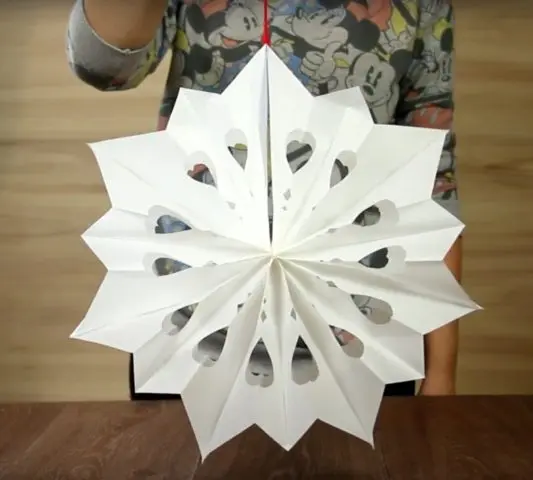
Such a snowflake can even be made from old newspapers
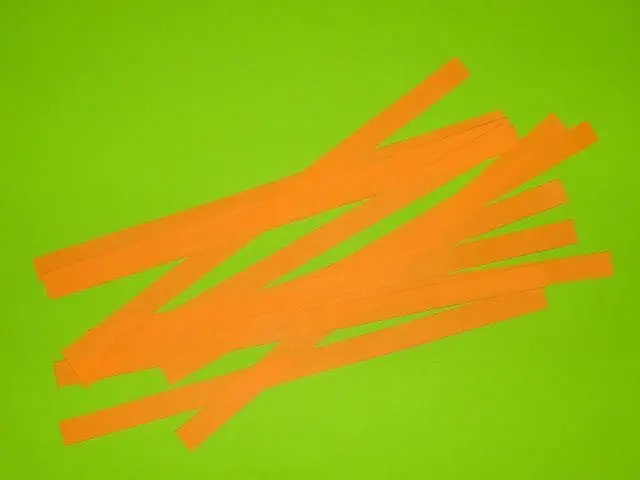
Simple volumetric snowflakes from strips of paper
This is another simple craft with which it is recommended to decorate a room before the New Year. Do-it-yourself snowflake is collected from paper strips. You can use a material of several colors (optional).
Manufacture:
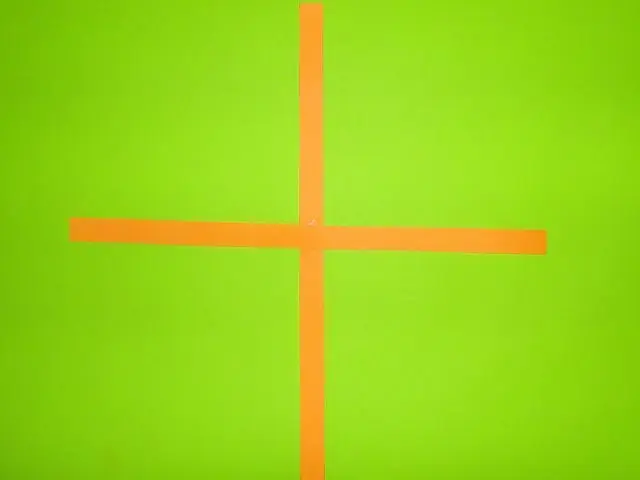
- Cut 12 strips (width – 1,5 cm, length – 30 cm).

- Glue two of them crosswise in the center.
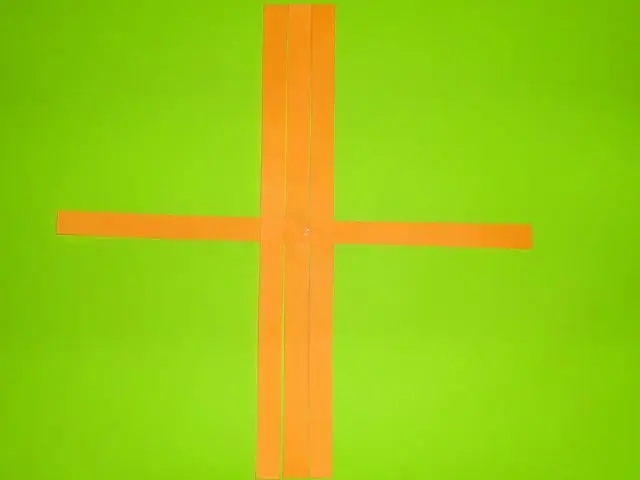
- Add 2 vertical stripes on the sides of the main one.
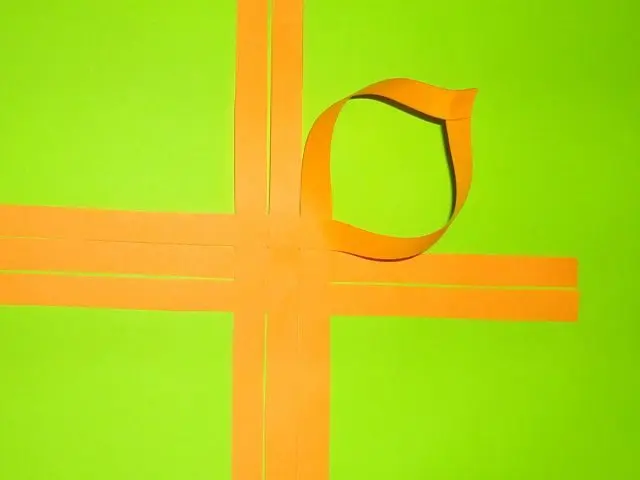
- Weave 2 more horizontal segments.

- Glue the corner strips together.
- This is one part of the snowflake, do the second in the same way.
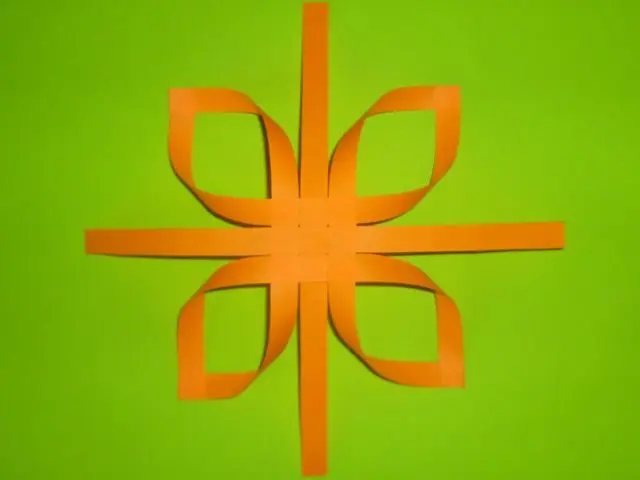
- Glue the halves.
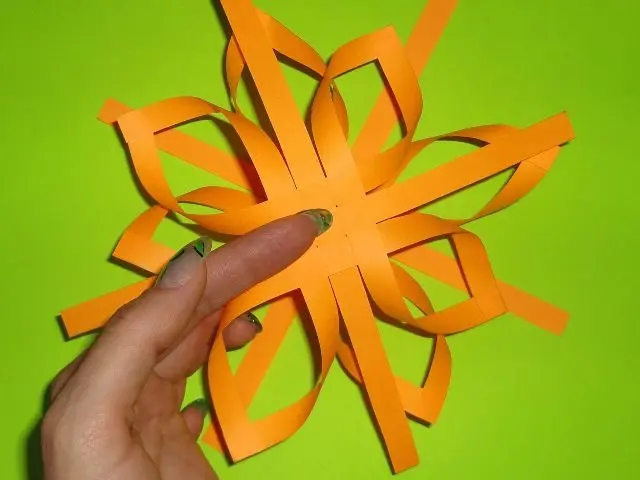
The center is recommended to be glued, otherwise the figure turns out to be convex. This procedure is not required. If desired, the craft can be left convex, as it will appear more voluminous.
Unusual voluminous snowflake-ballerina made of paper
This is a beautiful winter decoration that is easy to make. First you need to find a ballerina template and print it. Also need a pattern for a snowflake.
Manufacture:
- Transfer the ballerina template to white cardboard, cut it out and set it aside.
- From another sheet, make a square base.
- Fold it diagonally 2 times to make a triangle.
- Transfer the snowflake pattern and cut it out.
- Make a cut in it and put on a cardboard figure of a ballerina.
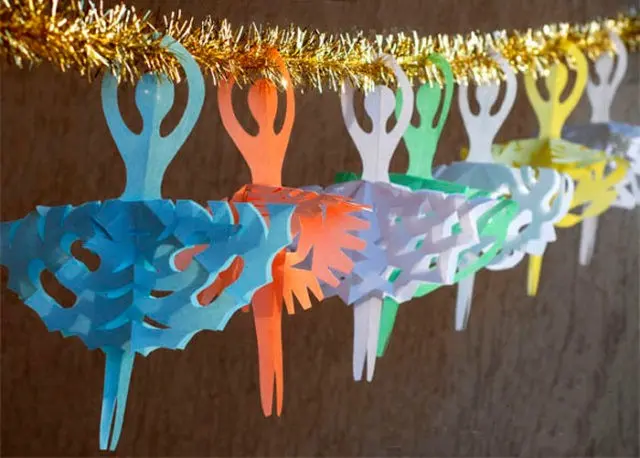
Christmas decoration can be hung on a chandelier or doorway
The snowflake in such crafts performs the function of a skirt. The finished figure should be hung on a transparent thread or thin fishing line.
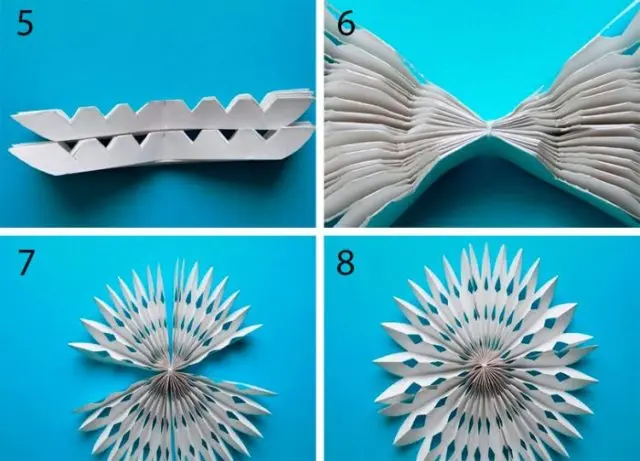
Volumetric paper accordion snowflakes
This is an easy way with which you can make jewelry with your own hands in a short period of time. Moreover, there are several manufacturing options in this technique.
For the first method, you will need 2 landscape sheets of paper and a white thread. From the tools you need a pencil, scissors and glue.
Instructions:
- Fold the sheet horizontally several times.
- The result is an accordion.
- Mark the center and cut 3 triangles on each side.
- Carry out a similar procedure with the second sheet.
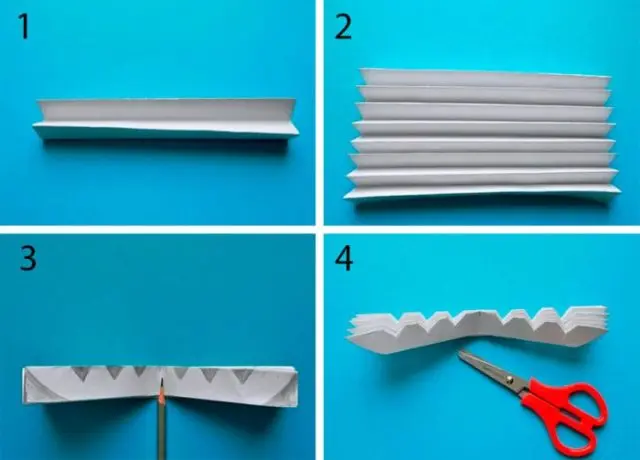

- You should get 2 identical accordions.
- They are tied in the center with a white thread.
- The sides are straightened, forming a snowflake.
- The side part of the halves is glued.
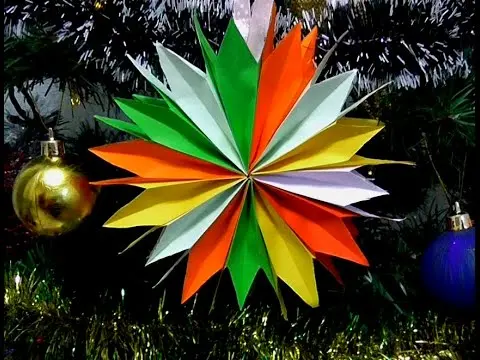
In a similar way, you can make another volumetric snowflake with your own hands. It consists of several accordions. You will also need a stapler, glue and a template with a pattern.
Instructions:
- Cut out several identical paper rectangles.
- Form an accordion 1,5-2 cm wide.
- Transfer the pattern template or apply it yourself.
- Cut out the outline.
- Glue the bottom edge of the accordion to form a fan.
- Perform a similar procedure with each paper rectangle.
- Glue the sides of the fans, forming a round voluminous snowflake.
Crafts can be of different colors, not just white
Finished products decorate the room or use instead of Christmas toys. You can make accordions from cardboard of any color.
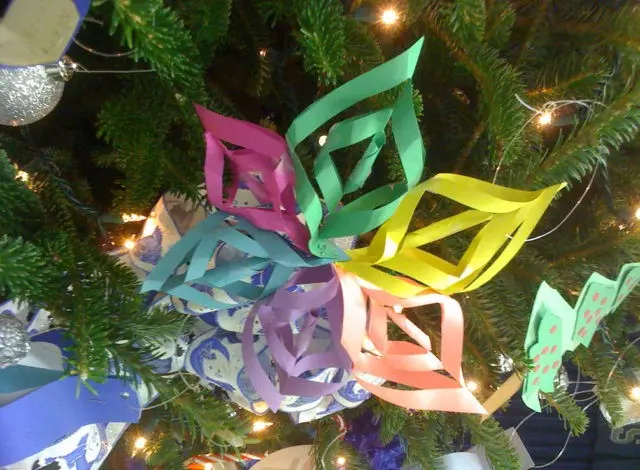
Step-by-step MK of a multi-colored volumetric paper snowflake
Another option for making an accordion decoration. The difference between such a figure is that it is made of multi-colored elements.
Required:
- thick colored paper;
- scissors;
- glue;
- pencil.
To attach such snowflakes to the Christmas tree, you should take care of a thread or ribbon.
Stages of manufacture:
- Cut out identical rectangles from colored paper (11×16 cm).
- Fold the rectangle like an accordion.
- Glue the edges of the element to make an envelope.
- Prepare other paper rectangles in the same way.
- Assemble a snowflake by gluing multi-colored elements.
The result is a multi-colored complex figure. It will perfectly complement the interior during the New Year holidays.
To simplify the process, it is recommended that you read the following instructions:
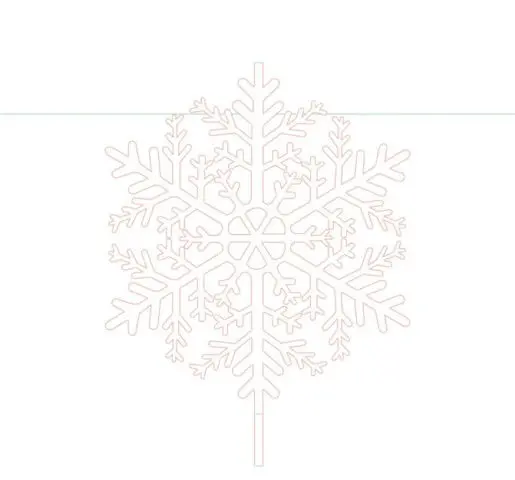
Volumetric paper kirigami snowflake
This technique involves the manufacture of three-dimensional figures using a knife. The process is in many ways similar to making simple three-dimensional snowflakes. This will require a template, which later needs to be printed and transferred to paper.
Large snowflakes are suitable for decorating the interior, small ones for postcards.
Stages of manufacture:
- Print the template on a thick A-4 sheet.
- Place a cardboard or plank under the workpiece so as not to damage the surface.
- Cut out the outline with a utility knife.
- Bend along the lines indicated on the template.
- Glue colored paper under the cutout so that the figure is clearly visible against its background.
Kirigami crafts are usually used as a postcard. However, the finished snowflake can also be placed on a flat surface as a decorative element.
Conclusion
Do-it-yourself voluminous paper snowflakes are an original decoration that you can make yourself with a minimum set of materials. This will help step-by-step master classes with photos. Paper snowflakes can be made using different techniques. This will allow you to embody individual creative ideas and ideas for the festive decoration of the premises.