


Contents
A private house is the best place to relax surrounded by wildlife. Buildings with glazed outbuildings are in great demand among s. But even if there are none, a do-it-yourself terrace is a quick and inexpensive way to increase the usable area of uXNUMXbuXNUMXbthe home.
Technical features
In most cases, the terrace is an open furnished area attached to the main building. This is the best place for conservation, tea drinking, receiving guests and interesting pastime with children. If desired, a terrace can be built from lumber 5–10 m from the house. A separate structure, protected from wind and rain, will become a family island of calm, and if you want, then your personal territory.

It is important that the flooring rises at least 45–60 cm above the ground. In this case, water will not be able to penetrate the building during the defrosting period of the soil in early spring. Light metal railings and an original bamboo canopy provide additional protection from adverse external factors. If the plot area exceeds 35 sq. m, a swimming pool can be added to the project of a guest terrace in the country house.
There will be no windows and walls, which, in turn, is considered impermissible in the improvement of the veranda. The latter is always attached to the house at the entrance, and the terrace can be located anywhere on the site. The technical features of this facility include:
- sides and railings instead of walls;
- lack of a roof on summer grounds, while there is always a roof on the veranda;
- warming is possible only in 20% of cases, which cannot be said about gazebos and closed verandas;
- floor coverings exclusively from wear-resistant materials that do not deteriorate under the influence of moisture and ultraviolet radiation;
- a plot on a hill is an ideal place for building a multi-level terrace, but it is better to build a gazebo 5–7 m from a river or reservoir.
Video “Building a terrace with your own hands”
From this video you will learn how to build a beautiful terrace yourself.
Preliminary steps
In some cases, the terrace serves as a porch. For greater convenience, it is better to attach it to the part of the building where the front doors are located. Thus, you can have a good time in the bosom of nature, and, if necessary, quickly deliver food from the kitchen to the festive table. For older people, an area of 3-4 square meters is enough. m. If we are talking about large families, 8-10 square meters. m is the best option.
In choosing the shape of the building, it is better to give preference to a square or a rectangle. For a winter covered terrace with a single-level roof, an octagon is more suitable. Looking after building materials, consider the features of their combination, and most importantly, performance properties. For example, a wooden terrace can be attached to a brick building. If the main building is built from beams, it is better to use lumber in the work.
Forged metal may be needed in the construction of a closed terrace. Before laying the foundation, it is important to stock up on sea sand, crushed stone, cement and rods for reinforcement. Considering that most of these structures are located in the open air, it is better to give preference to frost-resistant materials. Among them: wood concrete, foam concrete and warm ceramics.
Of the tools you will need shovels, screwdrivers, hacksaws, hammers, dowels and circular saws. For the construction of a multi-level terrace – lifting carts. To avoid technical errors, and with them unreasonable waste, it is important to indicate on the drawing of a building of any kind:
- the dimensions and location of the high rack and railings (step-by-step installation of these structures is the key to reasonable budget savings);
- features of fastening the side racks;
- the optimal slope angle of the site, since it is on this criterion that the quality of protection of the terrace from rain and melt water depends;
- placement of beams, logs, braces, front boards and support bars.
Depending on the quadrature and shape of the future structure, the exact amount of materials is determined.
Step by Step instructions
To begin with, it is important to clear the site of stones and weeds. Then you should level the surface of the soil and install wooden stakes so that the contours of the terrace are visible. At this stage, even a novice builder will understand whether it will be possible to implement the developed plan. You may have to redo the drawing and change the location of the reference elements. If you describe the device of the terrace step by step, the first thing to note is:
- Arrangement of the foundation required for most closed-type extensions. Concrete blocks, bricks and non-flowing backfill materials are useful in the work.
- Installation of floor coverings. For arranging a winter terrace, a massive board that is resistant to moisture and temperature extremes is well suited. In the case of a regular summer extension, most experts advise decking.
- The erection of wood walls, although this item is not mandatory.
- Roof arrangement. Here, the main thing is to correctly install the rafters and the crate, on top of which you can lay slate, roofing material and even straw.
- Interior decoration of the room with breathable curtains and awnings.
- Fencing a finished terrace with a railing.
With a limited budget, you can try to equip the area with walls, but without a roof. Only in this case, the owners will need portable furniture for summer cottages.
Option on a column foundation

If the total weight of the structures does not exceed 1100 kg per 1 m³, it is better to lay a columnar foundation. Even an amateur builder can handle it. The main advantage of such a foundation is the possibility of independent work in almost any territory. The only exceptions are areas with a high level of groundwater. As for the speed of work, 10-12 days is the ceiling. A week is enough for experienced specialists.
And if every penny counts, it is worth noting that you can save up to 35% on waterproofing such a foundation. This is almost the only option for the foundation of a country terrace, which can be laid on a hill quickly and inexpensively. The minimum shelf life here is 40 years.
The easiest way is to build a shallow foundation. This is the best solution for open summer terraces. Bricks, natural stone and concrete blocks are useful in the work. The optimal distance between the supporting columns is 2–3 m. The base itself can be made of clinker bricks. Unlike the ceramic “brother”, and even more so from conventional shaped products, it has a much lower percentage of voids. And resistance to moisture and frost, on the contrary, is higher.
Under each post there should be a dense cushion of sand. Usually their number depends on the degree of load on each element of the base. Open blocks are best plastered. At the very end, the foundation is waterproofed with bitumen plastic. It is better to use wear-resistant and refractory metal as supports. If the owners prefer wood, the minimum diameter of the products should not be less than 25 cm. Before installation, they should be treated with a protective compound.
gravel base
Most often, this option is chosen by supporters of natural materials. And since wooden beams are laid almost at ground level, it is better to use products with high hardness, moisture resistance and density in work.
First you need to prepare the site, in particular to remove a 30-centimeter layer of soil. After that, you should dig a pit, and cover its bottom with gravel. From above it is important to lay metal profiles. In this case, the distance between them should not be less than 600 mm. It is important to install rubber gaskets at the junctions of beams with profiles. This will help protect the wood from excessive moisture, and thereby increase its shelf life by 1,5 times.
Bearing elements are best treated with geotextiles. Otherwise, the strength of the foundation will weaken due to actively growing weeds. To prevent the floor from rotting ahead of time, experts recommend making spacers between the board and the protective fabric, and leaving at least a two-centimeter gap between the flooring and walls.
Clinker paving
This procedure includes the following work:
- We clear the area of debris.
- We prepare a 20-centimeter sand cushion.
- We fall asleep gravel at the bottom of the pit for better drainage of liquid at the installation site of the fences.
- We fasten the supporting pillars with self-tapping screws, thereby increasing the strength of the base.
- We determine the optimal level of sand backfill so that in the future water does not accumulate on the terrace.
- We lay clinker tiles on compacted sand, and fill the gaps between the fence and paving with gravel.
- We carry out drainage with the subsequent installation of a gutter.
Using decking

This material is of high quality, which, of course, could not but affect its price. On the other hand, decking, commonly referred to as a terrace board, withstands great physical exertion well, is easily installed on hardware and retains up to 45% of heat indoors.
For the construction of summer terraces, decking with sawdust and polypropylene in the composition is more suitable. The optimal length of the product is 5–6 m, and the thickness is above 25 mm. This material can withstand loads up to 600 kg per 1 m³. It does not lose its original properties at low temperatures and is not afraid of aggressive “chemistry”.
As for installation, a natural array is often laid in a lag way. In this case, the distance between the lamellas should not be less than 3,5 mm. Planks, which are more than 70% sawdust, can be attached to each other using clips. Seam mounting involves the use of terminals.
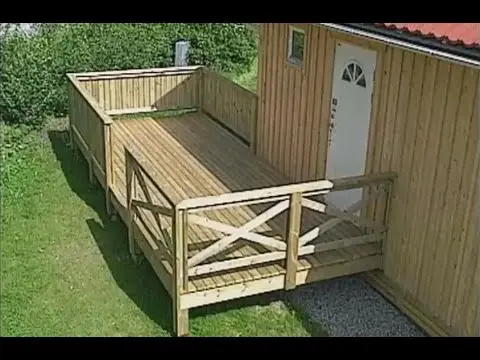
Connection to home
This is the best option for outdoor recreation, and almost without leaving home. On such terraces you can arrange a place for friendly gatherings, romantic dates and various feasts. And since the same materials are often used in construction as in the construction of the main building, there can be no question of violating the architectural style. The only thing that is important for the owners to take care of in the first place is to lay a separate foundation. Otherwise, cracks are possible, or even worse – deformation of the supporting structures of the main building.

In order to avoid such situations, it is better to apply expansion sutures in a timely manner according to the instructions. Extensions with an autonomous foundation also transfer loads to houses, but not so significant. If the terrace itself is located on a site with low soil resistance, it should not be attached to the house. In the future, such structures become covered with cracks and, as a result, are disconnected from the main buildings.
Beautiful curtains, paintings, clay figurines and, of course, flowers in flowerpots are suitable as decoration for terraces.
The functions of a traditional roof can be assigned to a tree-like wisteria or vine.