


Contents
Cooking in the summer kitchen in the warm season is a pleasure for any housewife. In this case, it is not necessary to resort to the services of specialists – you can build a summer kitchen with your own hands. The main thing is the correct selection of building materials, and then the building will last for many years.
The main varieties
There are three main types of cuisines:
- open kitchens. These include a terrace or a gazebo created for barbecue. It is a conventional frame structure, in some cases without walls and insulation. Sometimes in such a small kitchen there is not even a full roof. Usually it looks like a canopy or gazebo, equipped with a barbecue and a dining area. This type of building is perfect for dinners with friends or family during warm summer days. The kitchen can be built from improvised materials. In winter, the building can be used as a warehouse for household utensils. The disadvantages of an open building are its short service life, the absolute insecurity of furniture from weather conditions.
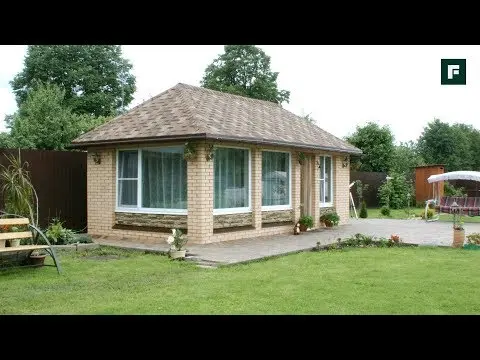
- Closed kitchens (for example, a veranda). Such a structure has walls, can be insulated and equipped with a heating system. Looks like a small house. The advantage of such a structure is that it can be used all year round. Inside, there is usually a real kitchen with a gas stove, sink, refrigerator and other appliances. But you need to remember that the construction of such a kitchen will cost more than an open one.
- Combined building combines open and closed parts. It features high construction costs and a complex project plan.

Additionally, consider the characteristics of extensions and individual buildings:
- The advantage of separate kitchens in country houses is that the smells that arise during cooking will not penetrate into the main building. You need to build such a kitchen if you have a large plot so that it decorates it.
- Kitchens attached to a private house. Such a building is easier to build, it will be easier to move between the house and the summer kitchen. The disadvantage of the terrace is the entry of excess smell into the house and its high traffic.
Video “Building a summer kitchen with your own hands”
From this video you will learn how to build a brick summer kitchen with your own hands.
Construction of an open kitchen
There are several options for building a beautiful open-type kitchen, but the main stages are the same: marking and arranging the site, building a foundation, building supports, installing a roof, working on floor and ceiling lining.
Required Tools:
- level;
- stakes and rope;
- shovel;
- roulette;
- bulk materials – sand, crushed stone;
- cement mortar;
- armature;
- wooden bars measuring 150×150 mm;
- Circular Saw;
- screwdriver;
- drill;
- metal corners;
- nails and hammer;
- self-tapping screws;
- several boards 2,5 cm thick;
- primer.
Preliminary events
When designing, you should definitely indicate the dimensions of the kitchen, do not forget to draw the roof and indicate the height of the building.
You should consider the type of building – it will be an extension to the main building or a full-fledged structure. It is also important to consider how the kitchen will be located in relation to the green area, the sun, the main communications and the road.
The area provided in the yard for future construction should be cleared of grass and unnecessary debris. Then they choose one of the corners of the building and hammer a peg into the ground, from which they begin to measure the width and length of the kitchen. In the corners of the selected suburban area, stakes are hammered and the twine is pulled. A mandatory point is to check the correctness of the markup along the diagonals, which must be the same length. If the check is passed, 15–20 cm of soil should be removed in the middle of the selected area, compacted and leveled the resulting depression.
For a simple foundation, sand is evenly poured onto the bottom, then it is leveled and carefully compacted. If required, communication pipes are laid along the bottom, everything is covered with a layer of rubble from above. Then a reinforcing mesh is laid, a metal rod 20 cm high is inserted into each corner of the site, and a wooden formwork 10 cm high is installed around the perimeter. The base of the building is poured with concrete mortar, which is leveled using the rule.
Main work front
Starting the direct construction of the gazebo, you should do the construction of supports. To do this, holes for rods from reinforcement are drilled in the lower part of the beam. For the convenience of mounting the canopy, the racks in front are made a couple of tens of centimeters higher than the rear ones. The bars are installed in the corners, and then fixed with metal plates on the bolts. At the top, the pillars are connected to each other with the help of a strapping and a beam, and at a height of 80 cm from the foundation, wooden lintels are built.
At the stage of installation of the canopy, boards pre-treated with a primer are nailed to the strapping at the top. The joints inside must be reinforced with metal corners. The distance between the boards should not exceed 50 cm. Insulating material is laid on top of the boards, then thin laths are stuffed and roof slate is laid.
Next up is the flooring. The best option for an open kitchen with a barbecue is tiles. It is moisture resistant, washes quickly and tolerates temperature changes well. To make the seams the same, use plastic crosses. Laying should be checked with a level, and at the end of the procedure, wipe the tile with a mixture.
Construction of a closed building

Required Tools:
- level;
- saw;
- a jigsaw;
- drill, screwdriver;
- shovel, hammer;
- a bar measuring 10×10 cm;
- profile pipe;
- boards 2,5 cm thick;
- roulette;
- twine and pegs;
- cement, roofing material;
- foam block;
- sand;
- nails, screws;
- building studs;
- working out.
Before starting construction, you need to decide on a place. The building of a closed type should be removed from the roadway and sources of unpleasant odors. At the same time, the glazed kitchen should not be located too far from the house, otherwise it will be problematic to move between buildings.
Having chosen a plot in the garden, it should be prepared: level the surface, remove grass and large stones. Then it is worth deciding on the facade line and installing 2 beacons. The distance between the stakes should be equal to the length of the building. From each of the beacons, you should measure the length of the side walls and also set marks. Pull the cord along the beacons, measure the diagonals – they should be equal.
Preparatory stages

Before construction, it is worth making a detailed drawing of the building, where you should indicate the dimensions of the kitchen, the placement of communications, doors, windows, niches. The plan should indicate all the elements, having previously made measurements.
Now for the pouring of the foundation. Holes are dug with a shovel in the places marked with stakes, several cinder blocks wide and 40 cm long. The dug holes are rammed, 10 cm of sand are poured inside. 2 aerated concrete is placed on it, the surface is covered with a mortar, and a construction pin is inserted in the center, which rises 30 cm above the ground. A second row is laid across this foam block, the mortar is added again and the 3rd row is laid.
It is the turn of the construction of the lower trim – several rows of timber knocked together, pre-treated with oil. Holes for studs are cut in the beams for the lower row, and grooves for the floor beams are cut out for the upper row. Roofing material is laid on top of the pillars, which is fixed directly to the studs. The lower bars are placed on the surface of the foundation, a stud is threaded into the pre-drilled holes and the nut is tightened. To prevent distortion, check the design with a level. Then the top layer of wooden beams is laid down, nailed, and floor bars are inserted into the grooves. Joints inside can be additionally strengthened with metal corners.
Creation of the frame and roof
The frame for a closed kitchen is made of two groups of materials:
- Stone. It can be concrete, granite, limestone. The advantage of such walls is their long service life and reliability, but the prices for such material are quite high. When erecting frame walls, you should think about their thickness – it will depend on the climate. In most cases, laying in one brick will suffice. If the owners want to use the kitchen in winter, it should be insulated from the inside.
- Logs. Inexpensive material, which is especially popular with summer residents. If the site owner has chosen a similar material for finishing, it should be remembered that for long-term operation, the tree must be treated with a special solution. Outside, walls can be sheathed with boards or siding, and inside they can be insulated with clapboard or drywall.
After you should build a roof. Choose either a flat shed roof (it is easy to build and inexpensive) or a traditional gable roof (a reliable and durable option). You can fasten the roof parts to the top trim with bolts. After installing the frame on top, the roof is upholstered with boards, then slate is laid. The visor can be made of polycarbonate.
Final decoration

There are many ideas for decorating a kitchen, only the main aspects will be described in the article.
As a rule, the floor in the kitchen is decorated with linoleum, parquet or ceramic tiles. If wood was chosen as the main material for decoration, then it must be covered with drying oil, which protects the wood from moisture. If you decorate a closed kitchen with a fireplace, then stone or tile is ideal as a floor covering.
For the dining area it is worth allocating a lot of space. The minimum dimensions are 3×3 m. When choosing a table, you need to calculate the maximum number of people who can attend the festive dinner. When arranging the working area, you should not forget about cabinets for storing dishes and choose a good place for cooking – the space near the panoramic window is ideal.
Decorating the kitchen, house and landscape next to it is in a single design. In this way, harmony and order can be achieved.
It is not necessary to choose a single color scheme or exactly repeat the interior – just the objects should have common features.