


Contents
Retractable or swing? Swing gates are good because they are simple and cheap. But in winter, with a lot of snow, you can open them only by thoroughly working with a shovel. When you need to go to work – it’s not at all happy. Retractable or, as they say, sliding / sliding gates are deprived of this drawback. The one-piece structure, covering the entire entrance, drives off to the side, hiding behind the fence. They can stay on a regular or cantilever beam, or they can simply ride on rails. In any case, do-it-yourself sliding gates are quite within the power.
Designs
By type, sliding (sliding, sliding) gates are:
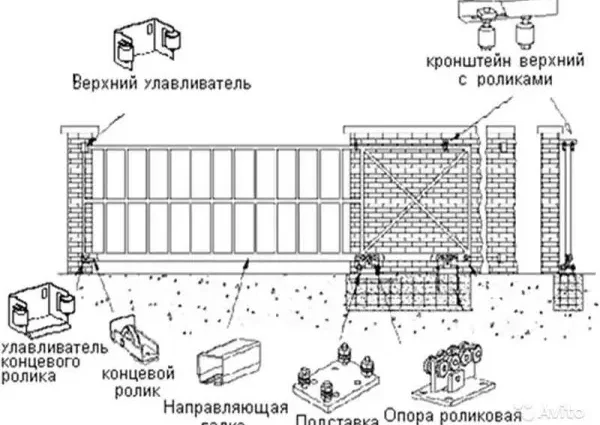
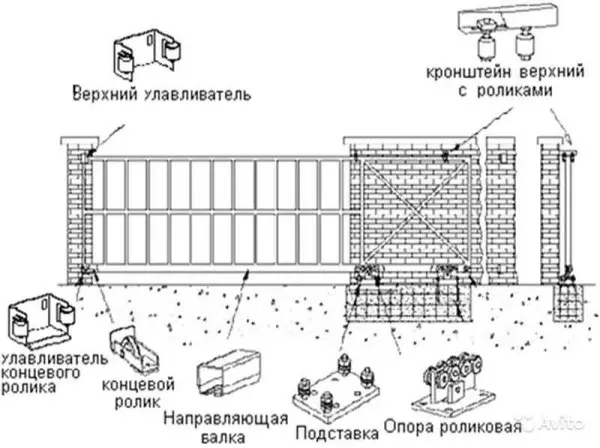
- Cantilever – with a guide beam (tire). The beam has a U-shaped profile, rollers move inside. This is the most popular type of sliding gate (see video below).
Cantilever doors with bottom beam According to their location, they are:
- with bottom beam;
- middle beam;
- top beam.
- Cantilever – with a guide beam (tire). The beam has a U-shaped profile, rollers move inside. This is the most popular type of sliding gate (see video below).
- Suspended. This design also has a beam, but it rests on both pillars on the sides of the gate. It also has a special structure, similar to the letter “P” only with the edges bent inward. There are also rollers inside, the door leaf hangs on them. This is how the canvas moves.

suspended structure - Retractable on rail. A rail is mounted in the ground, rollers are attached to the lower part of the gate leaf. The canvas rolls along the guide. The design is the simplest, but its disadvantage is that the rail and the rollers themselves are clogged with snow, mud, and leaves.


Sliding gate on rail
Which is better
Which design is better is hard to say. If we talk about reliability, then the best choice is a suspended structure. Everything is easy and reliable, almost indestructible system. Gates of this type have been operated at enterprises for decades. Their disadvantage is that the beam limits the height of the incoming transport, which is sometimes important. But today there are models with composite beams that allow you to remove the jumper over the entrance with the gate open, and then return it to its place.
The cheapest and easiest to implement is the rail system. These sliding gates are the easiest to assemble with your own hands. But the problems that arise during operation make it unpopular.
Of all the above structures, the most expensive and difficult to perform is the cantilever, however, it is the one that is installed most often: correctly made, it does not cause inconvenience during operation. When choosing, you need to keep in mind that when it is arranged to the right or left of the gate, a distance of one and a half times more than the width of the leaf is required: in addition to the sash itself, there is also a technical part that protrudes from the side by about half the length.
The types of sliding gates, design features and construction are discussed in detail in the video.
How to make a cantilever sliding gate
This design is good because there are no beams above the driveway. But it is the most expensive in the device. The point is not so much in the system of rollers, but in the need for a foundation with metal mortgages, to which the cantilever beam will then be attached. If there are already pillars, the foundation is poured in front of it and along the fence to the length of the technical extension, which is necessary to compensate for the load created by the canvas.
Even if they make cantilever sliding gates with their own hands, a kit consisting of a guide beam, rollers, end rollers and traps is usually bought from a company. All spare parts are calculated based on the dimensions of the canvas, the material of the frame and the type of sheathing: weight is essential. Therefore, it is desirable to decide with all these parameters in advance.
Knowing the length of the supporting beam, you can calculate the required size of the foundation. By type, this is a strip foundation, a foundation pit is dug under it below the freezing depth of the soil (it has its own for each region), in which reinforced supports are laid under the plates with rollers, and racks are also installed. A set of upper rollers is then attached to these racks, holding the canvas and preventing it from swinging.
How to calculate the foundation for fixing a cantilever beam
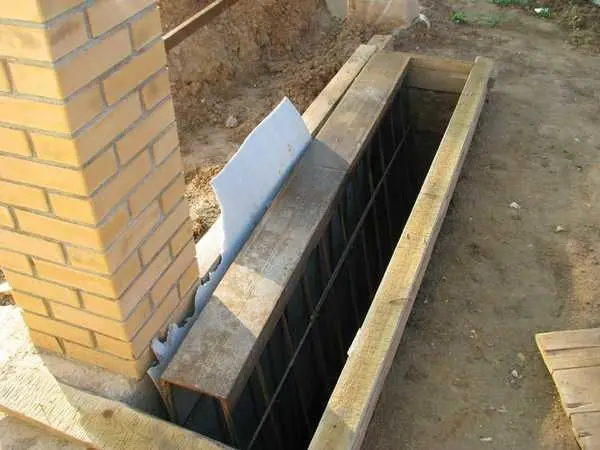
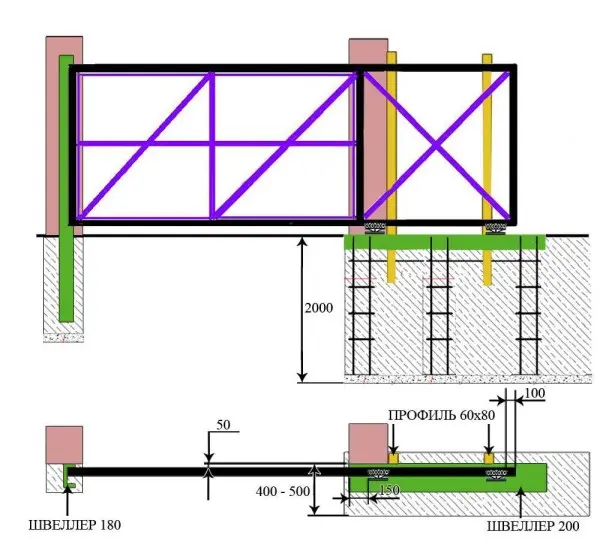
There is nothing difficult in the calculation. The length of the foundation is almost half the length of the span. If the span is 4 meters (the width of the passage or the distance between the pillars), then the foundation should be 1,8-2 m. Its width is 40-50 cm, the depth is below the freezing depth of the soil for the region.
The pit is dug another 10-15 cm deeper – under a gravel-sand cushion. This foundation is reinforced (like a tape one), in its upper part a channel (18 or 20) is welded to the reinforcement, and all this is poured with concrete. The channel is set to the “zero” level, that is, it must be on the same level with the ground level or the material with which the yard is finished.
There is a cheaper and faster option, but in terms of reliability it is inferior to the one described above. Three screw metal piles are screwed into the ground, a channel is welded to them.
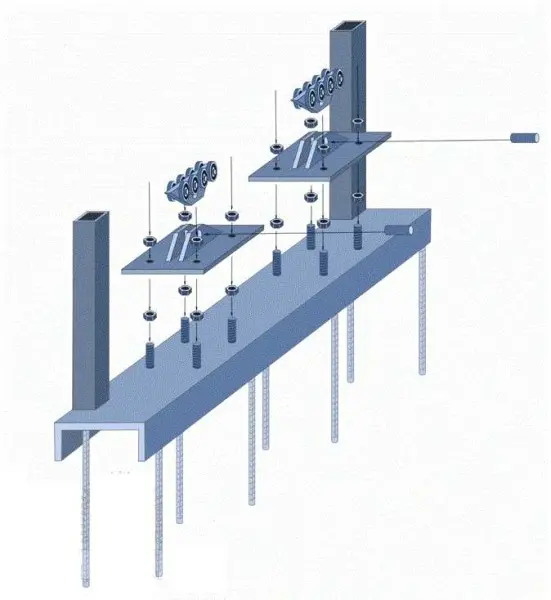
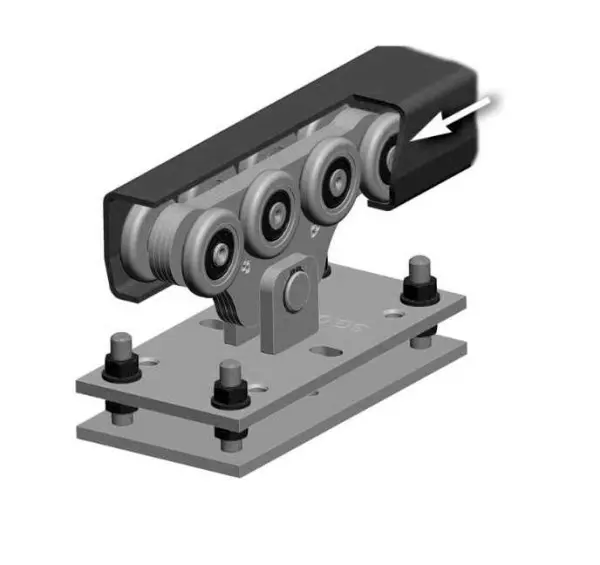
Installation of roller bearings
Studs are welded to the embedded channel, then platforms with rollers are attached to them on bolted joints. Sometimes you can find options when the platforms are welded immediately to the mortgage. It is not right. There is a fairly high probability that the foundation or fence post will shrink. Even a small shift – and your gate will not work. If the rollers can be removed from the studs, the studs can be digested and everything put back together, then how to correct if the platform is welded? Cutting down? Difficult, long, no guarantees. So in this case it is better to do everything according to the rules.

When buying, pay attention to the roller carriages and the rollers themselves. These are necessarily sealed rolling bearings. They are usually arranged in two rows of 4 pieces each. The lubricant in them must be frost-resistant – the lower temperature limit is -60 ° C. Examine the platform on which they are mounted. It should be steel, cast, good metal with a galvanized surface, coated with a protective lubricant.
Roll rollers. Everyone should ride effortlessly, and should not have play (should not wobble from side to side). Then you can be sure that the gate will move easily and the sliding mechanism will work for a long time (some companies give a guarantee of 10 years). After all, most of the load falls on the rollers, because their quality is a key point, as is the balanced design of the canvas.
The remaining stages of installation will be more clearly described in the photo report: the gates were assembled independently, without the involvement of specialists.
Read more about swing gate automation here.
Do-it-yourself sliding gates: photo report with explanations
The gates were placed in Moscow, respectively, the prices are capital. They were installed in 2010, since then the kits have become much cheaper. For example, the “fresh” price of a drive for a web weighing no more than 400 kg (up to 1,2 tons is available) is about $ 100, but this is a budget option. During construction, components from the Rolling Center company (the best then on the market) with a 6-meter-long drive beam were purchased. The top catcher and bracket were also ordered separately. Everything cost about $600 including shipping.
The following items were also purchased:
- profile pipe 80*60 mm – 6 m, 60*40 mm – 18 m, 40*20 mm – 36 m;
- channel – 180 mm – 3 meters, 200 mm – 2,4 meters;
- reinforcement 12 mm – 6 m;
- electrodes – 2 kg;
- paint – 3 cans, brushes, rivets;
- cement M-400 – 5 bags;
- corrugated board was bought during the manufacture of the fence.
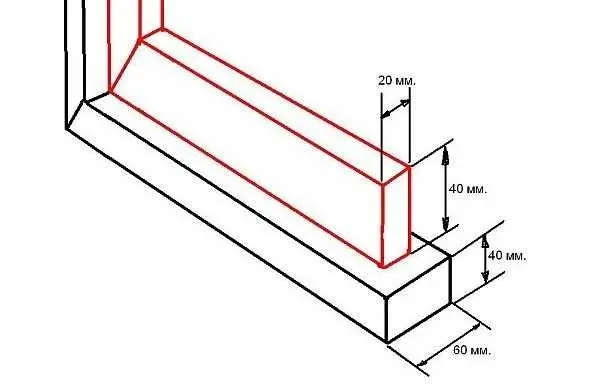
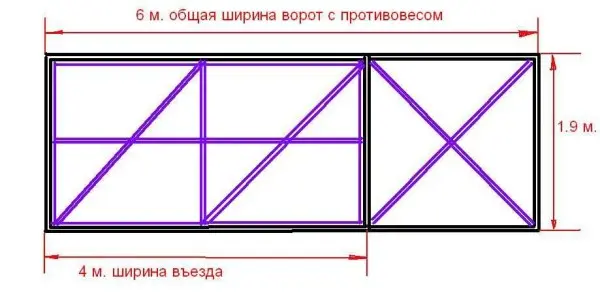
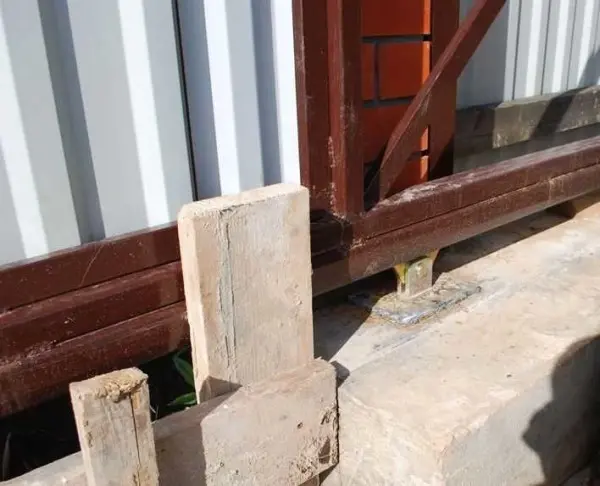
First of all, we welded the frame for the gate with a counterweight. The frame (in black) was made from a profile pipe 60 * 40 mm, jumpers and the inner frame (lilac) from a pipe 40 * 20 mm. At the bottom, a guide beam is welded with a cut down.
The inner frame was welded indented from the edge – 20 mm on each side. So it is more convenient then to fix the profiled sheet, if desired, you can sheathe it from the inside.
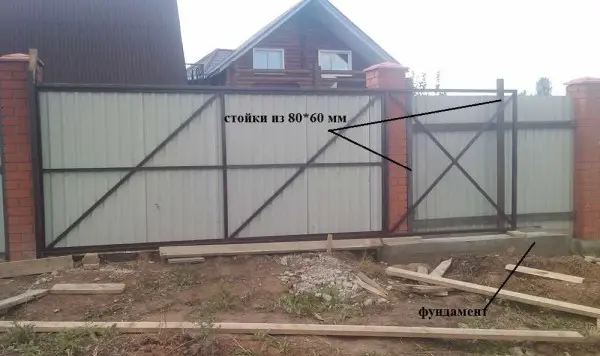
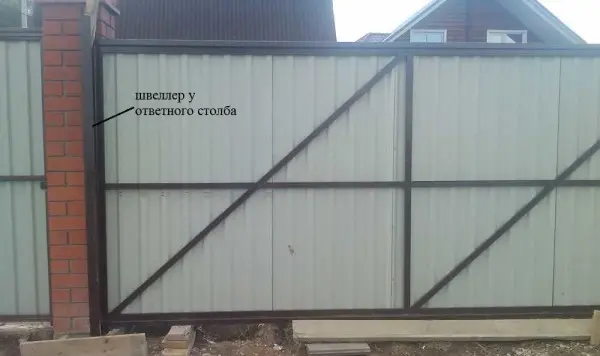
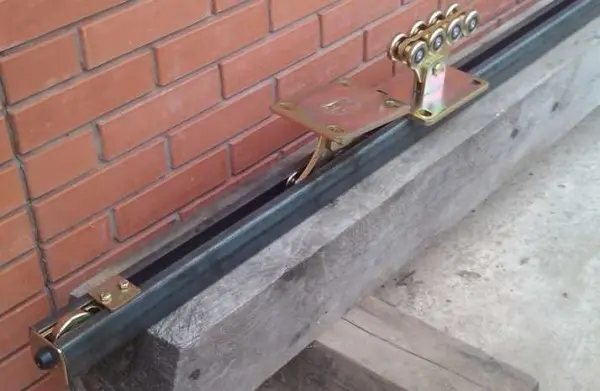
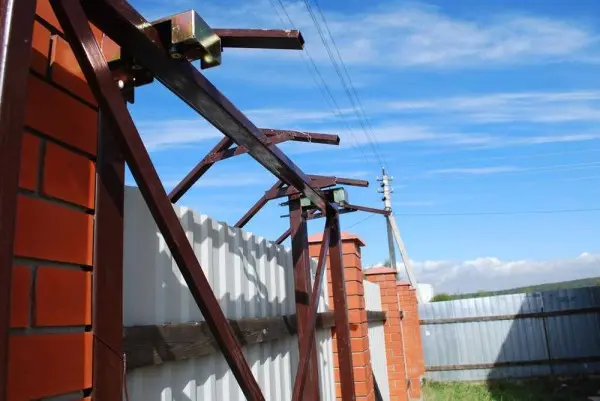
First, the foundation was poured. Reinforcement was installed in it, on top of the channel with the back up. Close to the channel are two racks made of profiled pipe 80 * 60 mm. One stand is adjacent to the post, the second is set vertically at a distance of 120 cm. Then rollers are hung on them, which hold the canvas from above. On the other hand, a 180 mm channel was installed along the counter post.
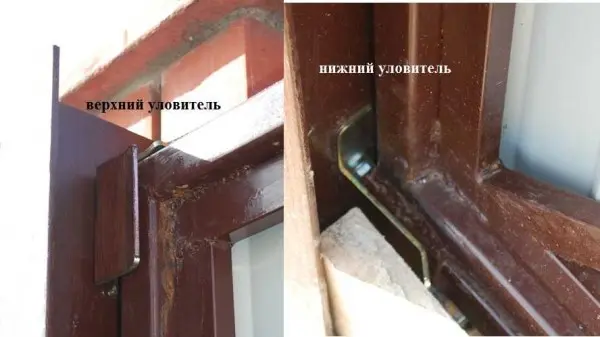
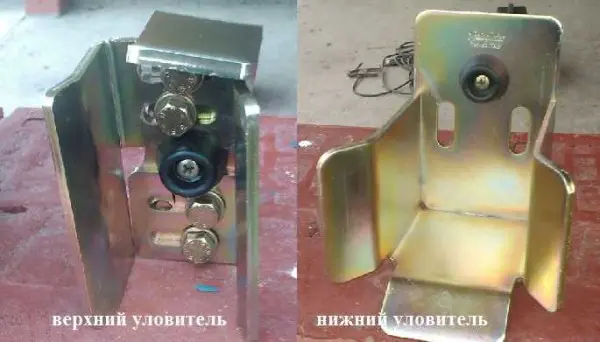
Catchers are fixed on the counterpart to the channel at the top and bottom, which will not allow the gate to hang out in the wind.
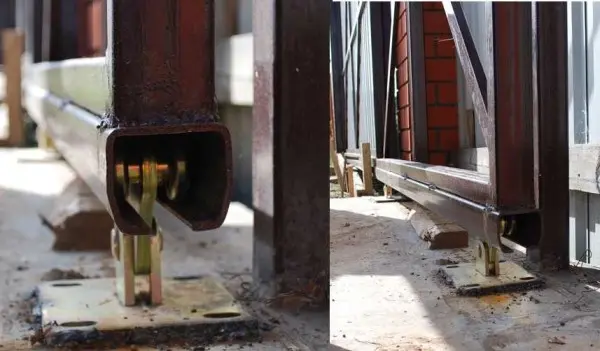
The next step is to install the roller plates. They are attached to mortgages. In this case, it is a channel, because the space turned out to be large. When they made the foundation, they made it too high, because the plates were welded directly to the mortgage. This is impractical: if the roller breaks, it will be problematic to change it. Usually a platform is welded, to which a platform with rollers is then bolted.
The finished gate frame is simply rolled onto fixed rollers.
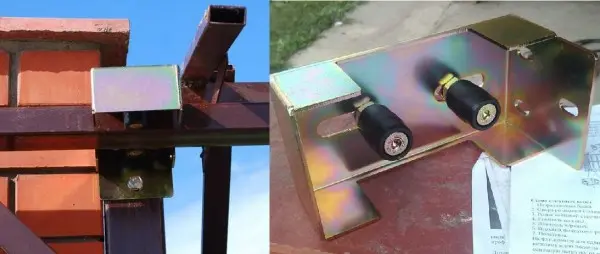
After installation, plugs are put on the support beam at both ends. On the far side, a thrust wheel is also installed, which, in the closed position, drives into the lower trap, lifting the gate and removing the load from the rollers.
Now, so that the gate does not “walk” in the upper part (they are not fixed by anything now), sets of upper rollers are attached to the racks (80 * 60 mm) – one per rack. They are practically put on the frame. Now the rollers inside will hold it at the top.


All do-it-yourself sliding gates are assembled and ready for operation.
If you have any questions, watch the video. A ready-made kit is assembled in it, the whole process will become clearer.
Video
Several videos with different designs of sliding gates. The first is cantilever on the middle beam. There will be no problems with snow, but the appearance from the yard is below average. Economy option: sliding gates for summer cottages. The design is extremely simple. Another do-it-yourself option. Here in the pipe 60 * 60 mm, propylene clearance, into which the rollers are inserted. The design is taken standard, assembled from different components.