Contents
All people living outside the city in winter are faced with the need to clear their plots of snow. Do-it-yourself snow clearing of the entire adjacent area will take a lot of time. Therefore, many gardeners and gardeners use a walk-behind tractor for these purposes. You can make a shovel for it with your own hands and save money on buying it. What is a motor-block shovel and how you can make it yourself this article will tell.
Description of fixture
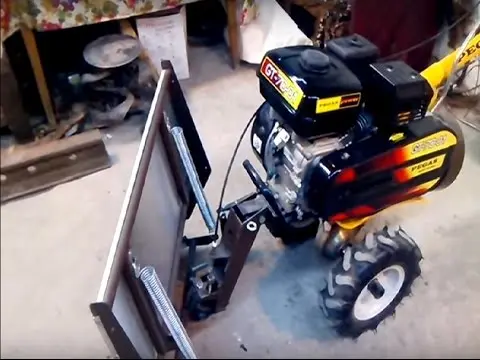
To understand what drawings will be needed during the assembly of the tool with your own hands, you need to understand what a shovel blade for a walk-behind tractor is. A complete motoblock (Neva or other model) consists of the following parts:
- a pen. It is often made in the form of a “telescope”. This allows you to adjust its height. In addition, there are convenient handrails on the handle itself on both sides. With their help, the unit (Neva or another company) is sent in the course of movement. All parts of the handle are firmly fastened with nuts;
- ladle. It is attached with nuts to the base of the electric motor.
- electric motor. It is located under the body and below it has the main ones for connecting a variety of nozzles.

At the same time, the motor-block shovel itself consists of the following parts:
- shovel itself;
- a device for adjusting the angle of rotation of the shovel;
- fastener assembly.
This add-on can have a variety of modifications depending on the type of walk-behind tractor (Neva, etc.). But common features and the principle of operation are characteristic of all models. Rotation of the structure is possible at the following angle:
- to the right (with a slope of 30º);
- to the left (with a slope of 30º);
- forward.
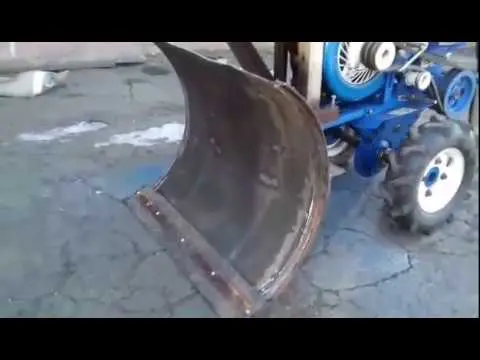
As you can see, a shovel blade for a walk-behind tractor acts as an attachment. Drawings for this tool can be easily found in specialized literature or instructions for the unit (Neva, etc.). According to them, you can easily do it yourself. Such a home-made shovel blade will be operated no worse than its factory counterpart.
What is it for

shovel diagram for walk-behind tractor
After the correct connection of all parts of the walk-behind tractor (Neva brand, etc.), we connect it to the outlet and remove the snow from the required area. But do not think that you will need such equipment only when cleaning snow. The unit can also be used when cleaning plant debris from the fields after harvesting, as well as for leveling the soil before planting cultivated plants. In addition, a shovel blade will allow you to transfer a small amount of land from one place to another.
As you can see, this tool is very necessary when growing cultivated plants in the garden. With its help, you can carry out certain tasks for the arrangement and ennoblement of the garden and personal plot.
How to Make Your Own Hands
If you already have a walk-behind tractor, then you can easily make this structural addition with your own hands. Most often, people buy a Neva brand unit.
To assemble the blade, you may need the following materials and tools:
- a bucket from an old and already unnecessary shovel;
- a sheet of iron with a thickness of at least 2-3 mm;
- tin barrel;
- knife;
- Bulgarian;
- welding machine;
- perforator and electric drill.

This list can be expanded with additional materials, depending on which version has been chosen. For example, this list can be expanded with the following materials:
- rack;
- tin strip 5 mm thick;
- stiffening ribs 3-4 mm thick;
- lugs for traction;
- drills, washers, nuts and bolts (M12, M10, and M8);
- rods with a length of 520 mm;
- rubber sheet, etc.
Upon completion of the preparatory stage in terms of finding the necessary tools and materials, you can begin to assemble the blade shovel with your own hands.
Video “Shovel device”
Versions
There are several options for assembling this add-on to the walk-behind tractor with your own hands. Which one you will use to make the product depends on your preferences, the materials and tools available, as well as free time. Consider the most popular options for making a shovel.
Option number 1. The easiest way is to make a tool from an old steel barrel. The ease of manufacture is due to the fact that the barrel already has the necessary roundness. The tool assembly process is as follows:
- take a 200-liter barrel;
- clean its surface from rust and dirt;
- we cut it into three parts;
- two parts are welded along the contour using a welding machine. This will give the structure additional rigidity;
- the lower part of the blade should be reinforced with a knife or a stole strip. In the reinforcement, you need to drill holes in increments of 10-12 cm and a diameter of 5-6 mm;
- in the resulting holes, it is necessary to fix a protective strip of rubber;
- then we attach the attachment system to the walk-behind tractor to the resulting product.

Option number 2. Using an iron sheet. In this case, you will need to perform the following manipulations:
- clean the sheet of dirt and rust present on it;
- bend the sheet. For these purposes, you can use any semicircular object of large dimensions (barrel, buckets, etc.). In such a situation, you will achieve better curvature and optimal shape of the sheet than when bending without additional devices;
- the bottom edge of the sheet should be weighted. To do this, we weld a strip of iron or a piece of wire to it;
- turn over the resulting bucket. We weld fastening systems to its convex side, with the help of which it will be hung on a walk-behind tractor (Neva and other companies).
As a result, you will get a plate that can be fixed to the unit with bolts. Now you just have to install the resulting tool and test it for strength and efficiency in work.
As you can see, both options can be made with your own hands in your home workshop. The dumps obtained in this way, subject to the technology of working with metal and a welding machine, will not differ in any way (in terms of physical, chemical and technical parameters) from purchased models. At the same time, you will save a significant amount of money, since such a complete unit is quite expensive. The main thing in the assembly process is to understand the drawing of the tool and correctly weld all its components together.
Video “Do-it-yourself snow plow for a walk-behind tractor”
How to make this useful device, you will learn from the video. Such know-how will help you remove snow in winter without any problems.