Contents
With the approach of spring, it’s time to think about the improvement of a summer cottage or garden plot, as well as the installation of greenhouses that will allow you to grow seedlings, leafy vegetables, and even early cucumbers and tomatoes. A greenhouse can be installed even in a small area, and if we are talking about saving space, then a bread box greenhouse will be of help in such cases.
Design features
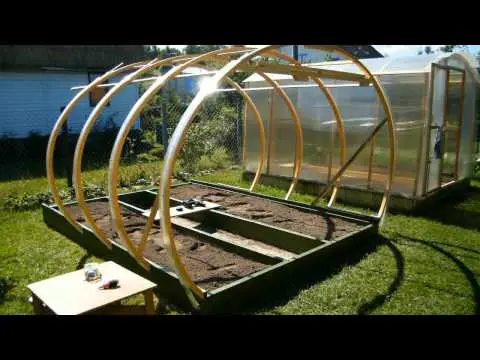
This is a small (usually up to four meters in length and up to a meter in height) structure with semicircular movable walls. Both walls can move, or only one (the so-called “snail”), and the width of the greenhouse depends on this design feature: the maximum width of the snail is one meter twenty centimeters, bread bins that open on both sides are standardly produced in two meters wide.
The design resembles an ordinary home bread bin. The main working parts are semi-arcs on hinges that allow you to open and close the greenhouse. This design allows the sashes to be raised for work or ventilation, including ventilation from both sides. In this case, in the closed state, the sashes must be tightly closed.
The frame can be made of a metal profile (or pipes), a variant with plastic pipes is also possible, the coating is made of polycarbonate material. It is strong enough, unlike different types of film, but light, which will allow you to effortlessly open or close the greenhouse. The optimal sheet thickness is 4-5 millimeters. In addition, some types of polycarbonate have protective properties with respect to ultraviolet radiation, which is useful when growing seedlings. However, it is also possible to make the coating from durable pressed polyethylene.
Experienced gardeners who have already worked with such a greenhouse advise a polycarbonate coating – it is easier to fix it on the frame using ordinary self-tapping screws. If a film is used, then washers must be placed under the screws – this protects the film from tearing. On the bottom of the sash, in the place of its contact with the foundation, you can use a sealant – this will help to additionally retain heat.
Advantages
Compared to other greenhouses, the bread box has a number of advantages.
- the use of the entire usable area, while you can take care of the plants without stepping on the soil.
- bread box drawings are easy to find on the Internet, materials can be bought at the nearest hardware store, and the necessary tools are usually found in every home or country house.
- such a greenhouse is ideal for low-growing plants – seedlings, greens and leafy vegetables, root crops, early potatoes, flowers.
- well ventilated.
- quickly assembled, and the only difficulty during installation is to correctly cut the polycarbonate sheets so that the finished sashes fit tightly to each other.
- easy to carry.
- the bread box can not be dismantled for the winter, and thanks to the shape, snowdrifts will not linger on it.
- in such a greenhouse, you can install a piston, which itself will open and close the sashes when necessary for ventilation or heating – this function became possible thanks to lightweight materials (plastic frame and polycarbonate coating).
- such a greenhouse is environmentally friendly.
- The bread box is assembled from inexpensive materials. The laziest and cheapest option is a large plastic barrel with cut-out “windows”, covered with a film. Suitable for those who want to experience the operation and benefits of such a greenhouse, but do not want to install a more permanent structure.
- greenhouse “bread box” looks neat and aesthetically pleasing. Installed in the front garden and planted with flowers, it will serve as a wonderful decoration for the site.
Video “Technical nuances of installation”
Assembly and installation
Gardeners who decide to install such a greenhouse for themselves have two options – either buy a ready-made bread box and assemble it according to the instructions, or find drawings on the Internet, buy materials – metal or metal-plastic profiles, hinges, polycarbonate, self-tapping screws, handles, clamps and sealant – and assemble a greenhouse with your own hands. Neither in the first nor in the second case should there be any difficulties. For those who want to do everything for sure, another way is suitable – to buy a ready-made greenhouse, draw up a drawing for a home-made one from it and collect as many more bread boxes as you need. The only thing to remember when self-assembling is that the length of the greenhouse should not be too large. Sashes more than four meters in length are difficult to both assemble and lift when operating a greenhouse.
The biggest difficulties during installation can arise with polycarbonate sheets. For best results, they should be cut on a flat surface with any sharp tool, and only bent along the air passages. When attaching polycarbonate to the frame, make sure that the self-tapping screw fits snugly against the sheet, but does not deform it. For the stability of the sash, it is recommended to attach a profile every half a meter.
The bread box should be placed on a well-lit, level place, orienting the movable doors to the south and north, at a sufficient distance from the country house, toilet, shower, compost pit.
Installation begins with the arrangement of heating. To do this, first of all, you should dig a hole at the installation site, the perimeter of which matches the size of the greenhouse, and the depth is from fifty to eighty centimeters. Along the edge of the pit, you need to install a foundation of brick or timber. Wooden beam must be processed from rotting. Next, the pit needs to be filled with humus, manure, or at least fallen leaves and grass. This so-called biofuel will provide the greenhouse with the necessary heating, as well as nutrients. A layer of soil is laid on top – the greenhouse pillow is ready.
Then, with the help of pins, a bread box frame is installed on the foundation, and movable doors are already attached to it. The greenhouse is ready to go. The sashes of the greenhouse are washed as necessary with water and a mild detergent – this allows for optimal lighting and maintaining the temperature inside the breadbasket. With proper installation and operation, the bread box can remain in one place for up to ten years and every year bring benefits in the form of a new crop.
Video “We make a greenhouse on our own”
In the video you will learn what you need in order to build a greenhouse on your site. What materials will be required for this – you will learn from the video.