


Contents
A do-it-yourself garden path using a form is considered the best solution for arranging the territory of a personal plot. Making homemade paving slabs does not require large investments and does not take much time.
Technology advantages
Paved garden paths connect all the significant functional objects that are located on the territory of the infield. Such paths make the suburban area more harmonious and aesthetically attractive. For paving the paths, you can use various building and improvised materials: natural wood boards, pressed wood boards, plastic panels, natural and artificial stone, paving stones, paving slabs.
The cheapest way to arrange paths in the garden is to fill the site with concrete mortar. However, a track complemented by a pattern or a certain pattern looks much more interesting and attractive. For this reason, paths paved with paving stones are very popular among summer residents. As an alternative, it is recommended to use plates made using special molds.
: instructions for pouring formwork on a stencil")
The advantages of the form for arranging paths in the country include:
- low cost of building material;
- lack of attachment to transport companies that are engaged in unloading and loading operations and the delivery of building materials;
- ease of installation;
- no difficulties during the operation of the finished structure;
- a wide selection of stencils that differ in size and configuration;
- the possibility of making stencils with your own hands.
The garden path, made by hand by using special forms, looks very organic and interesting. You can increase the attractiveness of such a path by adding pebbles, marble chips or broken organic glass to the solution.
Video “Laying paths in the garden”
This video shows how the garden path is concreted using special stencils.
Varieties
Many are interested in where to find a mold for making homemade tiles. Ready-made templates, which professional builders call matrices, are sold in almost every hardware store. A wide range is offered to the attention of buyers. Forms differ in size, configuration and material of manufacture.
Silicone models are considered the strongest and most durable. Silicone stencils hold their shape well, wash well, and are easy to use. Plastic matrices are a more budgetary version of the finished stencil. As for the pattern, the finished shapes are round, oval, square, rectangular and custom.
How to make your own form
It is not necessary to buy ready-made stencils in stores, you can make such a form yourself. As a basis, hoops removed from barrels, wooden beams and slats, curved metal sheets are used.
The easiest way to make a homemade mold for casting paving slabs:
- Take wooden bars with a section of 50×50 cm. Form a frame in the form of a square or rectangle.
- Secure the joints of the bars with metal corners.
- Using slats with a section of 30×30 cm, make internal jumpers.
Homemade stencils are original and unique configurations. Garden paths, in the process of laying which they use do-it-yourself forms, have no analogues.
Path construction
Now let’s talk about how to make paths in the country with the help of stencils.
First you need to pick up a construction tool and make a purchase of all the necessary materials. To pour a strong and durable foundation, you need to choose high-quality cement. So, for the manufacture of paving slabs, it is recommended to take cement grade M-500.
At the next stage, the garden plot is divided into sectors and the foundation is prepared. The beginning of the path is marked with a wooden peg. The remaining guides are installed in increments of 1,5–2,5 m; in places of bends, the distance between the pegs should be no more than 1,5 m.
Preparation of the basis
: instructions for pouring formwork on a stencil")
Using a bayonet and a shovel, make indentations along the marking line and remove the top layer of the earth. When the trench is ready, lay the foundation. Coarse-grained river sand, crushed stone, geotextile fabric and dry cement are used as the base pillow. Geofabric performs the functions of a drainage system and prevents subsidence of the structure during its operation.
: instructions for pouring formwork on a stencil")
Each base layer is carefully compacted and leveled with special compacting equipment.
Pouring concrete
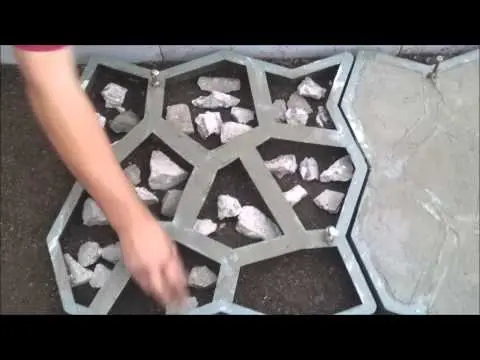
Upon completion of the preparation of the base pillow, you can proceed to pouring the molds. The first step is to form a formwork or install a curb that prevents the concrete from spreading.
Forms for pouring the solution are laid out on a previously prepared base. Crushed stone is poured inside each stencil and a concrete solution is poured. The surface is carefully leveled with a trowel. After 40–50 minutes, the stencils are removed and the pouring of the following elements continues.
: instructions for pouring formwork on a stencil")
Seam sealing
At the last stage, the seams are sealed. If the tiles are located back to back, it is recommended to grout the joints with a dry cement-sand mixture. To prepare such a mixture, you need sand and cement in a ratio of 4: 1. A dry solution is applied in an even layer on the finished surface and poured with water. After the surface of the path is completely dry, the inter-row gaps should be refilled with a dry mortar.
The procedure for sealing joints with a dry cement-sand mixture must be repeated 3-4 times with an interval of 4-5 days. It is not necessary to seal the seams between the plates in rainy weather, as the likelihood of uneven filling and partial subsidence of the grout increases.
: instructions for pouring formwork on a stencil")
Colored seams look more interesting and original. To make multi-colored grout, you can use special dry colors. When choosing a material, it is recommended to pay attention to the composition of the dye and its technical characteristics.
Moisture-resistant compounds are suitable for the design of street paths.
Useful Tips
Simple concrete paths in the garden have become so familiar that every summer resident wants something more interesting and unusual. Why not add dye to the solution and make a bright path in the garden? Multi-colored paths on the territory of the infield look bright and impressive.
The lawn grass planted between the slabs will give the path some originality and attractiveness. The slabs are also interesting, complemented by a variety of patterns, drawings and even footprints and handprints.
A garden path in a garden using stencils is a great opportunity to arrange a backyard plot without extra capital investment. A variety of sizes and configurations of stencils allows you to realize any ideas and ideas of a summer resident.