


Contents
When purchasing an undeveloped suburban area, the owner has the problem of storing tools and other things. The construction of a capital shed made of bricks or blocks requires a lot of labor and cash investments. How to solve the problem so as not to bring all the inventory into the house? You can quickly install a do-it-yourself frame barn from lumber in the yard.
What you need to consider before starting the development of a frame shed project
Despite the simplicity of erecting a frame barn, several important nuances must be taken into account before starting work. Let’s take a look at the step by step guide:
- When drawing up a project, you need to correctly position the frame building on your site. Even if the barn turns out to be beautiful, it still remains a utility block. At the entrance to the courtyard, it should not be in the foreground for everyone to see.
- The project is being developed in such a way as to provide a free approach to the entrance to the barn.
- It is desirable to locate a wooden building on a hill. During rain and snowmelt, the frame hozblok will not be flooded.
- Before developing a project, it is important to rethink the layout of the barn. In the frame hozblok, you can make a workshop, a woodshed, a summer kitchen and other useful premises. To simplify the task, on the sheet you will need to sketch a simple diagram showing all the partitions, doors and windows. A large wooden shed, divided into rooms, is more convenient to provide with several doors. Each room will have its own entrance, and you will not have to travel, for example, from the summer kitchen through the toilet to get into the shower.
- Projects of frame hozbloks are most often developed with a pitched roof. It is easier to install and requires less material. If desired, you can install a gable roof. Its scheme is a little more complicated, but the design allows you to create an attic space where you can store things.
- When developing a barn project, it is necessary to provide that the roof slope is located on the other side of the doors. Otherwise, at the entrance to the hozblok, rainwater will pour on the head of the owner.
After you have decided on the layout and other nuances, you can begin to develop a frame shed project.
We draw a drawing and determine the dimensions of the frame shed
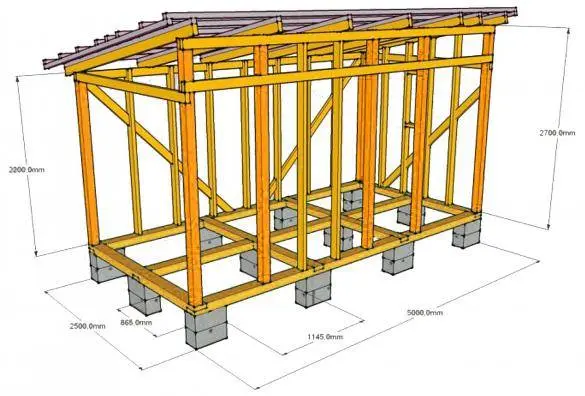
Taking into account the recommendations from the planning guide, they begin to develop the project. First you need to draw a drawing that defines the outline of the frame barn. In the photo, we gave an example of a utility block scheme with a pitched roof. A column base is used as a foundation.
When building drawings of a frame hozblok according to diagrams from the Internet, you need to indicate your dimensions of the overall structure and each element individually. The dimensions of the sheds are selected individually according to their needs. In general, frame technology does not provide for the construction of large utility blocks. Our photo shows a diagram of a barn 2,5×5 m. The most popular is a frame barn with dimensions of 3×6 m.
We build the foundation for the frame barn
The type of foundation must be determined when drafting the hozblok. For capital frame buildings with a concrete base, a strip base is poured. But such a foundation is not suitable for a site with sedimentary soil or a peat bog. Light frame sheds are placed on a columnar foundation. Let’s look at what the step-by-step instructions for making each type of base look like.
Let’s start the review with how the phased laying of the strip foundation looks like:
- According to the size of the future wooden shed, markings are applied on the selected site. For a frame hozblok, a shallow base of about 40 cm is enough. If there is seasonal movement of the soil, then it is better to increase the depth of the trench to 80 cm. The width of the tape is enough for 30 cm.
- A 15 cm layer of sand with crushed stone is poured into the trench. The bottom and side walls are covered with roofing material so that the milk from the concrete solution is not absorbed into the ground. Formwork is installed along the perimeter of the trench. It should protrude above ground level according to the height of the base. So that the high sides of the formwork do not bend from the weight of the concrete, they must be reinforced with spacers.
- The next step is to knit a box-shaped frame from reinforcement 12 mm thick throughout the trench. The metal structure will make the concrete tape durable for breaking.
- Pouring concrete mortar is best done in cloudy weather in one day. Rain, sun or pouring mortar with long breaks have a bad effect on the strength of the base.
After at least two weeks, and preferably after a month, you can begin to install the barn frame.
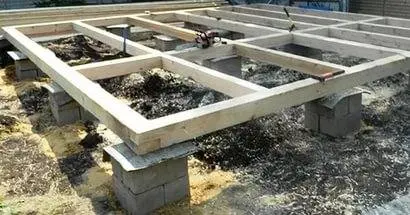
Now let’s focus on the step-by-step instructions for making a columnar base:

- Supports are placed at the corners of the frame building and at the junction of partitions. The thicker the beam of the lower trim, the larger the poles can be placed, but at least 2 m. If the width of the shed is more than 2,5 m, then intermediate supports are installed so that the floor covering does not sag while walking.
- To install the pillars under the frame of the utility block, first dig holes about 80 cm deep. Crushed stone or gravel with sand 15 cm thick is poured into the bottom. The pillars are laid from red brick or cinder block using concrete mortar.
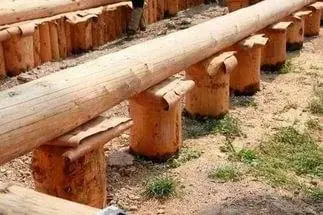
Poles can be cut from oak or larch logs with a minimum thickness of 300 mm. They will have to be soaked well with an antiseptic. The lower part of the pillars, which will be buried in the ground, is treated with bituminous mastic, after which they are wrapped with several layers of roofing material. After installation in the holes, wooden supports are poured with concrete.
The construction of all elements of the frame barn
Now we will look at how a frame wooden shed on a columnar base is built step by step with our own hands.
Carcass fabrication
The construction of the frame hozblok begins after the foundation is completely frozen. For sheds of this type, the manufacture of the frame begins with the lower frame. It will be the basis of the entire structure, so you need to take care of choosing a quality tree without knots and mechanical damage.
So, we look at the process of making the frame:
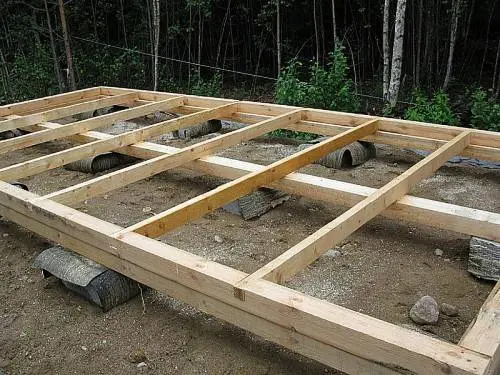
- Concrete supports protruding from the ground are covered with two sheets of roofing material. Waterproofing is needed to protect the wooden frame elements adjacent to the foundation from dampness. From a bar with a section of 100×100 mm, the lower frame of the frame is assembled. Lags are attached to it from a board with a section of 50×100 mm. The distance between them is kept within 50–60 cm.

- Having built the lower frame, they begin to install wooden racks of the frame from a bar of a similar section. They are fixed with metal patch plates or simply nailed obliquely. The maximum distance between the posts on the frame is 1,5 m, but it is better to set it in 60 cm increments. Then each support will coincide with the upper floor beams. With this arrangement, the racks will additionally become a roof stop.
From above, the racks are connected by strapping. That is, it turns out exactly the same frame as below.
Using frame technology for the construction of a barn, it is not necessary to use timber. The frame can be made from a steel pipe, angle or profile. The order of manufacture remains unchanged. The only difference is that all elements will have to be welded by electric welding. The advantage of a steel frame is that it can be installed without a foundation on a sand and gravel embankment.
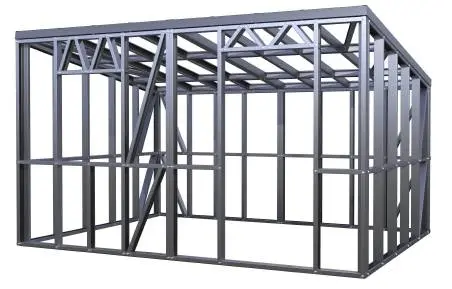
It is desirable to paint the constructed steel frame before sheathing. If a profile with a galvanized coating was used, then it can be left unpainted.
We make the walls and floor of the frame barn
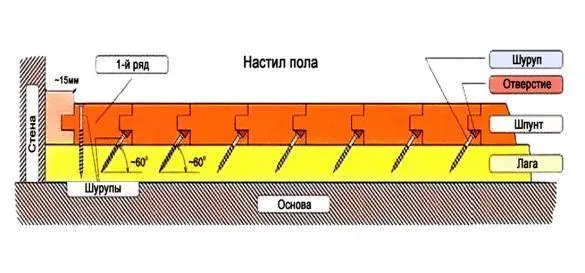
The floor can be laid immediately after the manufacture of the frame and laying the log. During the construction of a cold shed, OSB sheets are nailed to the logs. This will be the subfloor. Lay waterproofing on top. The cheapest material is roofing material. Next comes the finishing floor. It can be made from edged or tongue-and-groove boards. The second flooring material is better. Thanks to the grooves at the end of the boards, the formation of cracks is eliminated, and the strength of the floor also increases. How to properly fasten a grooved board is shown in the photo.
Before erecting walls, the frame is reinforced with jibs. Permanent elements are placed in the corners. Temporary jibs support the racks of the frame to avoid warping the structure. They are removed only after the installation of floor beams.
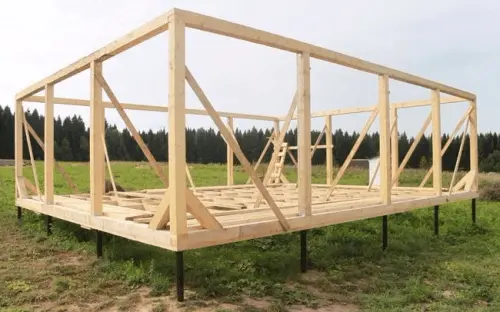
Permanent jibs are required if the frame will be sheathed with clapboard or board. When using OSB boards for these purposes, only temporary supports can be dispensed with. Before fixing the jibs, you need to align the corners of the frame, and this will help to make a plumb line or building level.
Having engaged in the independent construction of a barn, you must correctly be able to connect all the nodes of the frame and install the jibs:
- The optimal installation angle of the jibs is 45о. This position of the element provides better frame rigidity. Near windows and doors, it is not possible to maintain the required angle. It is allowed to install jibs at an angle of 60о.
- Hollow jibs can only be placed on the frame of a small hozblok.
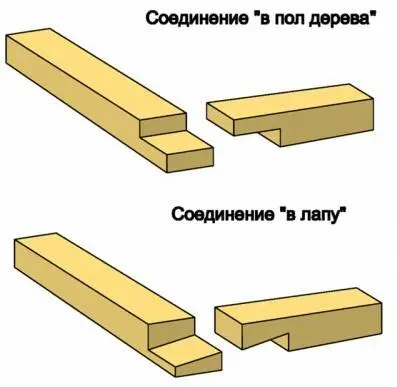
- Docking of all frame elements should occur tightly without gaps. At the corners of the frame, the timber is connected “to the floor of the tree” or “to the paw”. The principle of technology is shown in the photo.
- The jibs are not simply nailed to the surface of the beam. First, a groove is cut on the rack and bottom frame. Its depth depends on the section of the workpiece taken for the jib. The element inserted into the grooves has an additional stop, which complicates the warping of the frame.
After laying the floor and installing all the jibs, they proceed to the sheathing of the frame from the outside. When using an edged board with a thickness of 15–20 mm, it is nailed horizontally with an overlap to avoid the formation of cracks. Suitable for sheathing lining or OSB. The owner chooses the material according to his preference.
Barn insulation
The frame shed is warm in itself, as the wood has good thermal insulation properties. If the hozblok will be used in winter as a kitchen or workshop, then all its elements must be additionally insulated.
Work begins from the floor even before laying the flooring. Mineral wool, polystyrene foam or expanded clay are suitable as thermal insulation. First, a rough floor made of OSB or boards is knocked out from below the lag. As a result, cells were obtained, where the insulation should be laid. This work is done even before the frame racks are installed, immediately after the frame is made. If you miss this moment, then nailing the subfloor under the logs will not work. It will have to be laid on top, and then stuffed with a counter-lattice to form cells. You can do it this way, but as the floor is raised, the height of the free space inside the shed decreases.
Waterproofing is laid on the subfloor. Mineral wool or polystyrene is tightly pushed into the cells between the lags so that there are no gaps. Expanded clay is simply covered and leveled. The thickness of the thermal insulation should be less than the height of the lag, so that a ventilated gap is obtained between it and the floor covering. From above, the insulation is covered with a vapor barrier, after which the finishing floor is nailed.
The ceiling is insulated with the same materials, and exactly according to the same principle. The only difference is the laying of vapor barrier on the lower skin of the floor beams. Waterproofing is laid on top of thermal insulation to protect it from moisture from the roof.
Mineral wool or polystyrene is used to insulate the walls of the frame hozblok. The technology is almost the same as for the floor or ceiling. From the inside of the room, the insulation is covered with a vapor barrier, and the sheathing is nailed on top. From the side of the street, the thermal insulation is covered with waterproofing. Between it and the outer skin, a counter-lattice of planks with a section of 20×40 mm is nailed to create a ventilation gap.
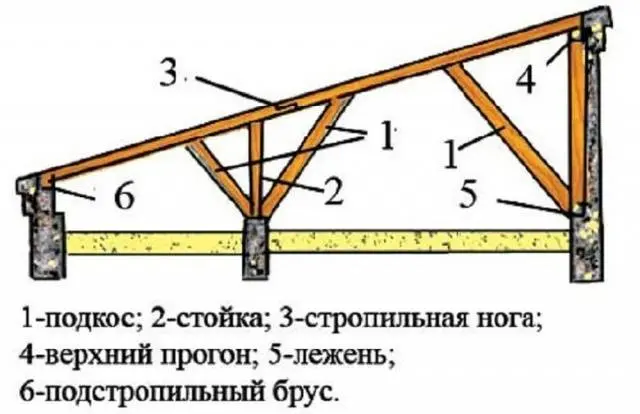
Installing the roof of a frame shed

For the manufacture of a shed roof of a frame shed, it is necessary to assemble rafters from a board with a section of 50×100 mm. Their scheme is shown in the photo. The finished rafters are installed after laying the floor beams, and fixed to the upper trim of the frame.
To do without rafters, you can make the front wall of the frame shed 50-60 cm higher than the back. Then the floor beams will fall on the upper strapping under a slope. They will play the role of rafters. It is only necessary to make the release of beams about 50 cm in front and behind the frame shed to get a roof overhang.
For a gable roof, triangular rafters are knocked down. In this case, the height of the front and rear walls of the frame shed should be the same. The rafters of the gable roof are attached in the same way to the upper trim of the frame.
On top of the rafter legs, a crate made of a board 20 mm thick is nailed. Its step depends on the roofing used. The crate is covered with waterproofing, after which it is possible to lay corrugated board, slate or other material.
The video shows an example of a frame barn:
Conclusion
Now you know in general terms how to build a frame barn on your site. You can do the work on your own, but if you are not sure, it is better to invite a specialist.